Difference between revisions of "Scanner Testing"
Jump to navigation
Jump to search
(→USB) |
|||
| (8 intermediate revisions by 3 users not shown) | |||
| Line 1: | Line 1: | ||
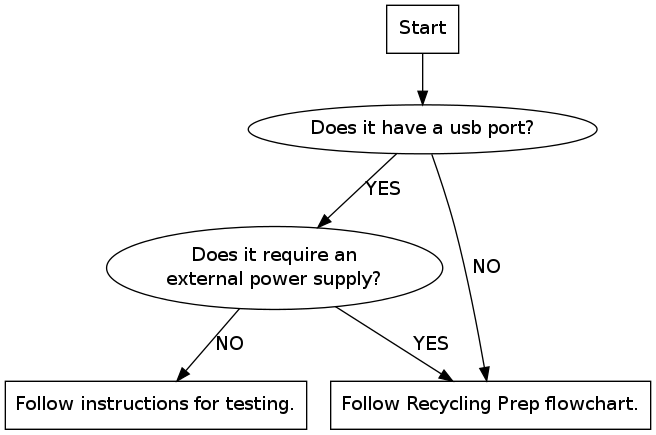
| − | + | <graphviz> | |
| + | digraph{ | ||
| − | + | start [label="Start", shape="box"] | |
| + | usb [label="Does it have a usb port?"] | ||
| + | other [label="Does it require an\nexternal power supply?"] | ||
| + | recycle [label="Follow Recycling Prep flowchart.", shape="box"] | ||
| + | testing [label="Follow instructions for testing.", shape="box"] | ||
| − | + | start -> usb | |
| + | usb -> other [label="YES"] | ||
| + | usb -> recycle [label="NO"] | ||
| + | other -> recycle [label="YES"] | ||
| + | other -> testing [label="NO"] | ||
| − | + | } | |
| − | + | </graphviz> | |
| − | + | ||
| − | + | '''Scanner testing''' is done at the testing computer in [[Printerland]]. | |
| − | + | ||
| − | # | + | #Grab a scanner. |
| − | + | #Plug the USB cord from the computer into the USB port of the scanner. | |
| − | + | #Click on Applications > Graphics > Xsane. | |
| − | #Plug the USB cord from the computer into the USB port of the scanner | ||
| − | #Click on | ||
| − | |||
#Xsane will either find the scanner and open up a preview pane or it will tell you that a device has not been found. | #Xsane will either find the scanner and open up a preview pane or it will tell you that a device has not been found. | ||
#If xsane does not find any devices, wait a minute and try again (sometimes the scanner needs to warm up first) . | #If xsane does not find any devices, wait a minute and try again (sometimes the scanner needs to warm up first) . | ||
#*Close Xsane, unplug the USB and plug it back in and open Xsane again. | #*Close Xsane, unplug the USB and plug it back in and open Xsane again. | ||
#*If Xsane still finds no device, the scanner is not functioning or Linux does not support the scanner. | #*If Xsane still finds no device, the scanner is not functioning or Linux does not support the scanner. | ||
| − | # | + | #*To make sure that Linux supports the scanner. Look on sane-project.org in a web-browser. |
| − | # | + | #*Click on "Supported devices." Then under "Sane Development (CVS) Version," click on "Ordered by Manufacturer." Browse the listed devices to ensure that the scanner which is being tested is supported. |
| − | # | + | #*If the scanner is supported, this probably means that the scanner is not functioning. |
| − | + | #If Xsane finds a device, it will open a preview pane. Put in an image to scan. (a magazine cover with both text and pictures is good.) | |
| − | #If | + | #*Click preview to scan the image. |
| − | # | + | #*Look for color variations, wavy lines, empty scan lines. The most frequent problem is blotchy, weird color. Some scanners miss lines, which will show up as black streaks on the resulting image (best seen at high resolution). |
| − | #Look for color variations, wavy lines, empty scan lines. The most frequent problem is blotchy weird color. Some scanners miss lines, which will show up as black streaks on the resulting image (best seen at high resolution). | ||
| − | |||
| − | |||
| − | |||
| − | |||
| − | |||
| − | |||
| − | |||
| − | |||
| − | |||
| − | |||
| − | |||
| − | |||
| − | |||
| − | |||
| − | |||
| − | |||
| − | |||
| − | |||
| − | |||
| − | |||
| − | |||
| − | |||
| − | |||
| − | |||
| + | If the scanner fails at any point, process as if it had failed the first step of [[Scanner Evaluation]]. | ||
| + | If the scanner produces a good image, then write "OK" on the ID # sticker and the highest dpi (dots per square inch - resolution) tested on the label. If you don't know the dpi, google the model number and "dpi" to find it. Place the scanner on the outgoing cart. | ||
| + | |||
[[Category:Scanners]] | [[Category:Scanners]] | ||
[[Category:Hardware Testing]] | [[Category:Hardware Testing]] | ||
| + | [[Category:Howto]] | ||
Latest revision as of 12:30, 26 June 2008
Scanner testing is done at the testing computer in Printerland.
- Grab a scanner.
- Plug the USB cord from the computer into the USB port of the scanner.
- Click on Applications > Graphics > Xsane.
- Xsane will either find the scanner and open up a preview pane or it will tell you that a device has not been found.
- If xsane does not find any devices, wait a minute and try again (sometimes the scanner needs to warm up first) .
- Close Xsane, unplug the USB and plug it back in and open Xsane again.
- If Xsane still finds no device, the scanner is not functioning or Linux does not support the scanner.
- To make sure that Linux supports the scanner. Look on sane-project.org in a web-browser.
- Click on "Supported devices." Then under "Sane Development (CVS) Version," click on "Ordered by Manufacturer." Browse the listed devices to ensure that the scanner which is being tested is supported.
- If the scanner is supported, this probably means that the scanner is not functioning.
- If Xsane finds a device, it will open a preview pane. Put in an image to scan. (a magazine cover with both text and pictures is good.)
- Click preview to scan the image.
- Look for color variations, wavy lines, empty scan lines. The most frequent problem is blotchy, weird color. Some scanners miss lines, which will show up as black streaks on the resulting image (best seen at high resolution).
If the scanner fails at any point, process as if it had failed the first step of Scanner Evaluation.
If the scanner produces a good image, then write "OK" on the ID # sticker and the highest dpi (dots per square inch - resolution) tested on the label. If you don't know the dpi, google the model number and "dpi" to find it. Place the scanner on the outgoing cart.