Difference between revisions of "Mac As-is Checklist"
AshleySueMas (talk | contribs) |
AshleySueMas (talk | contribs) |
||
| (2 intermediate revisions by the same user not shown) | |||
| Line 1: | Line 1: | ||
| + | {{Migrated}} | ||
| + | [https://drive.google.com/a/freegeek.org/#folders/0B9fabqk-bNi7c3JQTkM0U1gtX0U Google Docs Link] | ||
| + | |||
AS-IS System Checklist | AS-IS System Checklist | ||
The system you are inspecting has been designated an “AS-IS” system. This means it is either slightly below our minimum Spec Level or it has issues that prevent us from being able to offer it with a warranty. In other words, it's not quite good enough to go through the Build process, but might still be of use to someone. We ensure basic functionality, but do not perform the more detailed tests of the Build and Quality Control processes. Thank you for your help! | The system you are inspecting has been designated an “AS-IS” system. This means it is either slightly below our minimum Spec Level or it has issues that prevent us from being able to offer it with a warranty. In other words, it's not quite good enough to go through the Build process, but might still be of use to someone. We ensure basic functionality, but do not perform the more detailed tests of the Build and Quality Control processes. Thank you for your help! | ||
| − | + | == Data Security Check == | |
We are responsible for securely wiping or destroying any data storage device that is donated to Free Geek. This is the most important step in the Recycling process. In most cases this means removing hard drives from computers so the data can be wiped, but keep an eye out for other kinds of data storage devices. If you are not sure how to remove the hard drive, use the website ifixit.com for a step by step disassembly guide to most systems. | We are responsible for securely wiping or destroying any data storage device that is donated to Free Geek. This is the most important step in the Recycling process. In most cases this means removing hard drives from computers so the data can be wiped, but keep an eye out for other kinds of data storage devices. If you are not sure how to remove the hard drive, use the website ifixit.com for a step by step disassembly guide to most systems. | ||
| − | Check for Hard Drives | + | === Check for Hard Drives === |
| − | Separate any hard drive caddies and adapters from the hard drive. | + | * Separate any hard drive caddies and adapters from the hard drive. |
| − | Tape them (along with their screws) back inside the hard drive bay. These should stay with the system unless your instructor needs them for parts. | + | * Tape them (along with their screws) back inside the hard drive bay. These should stay with the system unless your instructor needs them for parts. |
| − | If a hard drive or other storage device is found, it should always be given to your instructor. | + | * If a hard drive or other storage device is found, it should always be given to your instructor. |
| − | Some systems, mostly desktops, may have two hard drive bays. | + | * Some systems, mostly desktops, may have two hard drive bays. |
| + | |||
| + | === Check for Other Storage Devices === | ||
| + | * Check the Optical Drive for disks. | ||
| + | ** You can manually open the drive by pushing a paper clip into the small quick-release hole in the drive faceplate. | ||
| + | ** To verify there are no disks in a laptop optical drive, try to insert a disk into the drive (do not put the disk in all the way), if the disk seems to slide in easily, there is no disk, if you cannot push the disk in, there is a disk in the way. You will need to turn on the system to remove that disk, or remove the whole optical drive. | ||
| + | * Look inside and around the chassis for other less common storage devices, such as: | ||
| + | ** 1.8” or other small-form-factor hard drives | ||
| + | ** Mini PCI, mini-PCIe, or mSATA solid state drives (SSDs) | ||
| + | ** SD cards or MemorySticks | ||
| + | ** SIM cards (usually under the battery) | ||
| + | ** Floppy disks | ||
| + | ** PCMCIA (PC Card slot) hard drives | ||
| − | + | ;Examples: | |
| − | + | <gallery> | |
| − | + | File:Hard_Drive_Sizes.jpg|'''Hard Drives''' <br> 3.5", 2.5", 1.8" and 1" sizes | |
| − | + | File:PCMCIA_Hard_Drive.JPG| '''PCMCIA Hard Drive''' <br> (PC Card) | |
| − | + | File:SD-card.jpg|'''SD Memory Card''' | |
| − | + | File:Mini_PCIe_SSD.jpg|'''Mini-PCIe SSD''' <br> (Solid State Drive) | |
| − | Mini | ||
| − | |||
| − | |||
| − | |||
| − | |||
| + | </gallery> | ||
| − | + | == Physical Inspection == | |
| − | Take a close look at the system you are evaluating. Inform your instructor if you find any of the following: | + | * Take a close look at the system you are evaluating. Inform your instructor if you find any of the following: |
| − | Floppy Drive | + | ** Floppy Drive |
| − | Missing cover plates on the bottom of the system | + | ** Missing cover plates on the bottom of the system |
| − | Missing Battery (laptops) | + | ** Missing Battery (laptops) |
| − | Missing Optical Drive | + | ** Missing Optical Drive |
| − | Missing keyboard or individual keys (laptops) | + | ** Missing keyboard or individual keys (laptops) |
| − | Cracked or broken hinges (laptops) | + | ** Cracked or broken hinges (laptops) |
| − | Cracks, discoloration, scratches, or marks on any surface | + | ** Cracks, discoloration, scratches, or marks on any surface |
| − | Evidence of liquid spills or oxidation residue | + | ** Evidence of liquid spills or oxidation residue |
| − | Dirt, dust, cat hair and/or grime above and beyond what can be cleaned | + | ** Dirt, dust, cat hair and/or grime above and beyond what can be cleaned |
| − | Damaged ports or power jack (look very closely) | + | ** Damaged ports or power jack (look very closely) |
| − | Visible screen damage (laptops) | + | ** Visible screen damage (laptops) |
Stop here and check with your instructor if the system has any of these issues; they may have you go through the Recycling process instead. | Stop here and check with your instructor if the system has any of these issues; they may have you go through the Recycling process instead. | ||
| − | |||
| − | |||
| − | + | == Find an Appropriate AC Adapter == | |
| + | |||
| + | If you are working on a laptop, you will need to the appropriate AC adapter for it. Adapters are sorted by magnetic or non-magnetic plugs, then further more by voltage (V) and amperage (A). Most laptops will have this information on the back side; if you cannot find the voltage and amperage, ask an instructor. | ||
| + | |||
| + | == POST == | ||
| − | Plug in the power supply, network cable, and keyboard/mouse if needed, then try turning the machine on while pressing the 'N' button. | + | * Plug in the power supply, network cable, and keyboard/mouse if needed, then try turning the machine on while pressing the 'N' button. |
| − | It may take a while for it to boot to the network. You will see an Apple logo, or a globe. | + | ** It may take a while for it to boot to the network. You will see an Apple logo, or a globe. |
| − | If the system does not boot to the network, ask your instructor for an external hard drive. Turn off the machine, plug in the external HDD, then try turning the machine on while pressing the 'Option' key. You should see an icon for booting to the external HDD. | + | ** If the system does not boot to the network, ask your instructor for an external hard drive. Turn off the machine, plug in the external HDD, then try turning the machine on while pressing the 'Option' key. You should see an icon for booting to the external HDD. |
| − | Click 'Ignore' if a disc insertion warning box starts up. | + | * Click 'Ignore' if a disc insertion warning box starts up. |
| − | + | == Identify and Test the Hardware == | |
| − | |||
| − | |||
| − | |||
| − | |||
| − | + | * Click on the Apple icon in the top, left corner. | |
| − | Click on the | + | * Click on About This Mac |
| − | + | * Note the CPU type and speed. | |
| − | If | + | * Note the amount of RAM installed. We normally send As-Is machines out with 1-2gb of RAM installed. If more or less RAM is required, turn off the machine then remove/add as needed. |
| − | |||
| − | + | === Stress-test the CPU === | |
| − | Click on the | + | * Click on the CPU Test icon (green check mark) on the Menu Bar at the bottom of the screen |
| − | + | * Choose the option primenet as the test type and start the test; this will take a few minutes | |
| − | + | * If this or any other test fails, consult your instructor | |
| − | + | * Note if this test passed on the Keeper Label | |
| − | |||
| − | |||
| − | |||
| − | |||
| − | If this test fails, | ||
| + | === Stress-test the GPU === | ||
| + | * Click on the Apple icon in the top, left corner. | ||
| + | * Select System Preferences, then click on the Desktop & Screen Saver icon | ||
| + | * Scroll down to the bottom of the list and select GPULife | ||
| + | * Select Options, verify limit framerate is not selected and that show framerate is selected. | ||
| + | * Set Zoom to 1 and click OK , select Test. | ||
| + | * Look for any artifacting or other issues | ||
| + | * These would be popping lights, obvious glitches, lines, and cross hatching | ||
| + | * The frames per second should remain consistent, it may take a moment to appear. | ||
| + | * If this test fails, we are making it a System Sold for Parts (see Step 5), if it passes, we are making it a System Sold As-Is (see Step 6). | ||
| − | + | == Parts Sticker == | |
| − | Get a Parts sticker from the binder, stick it to the system and use the information gathered in the previous steps to fill out these fields: | + | * Get a Parts sticker from the binder, stick it to the system and use the information gathered in the previous steps to fill out these fields: |
| − | Does the system post (YES or NO) | + | ** Does the system post (YES or NO) |
| − | Does the screen work (YES OR NO). Leave this black if you are working on a desktop which does not have a built in screen. | + | ** Does the screen work (YES OR NO). Leave this black if you are working on a desktop which does not have a built in screen. |
| − | For Parts Systems ONLY remove the following: | + | * For Parts Systems ONLY remove the following: |
| − | Battery (laptops) | + | ** Battery (laptops) |
| − | RAM | + | ** RAM |
| − | Hard Drive caddy (laptops) | + | ** Hard Drive caddy (laptops) |
| − | Any additional cards on the motherboard (desktops) | + | ** Any additional cards on the motherboard (desktops) |
| − | + | == AS-IS Sticker == | |
| − | + | * Get an AS-IS sticker from the binder, stick it to the lid of the system, and use the information gathered in the previous steps to fill in these fields: | |
| − | CPU type | + | ** CPU type |
| − | CPU clock speed in GHz | + | ** CPU clock speed in GHz |
| − | RAM amount | + | ** RAM amount |
| − | HDD size, if the instructor wants you to add a blank hard drive to this system. | + | ** HDD size, if the instructor wants you to add a blank hard drive to this system. |
| − | Leave all other fields blank. | + | ** Leave all other fields blank. |
| − | Keep batteries, RAM, slot covers and caddies with this machine. | + | ** Keep batteries, RAM, slot covers and caddies with this machine. |
| − | Remove any additional cards on the motherboard (desktops) | + | ** Remove any additional cards on the motherboard (desktops) |
| − | + | == Final Steps and Sign-Off == | |
| − | Remove any sticker identifying the previous owner or with personal information. | + | * Remove any sticker identifying the previous owner or with personal information. |
| − | Remove any potentially offensive sticker or other material. If you are not sure if something might be offensive, just remove it anyway out of an abundance of caution. | + | * Remove any potentially offensive sticker or other material. If you are not sure if something might be offensive, just remove it anyway out of an abundance of caution. |
| − | Make sure the system is completely reassembled. | + | * Make sure the system is completely reassembled. |
| − | Give the system a quick cleaning with a rag. Don't go too crazy. | + | * Give the system a quick cleaning with a rag. Don't go too crazy. |
| − | Ask your instructor to sign off on the system, then put it in the AS-IS bin on the cart. | + | * Ask your instructor to sign off on the system, then put it in the AS-IS bin on the cart. |
| − | Check with your instructor for your next task. Thank you for helping | + | * Check with your instructor for your next task. Thank you for helping |
[[Category:Macintosh]] | [[Category:Macintosh]] | ||
Latest revision as of 12:19, 30 March 2014
 This page has been migrated to a document on Free Geek's Google Drive. Information remaining behind may no longer be relevant. MIGRATOR: When you have tagged this page as migrated, (Link to new page immediately below.) |
AS-IS System Checklist
The system you are inspecting has been designated an “AS-IS” system. This means it is either slightly below our minimum Spec Level or it has issues that prevent us from being able to offer it with a warranty. In other words, it's not quite good enough to go through the Build process, but might still be of use to someone. We ensure basic functionality, but do not perform the more detailed tests of the Build and Quality Control processes. Thank you for your help!
Data Security Check
We are responsible for securely wiping or destroying any data storage device that is donated to Free Geek. This is the most important step in the Recycling process. In most cases this means removing hard drives from computers so the data can be wiped, but keep an eye out for other kinds of data storage devices. If you are not sure how to remove the hard drive, use the website ifixit.com for a step by step disassembly guide to most systems.
Check for Hard Drives
- Separate any hard drive caddies and adapters from the hard drive.
- Tape them (along with their screws) back inside the hard drive bay. These should stay with the system unless your instructor needs them for parts.
- If a hard drive or other storage device is found, it should always be given to your instructor.
- Some systems, mostly desktops, may have two hard drive bays.
Check for Other Storage Devices
- Check the Optical Drive for disks.
- You can manually open the drive by pushing a paper clip into the small quick-release hole in the drive faceplate.
- To verify there are no disks in a laptop optical drive, try to insert a disk into the drive (do not put the disk in all the way), if the disk seems to slide in easily, there is no disk, if you cannot push the disk in, there is a disk in the way. You will need to turn on the system to remove that disk, or remove the whole optical drive.
- Look inside and around the chassis for other less common storage devices, such as:
- 1.8” or other small-form-factor hard drives
- Mini PCI, mini-PCIe, or mSATA solid state drives (SSDs)
- SD cards or MemorySticks
- SIM cards (usually under the battery)
- Floppy disks
- PCMCIA (PC Card slot) hard drives
- Examples
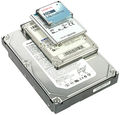
Hard Drives
3.5", 2.5", 1.8" and 1" sizes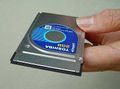
PCMCIA Hard Drive
(PC Card)
SD Memory Card

Mini-PCIe SSD
(Solid State Drive)


Physical Inspection
- Take a close look at the system you are evaluating. Inform your instructor if you find any of the following:
- Floppy Drive
- Missing cover plates on the bottom of the system
- Missing Battery (laptops)
- Missing Optical Drive
- Missing keyboard or individual keys (laptops)
- Cracked or broken hinges (laptops)
- Cracks, discoloration, scratches, or marks on any surface
- Evidence of liquid spills or oxidation residue
- Dirt, dust, cat hair and/or grime above and beyond what can be cleaned
- Damaged ports or power jack (look very closely)
- Visible screen damage (laptops)
Stop here and check with your instructor if the system has any of these issues; they may have you go through the Recycling process instead.
Find an Appropriate AC Adapter
If you are working on a laptop, you will need to the appropriate AC adapter for it. Adapters are sorted by magnetic or non-magnetic plugs, then further more by voltage (V) and amperage (A). Most laptops will have this information on the back side; if you cannot find the voltage and amperage, ask an instructor.
POST
- Plug in the power supply, network cable, and keyboard/mouse if needed, then try turning the machine on while pressing the 'N' button.
- It may take a while for it to boot to the network. You will see an Apple logo, or a globe.
- If the system does not boot to the network, ask your instructor for an external hard drive. Turn off the machine, plug in the external HDD, then try turning the machine on while pressing the 'Option' key. You should see an icon for booting to the external HDD.
- Click 'Ignore' if a disc insertion warning box starts up.
Identify and Test the Hardware
- Click on the Apple icon in the top, left corner.
- Click on About This Mac
- Note the CPU type and speed.
- Note the amount of RAM installed. We normally send As-Is machines out with 1-2gb of RAM installed. If more or less RAM is required, turn off the machine then remove/add as needed.
Stress-test the CPU
- Click on the CPU Test icon (green check mark) on the Menu Bar at the bottom of the screen
- Choose the option primenet as the test type and start the test; this will take a few minutes
- If this or any other test fails, consult your instructor
- Note if this test passed on the Keeper Label
Stress-test the GPU
- Click on the Apple icon in the top, left corner.
- Select System Preferences, then click on the Desktop & Screen Saver icon
- Scroll down to the bottom of the list and select GPULife
- Select Options, verify limit framerate is not selected and that show framerate is selected.
- Set Zoom to 1 and click OK , select Test.
- Look for any artifacting or other issues
- These would be popping lights, obvious glitches, lines, and cross hatching
- The frames per second should remain consistent, it may take a moment to appear.
- If this test fails, we are making it a System Sold for Parts (see Step 5), if it passes, we are making it a System Sold As-Is (see Step 6).
Parts Sticker
- Get a Parts sticker from the binder, stick it to the system and use the information gathered in the previous steps to fill out these fields:
- Does the system post (YES or NO)
- Does the screen work (YES OR NO). Leave this black if you are working on a desktop which does not have a built in screen.
- For Parts Systems ONLY remove the following:
- Battery (laptops)
- RAM
- Hard Drive caddy (laptops)
- Any additional cards on the motherboard (desktops)
AS-IS Sticker
- Get an AS-IS sticker from the binder, stick it to the lid of the system, and use the information gathered in the previous steps to fill in these fields:
- CPU type
- CPU clock speed in GHz
- RAM amount
- HDD size, if the instructor wants you to add a blank hard drive to this system.
- Leave all other fields blank.
- Keep batteries, RAM, slot covers and caddies with this machine.
- Remove any additional cards on the motherboard (desktops)
Final Steps and Sign-Off
- Remove any sticker identifying the previous owner or with personal information.
- Remove any potentially offensive sticker or other material. If you are not sure if something might be offensive, just remove it anyway out of an abundance of caution.
- Make sure the system is completely reassembled.
- Give the system a quick cleaning with a rag. Don't go too crazy.
- Ask your instructor to sign off on the system, then put it in the AS-IS bin on the cart.
- Check with your instructor for your next task. Thank you for helping