Difference between revisions of "Processing credit cards"
Jump to navigation
Jump to search
| Line 33: | Line 33: | ||
The receipt printer | The receipt printer | ||
| + | * This takes 2 ply paper that will print a white and yellow copy of the credit card slips. | ||
* There is an on/off switch to the left of the paper roll. | * There is an on/off switch to the left of the paper roll. | ||
* The machine needs to be plugged in to power for it to work properly. | * The machine needs to be plugged in to power for it to work properly. | ||
| + | * There is a square FEED button on the right to advance the paper out. | ||
| + | * There are POWER and PAPER LOW indicator lights right above the FEED button. | ||
== End of the day procedure == | == End of the day procedure == | ||
Revision as of 14:32, 2 November 2006
Basic transaction
This is what should normally happen during a normal sale or donation.
- Display should say "FREE GEEK". If not, hit the CLEAR button
- Get the credit card from the customer.
- Slide card with magnetic stripe to the outside (right)
- Enter amount without decimals and then hit the blue ENTER key
- For instance enter $15.75 as 1575 ENTER
- Wait for system to complete receipt. This could take a little time.
- Use this time to ask if they want an itemized (FGdb) receipt
- Do not actually complete the sale in the database until the credit card transaction has cleared.
- Do not return the credit card to the customer yet.
- The credit card machine will print out a two layer receipt for the customer to sign. (Don't tear it off until you see the signature line.)
- Finish FGdb transaction (and print itemized receipt if desired).
- Have the customer sign the receipt.
- Compare signature to back of credit card.
- Give customer the credit card and yellow copy of the receipt.
- Put white copy of receipt with checks in drawer.
- Press CLEAR button to get back to main screen.

The machines

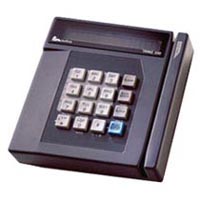
The credit card swiper
- The CLEAR button is on the top right hand side of the keypad.
- The blue button in the lower right is both the ENTER key and the FUNCTION key.
- Cards are swiped through the slot on the right hand side.
- Cards may be swiped either top to bottom or bottom to top.
- The machine needs to be plugged in to the correct phone line and power for it to work properly.
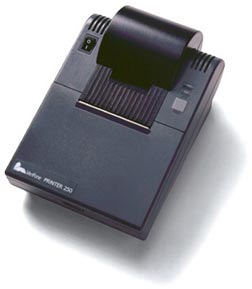
The receipt printer
- This takes 2 ply paper that will print a white and yellow copy of the credit card slips.
- There is an on/off switch to the left of the paper roll.
- The machine needs to be plugged in to power for it to work properly.
- There is a square FEED button on the right to advance the paper out.
- There are POWER and PAPER LOW indicator lights right above the FEED button.
End of the day procedure
(Untested)
- Display should say "FREE GEEK". If not, hit the CLEAR button
- Hit the blue FUNCTION key
- Hit the 3 (LOCAL REVIEW) and the blue ENTER key
- Hit the 1 (PRINT) and the blue ENTER key
- Hit the 1 (DETAIL) and the blue ENTER key
- Machine will print out a report.
- Find the NET amount and record it on the end of shift form.
Refunds, mistakes, and other miscellaneous transactions
Notes
- We are imposing a $5.00 minimum on all transactions.
- If we the phone line is in use you will have to wait longer. This could happen if:
- We are sending or receiving a fax
- The other till is conducting a credit card transaction
- Tech Support is testing a modem
- Talk to Richard or Michael for questions.
Questions
- What if paper jams? Can we reprint transactions?
- What if we make a mistake?
- What if card is unauthorized?
- What if people want cash back?