Difference between revisions of "User talk:Manseau"
| Line 3: | Line 3: | ||
Note: You can start Bat Check at any time during the Build process, as long as the battery is fully charged! | Note: You can start Bat Check at any time during the Build process, as long as the battery is fully charged! | ||
| + | <graphviz> | ||
| + | digraph D { | ||
| + | |||
| + | # size="10,12" | ||
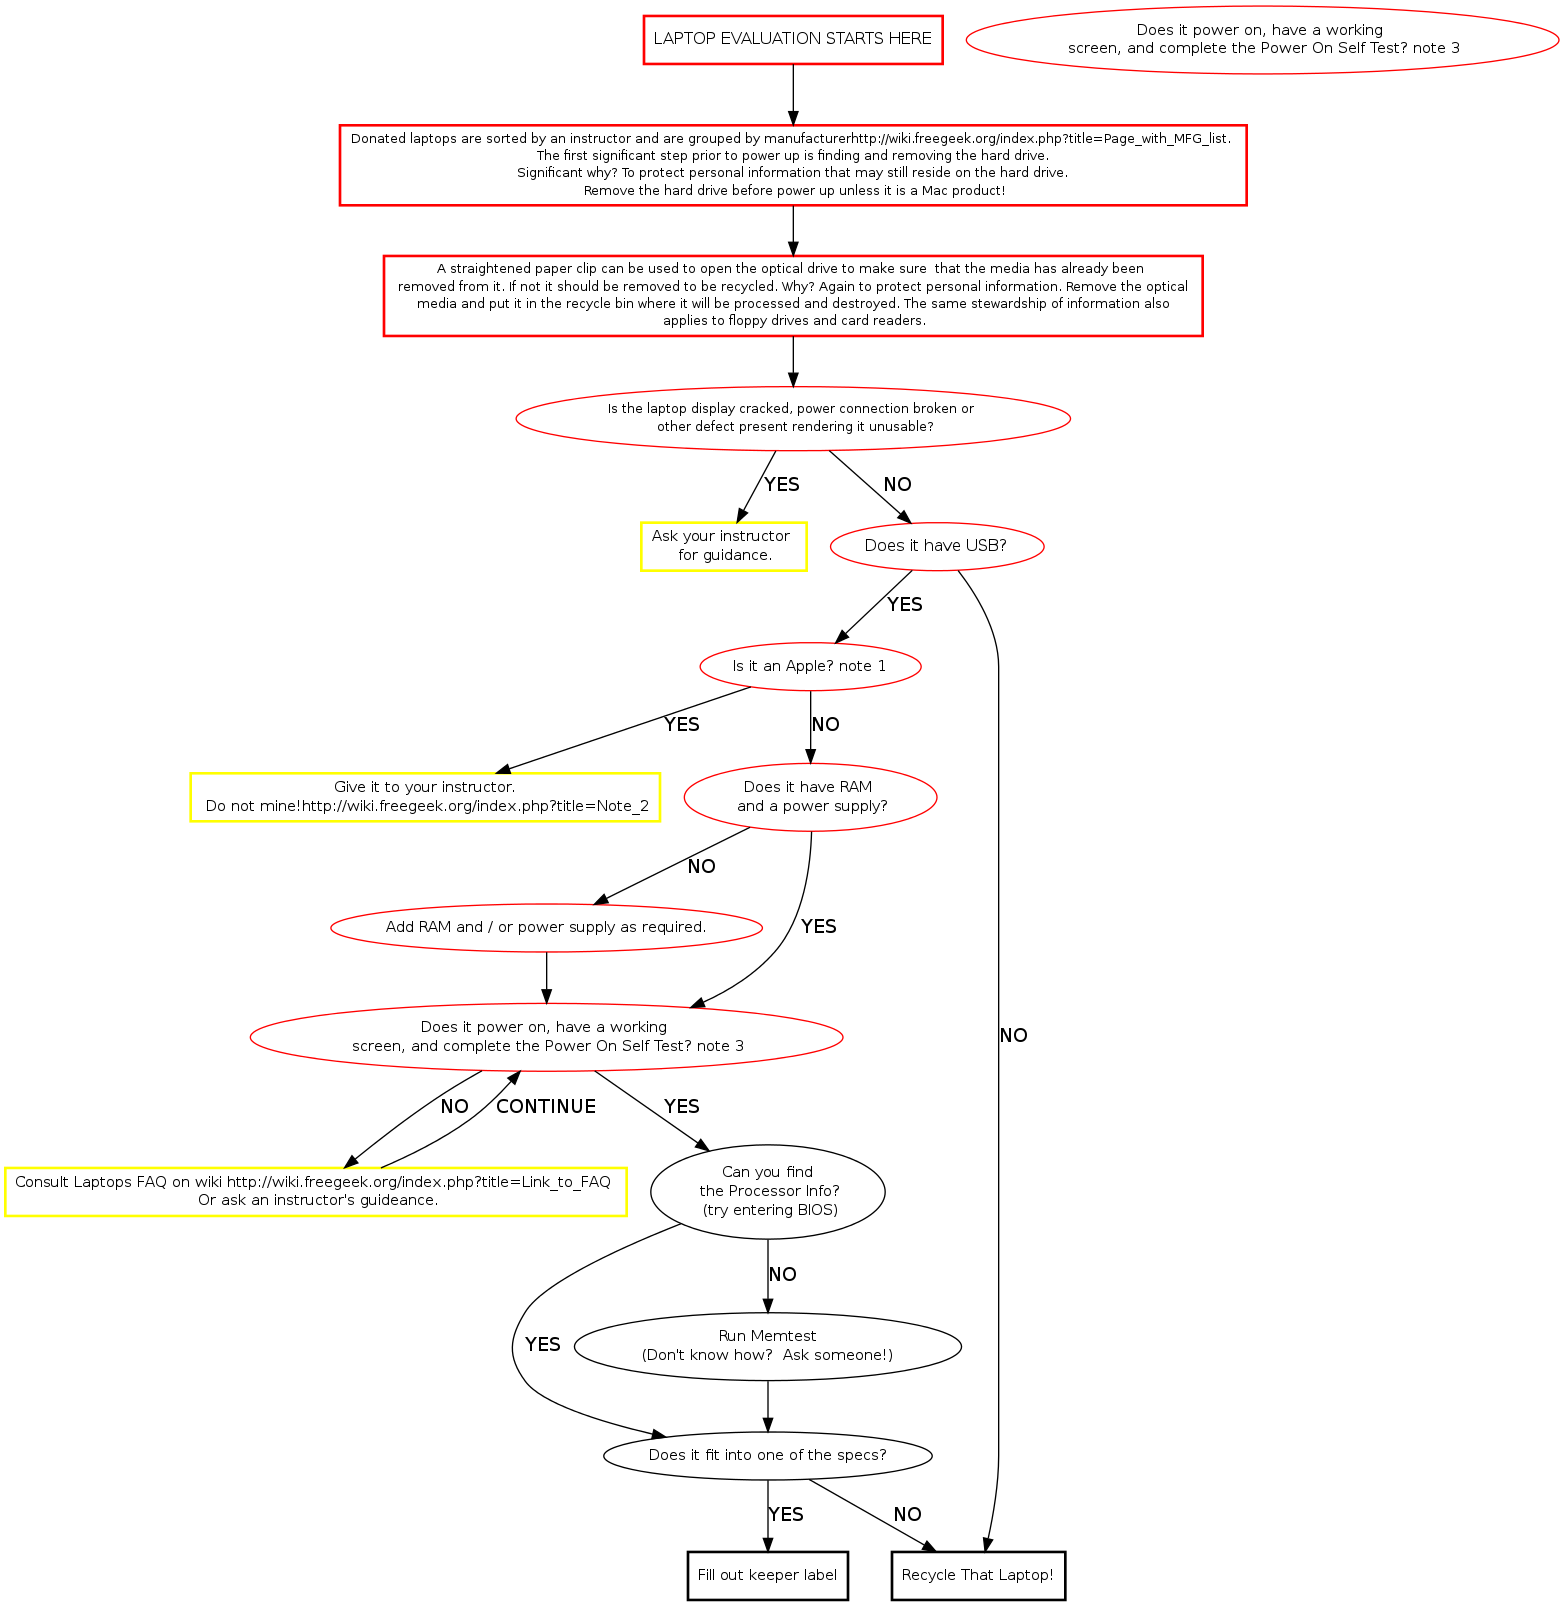
| + | intro [label="The laptop evaluation is a rapid, production oriented process. It is \n designed to quickly separate old or unserviceable technology \n for recycling from still serviceable or repairable, laptops and parts.", shape="box", style="bold", fontsize="14", color=""] | ||
| + | |||
| + | start [label="LAPTOP EVALUATION STARTS WITH '''DATA SECURITY'''", fontsize="11", URL="http://wiki.freegeek.org/index.php/Data_Security", fontcolor="darkviolet", shape="box", style="bold", color="black"] | ||
| + | |||
| + | poweruf [label="For the laptop you are evaluating, retrieve a power \n supply from shelf matching output volts and amps \n to the input volts and amps specs on the laptop.", fontsize="11", shape="box", style="bold", color="black"] | ||
| + | |||
| + | hddrem [label="OPEN THE OPTICAL DRIVE by inserting a small diameter screwdriver into \n the caddy release hole. IF THERE IS MEDIA IN IT, REMOVE IT from the caddy \n and put it in the recycle bin.", fontsize="11", shape="box", style="bold", color="black"] | ||
| + | |||
| + | sort [label="REMOVE THE HARD DRIVE and put it in the incoming HDD bin. Tape associated \n drive caddy parts together for ease of reinstalling new drive. If it's an Apple \n product the instructor will direct you in what to do with it." fontsize="11",shape="box", style="bold", color="black"] | ||
| + | |||
| + | busted [label="Is the display cracked, power connection broken, or \n other defect present rendering the laptop unusable?", fontsize="11", style="bold", color="red"] | ||
| + | |||
| + | usb [label="Does it have a USB port?", fontsize="11", style="bold", color="red"] | ||
| + | |||
| + | p2 [label="Is it faster than a Pentium II?" fontsize="11", shape="", style="bold", color="red"] | ||
| + | |||
| + | ask [label="Ask your instructor \n for guidance." fontsize="11", shape="box", style="bold", color="yellow"] | ||
| + | |||
| + | poweron [label="Does it power on, have a \n working display, complete the Power \n On Self Test, and boot to Bios?", fontsize="11", style="bold", color="red"] | ||
| + | |||
| + | poweron1 [label="Does it power on, have a \n working display, complete the Power \n On Self Test, and boot to Bios?", fontsize="11", shape="", style="bold", color="red"] | ||
| + | |||
| + | handwavy [label="Consult Laptops FAQ \n Or ask the instructor for guidance.", fontcolor="darkviolet", URL="http://wiki.freegeek.org/index.php/Laptop_FAQ", fontsize="11", shape="box", style="bold", color="yellow"] | ||
| + | |||
| + | |||
| + | keeper [label="Consult Laptops FAQ.", fontcolor="darkviolet",URL="http://wiki.freegeek.org/index.php/Laptop_FAQ", fontsize="11", shape="box", style="bold", color=""] | ||
| + | |||
| + | defect [label="Have the instructor determine \n the disposition of the laptop.", fontsize="11", shape="box", style="bold", color="yellow"] | ||
| + | |||
| + | enoughproc [label="Check the whiteboard;\n does it fit into one \n of the Laptop Specs?", URL="http://wiki.freegeek.org/index.php/Laptop_Specs", fontcolor="darkviolet", fontsize="11", style="bold", color="red"] | ||
| + | |||
| + | incoming [label="Yikes! RECYCLE THAT LAPTOP! Verify \n and affix hard drive removed sticker", fontsize="11", fontcolor="black", style="bold", color="red"] | ||
| + | |||
| + | whatzit [label="Run Memtest. \n See Memtest Notes", fontsize="12", shape="box", style="bold", color="green"] | ||
| + | |||
| + | keeper [label="YIPPEE! ITS A KEEPER! At this \n point all laptops need a KEEPER LABEL affixed \n and filled out. FG-PDX machines must be granted." fontsize="11", fontcolor="black", shape="box", style="bold", color="green"] | ||
| + | |||
| + | asis [label="POSTs to Bios but only meets \n specs for thrift store AS-IS.", URL="http://wiki.freegeek.org/index.php/As-Is_Checklist", fontcolor="darkviolet", fontsize="11", shape="box", style="bold" color="green"] | ||
| + | |||
| + | build [label="Laptop meets specs for grant, \n high or low end thrift store sale \n or FG-PDX. Be sure to \n document covered or uncovered \n equipment per ECYCLE", URL="http://wiki.freegeek.org/index.php/Ewaste_Training", fontcolor="darkviolet", fontsize="11", shape="box", style="bold" color="green"] | ||
| + | |||
| + | buildrdy [label="BUILD", fontcolor="darkviolet", URL="http://wiki.freegeek.org/index.php/Laptop_Build_Checklist", fontsize="12", shape="box", style="bold", color="green"] | ||
| + | |||
| + | tstore [label="Fill out and affix a KEEPER LABEL,\n an AS-IS Sale Sticker, and a \n HARD DRIVE REMOVED sticker.", fontcolor="black", fontsize="11", shape="box", style="bold", color="green"] | ||
| + | |||
| + | parts [label="AFFIX A PARTS ONLY LABEL and identify \n problems with laptop in detail. AFFIX A \n KEEPER LABEL and fill out laptop specs.",fontsize="11", shape="box", style="bold", color="green"] | ||
| + | |||
| + | chkit [label="Ask your instructor to verify that \n your decision to recycle is correct." fontsize="11", shape="box", style="bold", color="yellow"] | ||
| + | |||
| + | rcycle [label="RECYCLE Procedures.", URL="http://wiki.freegeek.org/index.php?title=Laptop§ion=4",fontsize="12", fontcolor="darkviolet", shape="box", style="bold", color="red"] | ||
| + | |||
| + | prts [label="Place a small label on the left side of the laptop \n with the name and model number for \n ease of identification in parts storage.",fontsize="11", shape="box", style="bold", color="green"] | ||
| + | |||
| + | store [label=" Forward to \n THRIFT STORE.", URL="http://wiki.freegeek.org/index.php/Thrift_Store", fontsize="12", fontcolor="darkviolet", shape="box", style="bold", color="green"] | ||
| + | intro -> start | ||
| + | start -> sort [label="" fontsize="11", color=""] | ||
| + | sort -> hddrem [label="" fontsize="11", color=""] | ||
| + | hddrem -> busted [label="" fontsize="11", color=""] | ||
| + | busted -> ask [label="Yes" fontsize="11", color="red"] | ||
| + | busted -> usb [label="No" fontsize="11", color="black"] | ||
| + | usb -> incoming [label="No" fontsize="11", color="red"] | ||
| + | usb -> p2 [label="Yes" fontsize="11"] | ||
| + | p2 -> poweruf [label="Yes \n or\n Don't Know" fontsize="11"] | ||
| + | p2 -> incoming [label="No" fontsize="11", color="red"] | ||
| + | ask -> usb [label="OK" fontsize="11"] | ||
| + | poweruf -> poweron [label="OK" fontsize="11"] | ||
| + | poweron -> handwavy [label="NO" fontsize="11", color="red"] | ||
| + | handwavy -> poweron1 [label="OK" fontsize="11", color="red"] | ||
| + | poweron1 -> defect [label="No" fontsize="11", color="red"] | ||
| + | poweron1 -> enoughproc [label="Yes" fontsize="11", color=""] | ||
| + | defect -> enoughproc [label="Parts \n Machine" fontsize="11", color=""] | ||
| + | poweron -> enoughproc [label="Yes" fontsize="11"] | ||
| + | enoughproc -> keeper [label="YES" fontsize="11", color="green"] | ||
| + | enoughproc -> incoming [label="NO" fontsize="11", color="red"] | ||
| + | defect -> incoming [label="Recycle" fontsize="11", color="red"] | ||
| + | incoming -> chkit [label="OK" fontsize="11", color="red"] | ||
| + | chkit -> rcycle [label="OK" fontsize="11", color="red"] | ||
| + | keeper -> parts [label="Parts \n Machine" fontsize="11", color="green"] | ||
| + | parts -> prts [label="OK" fontsize="11", color="green"] | ||
| + | keeper -> asis [label="AS-IS" fontsize="11", color="green"] | ||
| + | keeper -> build [label="Build" fontsize="11", color="green"] | ||
| + | build -> whatzit [label="Then" fontsize="11", color="Green"] | ||
| + | whatzit -> buildrdy [label="OK" fontsize="11", color="green"] | ||
| + | asis -> tstore [label="Then" fontsize="11", color="green"] | ||
| + | tstore -> store [label="OK" fontsize="11", color="green"] | ||
| + | |||
| + | } | ||
| + | </graphviz> | ||
| + | |||
| + | == Memtest Notes == | ||
| + | ''Memtest is a useful tool found on many boot disks. Besides testing memory, it provides us a quick way to find processor and memory info.'' | ||
| + | Memtest is available on Ubuntu (or other debian based) live cds and our netboot server. The Memtest program is also a boot option on the hard drive. | ||
| + | [[Category:Laptops]] | ||
| + | |||
{| fontname="Helvetica" fontsize="12" border="1" | {| fontname="Helvetica" fontsize="12" border="1" | ||
Revision as of 12:15, 4 February 2010
Laptop Build Chart
Work through every step as well as you can, and ask if you have questions. Try and learn the reason for each of the steps: this knowledge will come in handy later when, inevitably, things aren't going as smoothly. Your instructor will be able to answer questions and check your work. Never overlook the help that the builder to your right or left might be able to lend. You can also find information on the Free Geek wiki by going to http://wiki.freegeek.org/index.php/Laptops Check with your instructor to find out what type of box to build, then work your way down this checklist.
Note: You can start Bat Check at any time during the Build process, as long as the battery is fully charged!
Memtest Notes
Memtest is a useful tool found on many boot disks. Besides testing memory, it provides us a quick way to find processor and memory info. Memtest is available on Ubuntu (or other debian based) live cds and our netboot server. The Memtest program is also a boot option on the hard drive.
| Steps | Notes/Detailed Instructions |
| Check For Broken or Damaged Parts | Visually inspect laptop for broken screen, missing keys, etc. If you find one, check with your instructor. |
| Look at the Keeper Label | If there isn't a Keeper label already on the laptop, please affix one and fill out what you know (i.e. Processor info, RAM amount, Laptop Make and Model). Also look to make sure nothing looks out of line, e.g. there's only 256 MB of RAM. |
| Get a Power Supply | Grab appropriate power supply from the labeled boxes (the box labels are color-coded by brand for easy locating). Not sure how to determine which power supply the laptop wants? Ask your instructor and he/she will show you how to find this info out. |
| Install imaged hard drive | To do this:
|
| Install appropriate optical drive (if missing) | Check the whiteboard to see what kind of optical drive to install. |
| Enter BIOS | If you see an error message which reads something like "checksum error, defaults loaded" then your CMOS battery is dead. Ask your instructor what to do about it. |
| Check the RAM | To check the RAM, check in BIOS or use Memtest if the BIOS doesn't tell you. Is there at least 512 MB of RAM? If not, add RAM. If the laptop is High End, then it should have more than 512 MB of RAM. |
| Set boot order in BIOS | Look for the boot order in BIOS. Of the available options, the preferred order is as follows : CD-ROM boots first; Hard drive boots somewhere between CD-ROM and Network; Network boots last. Get as close as possible, depending on the BIOS, but make sure the Network boot isn't before the hard drive. |
| Save and exit BIOS | Continue on to boot to the hard drive. Log in as "oem" (password: freegeek). |
| Get wireless working. | If there isn't already a wireless card installed, then install, configure and test a wifi card (to determine if wireless card is already present and working, try and access a website like Google). Internal (mini-PCI) is best, but PCMCIA is an acceptable second option. For wireless advice, try the Wireless Tips page. |
| Set freegeek.org as homepage | In Firefox, go to freegeek.org Then set this page as the home page under Edit > Preferences > Main. Alternately, you can drag the Free Geek icon (on the left of the address bar) and drop it on the "Home" icon (immediately to the left of the address bar). |
| Run basiccheck | You will need to be connected to the wired or wireless network to test networking step. If you encounter any errors, check with your instructor. |
| Test optical drive - data, sound, and DVD. | For each drive:
|
| Test CD/DVD writing | Write to a CD and a DVD, if DVD-RW is present. You can use Brasero Disc Burning or, if this fails, install and use K3B. Put a blank disk in and drag and drop a few files from /home/oem/examples to the CD/DVD writing folder that appears. Click "Burn". When each disk is done, verify that they contain the files you wrote to them. |
| Blank the CD/DVD | Using Brasero Disc Burning, select Tools > Erase. Using K3B, select Tools > Erase CD-RW |
| Test all USB ports | Using a USB mouse, make sure that the cursor moves and can interact with things. Do this on all the USB ports. If any of the ports don't work, check in with your instructor. |
| Test Cardbus/PCMCIA slots | Put a wifi card in each slot -> if it lights up, then it's good. |
| Run "printme", from terminal | This will give you a System ID number
A webpage will open with info about the system. Click "Print." Choose "Print to file." Choose the PDF checkbox and save the file to the Desktop (name the file something with the word build in it, e.g. "Build Printme" or "BUILD" |
| Test the battery | Make sure battery is fully charged up (if the battery icon is missing from the top panel, this means that the battery is fully charged). Put in a music CD and select "Repeat." Start playing the CD, then open a terminal and run bat_check Pull power plug and place the laptop on the waiting rack. Don't forget to note on the Keeper label that you've started Bat Check. If you want to see for how many minutes bat check has run, open up another terminal and type watch wc bat_time |
| Clean up and check in with Build Instructor. | Ask what to do with the Laptop |

Memtest Notes
Memtest is a useful tool found on many boot disks. Besides testing memory, it provides us a quick way to find processor and memory info. Memtest is available on ubuntu (or other debian based) live cds and our netboot server.