Difference between revisions of "Keyboard Testing"
Jump to navigation
Jump to search
| Line 16: | Line 16: | ||
staff [style="bold", shape="box", color="blue"] | staff [style="bold", shape="box", color="blue"] | ||
obox [style="bold", shape="box", color="green"] | obox [style="bold", shape="box", color="green"] | ||
| − | usbk [style="bold", shape="box", color=" | + | usbk [style="bold", shape="box", color="orange"] |
blkbox [style="bold", shape="box"] | blkbox [style="bold", shape="box"] | ||
whtbox [style="bold", shape="box", color="grey"] | whtbox [style="bold", shape="box", color="grey"] | ||
wbox [style="bold", shape="box", color="magenta"] | wbox [style="bold", shape="box", color="magenta"] | ||
| − | usb [color=" | + | usb [color="orange", style="bold"] |
white [color="grey", style="bold"] | white [color="grey", style="bold"] | ||
black [style="bold"] | black [style="bold"] | ||
| Line 50: | Line 50: | ||
wbox [label="Take it to the\nWIRELESS KEYBOARDS & MICE BOX", fontsize="14"] | wbox [label="Take it to the\nWIRELESS KEYBOARDS & MICE BOX", fontsize="14"] | ||
apple [label="Is it an\nAPPLE OR MACINTOSH\nkeyboard?"] | apple [label="Is it an\nAPPLE OR MACINTOSH\nkeyboard?"] | ||
| − | eject [label="Does it have a ⏏ button?"] | + | eject [label="Does it have a ⏏ button?\n(See Below)"] |
START -> basic | START -> basic | ||
| Line 96: | Line 96: | ||
neither -> staff [color="blue", style="bold"] | neither -> staff [color="blue", style="bold"] | ||
| − | usb -> usbk [color=" | + | usb -> usbk [color="orange", style="bold"] |
} | } | ||
Revision as of 23:50, 1 June 2010
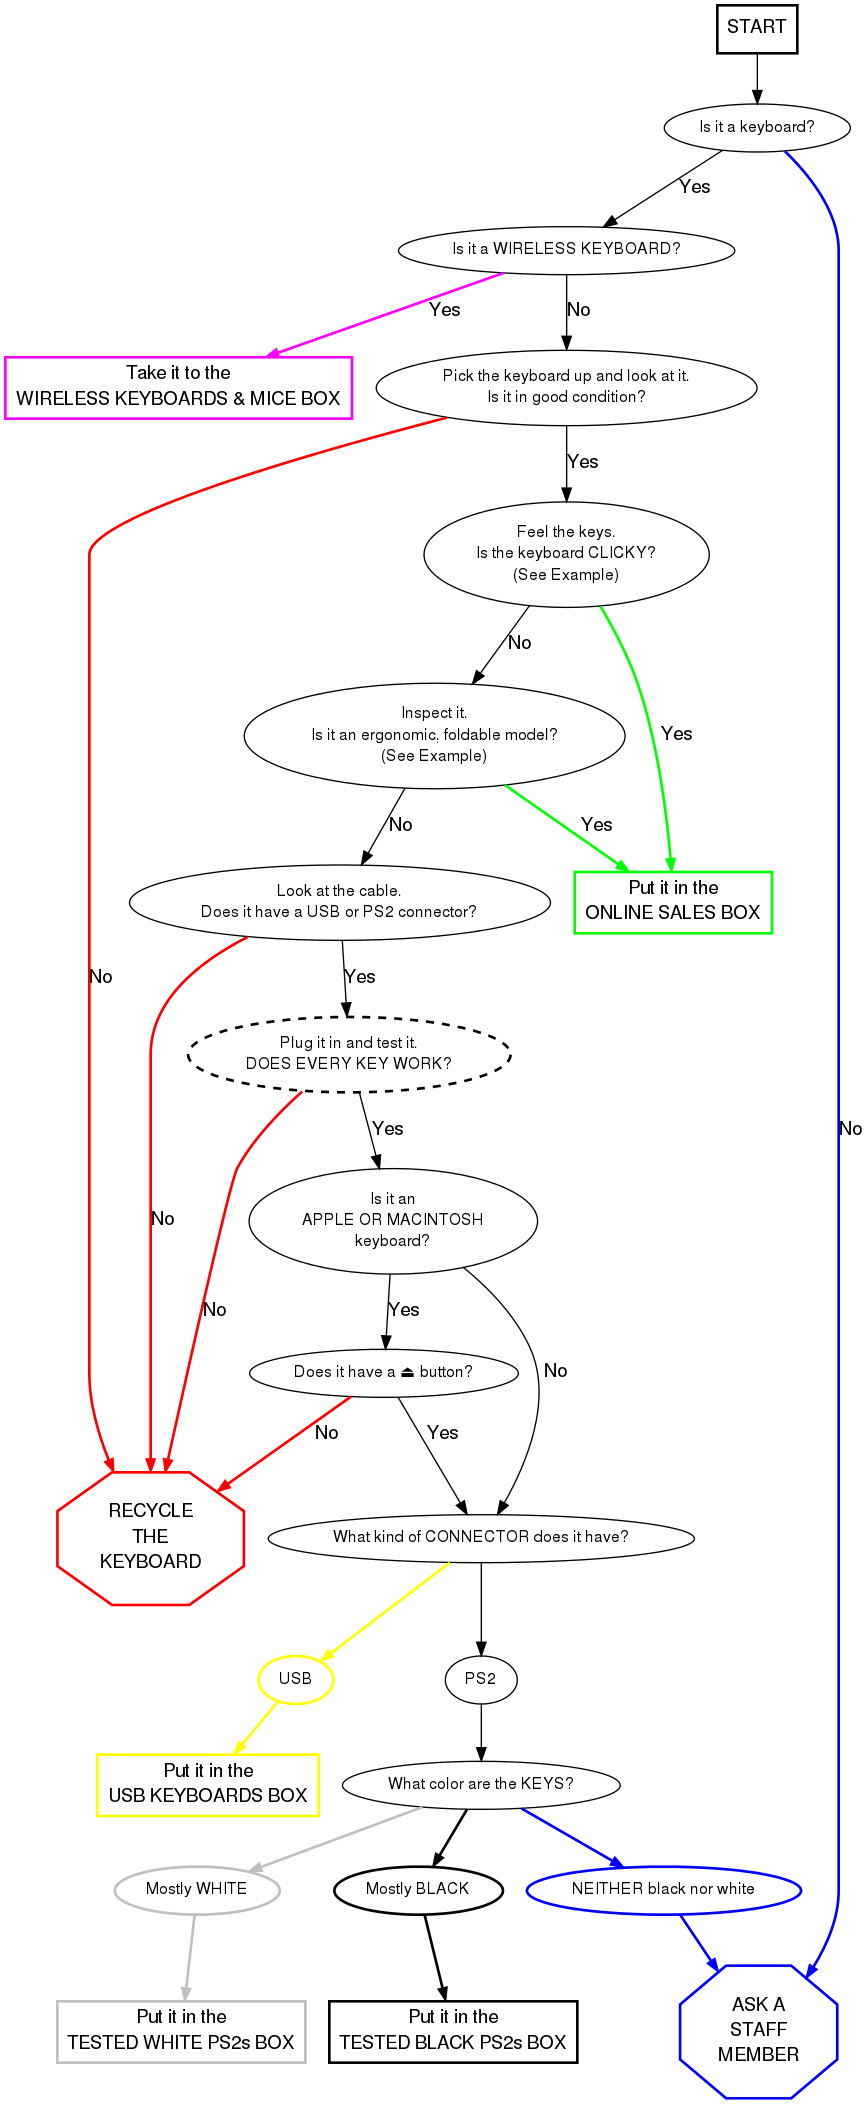
Testing Keyboards
Keyboards are tested for functionality. The good ones are then distributed throughout the facility.
The bad ones are recycled.
 This is a PS2 keyboard connector.
 This is a USB keyboard connector.
Keyboard Testing
- Turn the computer on.
- Connect the keyboard to the system using the extender on the right, or the USB port in front.
- To test a Macintosh or Apple keyboard, select the "Apple Layout".
- To test standard keyboards, select the standard "104-key Layout".
- Select CONTINUE.
- Go through and test every key.
- You will see on the screen what looks like a keyboard. Press a key on your keyboard.
- If the corresponding key on the screen turns black, it works.
- If the key does nothing, it does not work.
- If any keys do not work, RECYCLE the keyboard.
- When you have determined that a keyboard does not work, cut off the cord.
- Put the cord in the metal shopping cart in the main receiving room.
- Put keyboards in the shopping cart closest to you.
- When this cart gets full, notify a staff member.
- When you have finished testing a keyboard, hit "Reset" to reset the image in the program.
- Place working keyboards in the appropriate boxes.
- When a box gets full, ask a staff member where it goes.
- Plug in a new keyboard and start all over!
Notes from Free Geek Vancouver
The Finer Points of Keyboard Sorting
Mac Keyboards
The ⏏ (Eject) button for all Macintosh or Apple keyboards is located on the upper right-hand corner of the keyboard, as shown below.


Older Mac keyboards do not have this button; an example USB keyboard is shown here:

Note the absence of the eject key on the upper-right hand corner of the numerical input pad (highlighted).