Difference between revisions of "Motherboard Testing"
Jump to navigation
Jump to search

(merging with motherboards page) |
|||
| Line 5: | Line 5: | ||
*Socket type (Slot 1, Slot A, Socket A, Socket 370…) | *Socket type (Slot 1, Slot A, Socket A, Socket 370…) | ||
| − | + | [[Image:Blown_fuse_screenshot.JPG |thumb|''[[Blown capacitors]]'' Check for curved or leaking top.]] | |
| − | |||
| − | |||
| − | |||
| − | |||
| − | |||
| − | |||
| − | |||
| − | |||
| − | |||
| − | |||
| − | |||
| − | |||
| − | |||
| − | |||
| − | |||
| − | |||
| + | ; Check for visual defects (blown caps, mutilated components) | ||
| + | * If only one capacitor is bad, send the motherboard to recycle except if it is one that supports Pentium P4. | ||
| + | * look for burn marks or discolerment. | ||
| + | ; After checking the packaging and the socket type that matches the motherboard, | ||
| + | * Identify the motherboard by manufacturer, model, version | ||
| + | * Go to the manufacturer website or just search via google and determine with which range of processor the motherboard is compatible. | ||
| + | * Put a compatible heatsink with a fan on top of it. | ||
;Check the battery for the CMOS, if less than 3 volts replace it. | ;Check the battery for the CMOS, if less than 3 volts replace it. | ||
| − | + | ; Add some memory : DIMM modules, SDRAM, DDR SDRAM or Rambus RDRAM (remember to install Rambus in pairs and use CRIMMs). | |
| − | * | + | ; Attempt to post |
| − | *If board beeps but won't post, check the [[Beep Codes]] and diagnose the problem. | + | * connect the minimal things needed to post (power, keyboard, video, etc) |
| − | + | * if you need help see flowchart below. | |
| − | + | * If board beeps but won't post, check the [[Beep Codes]] and diagnose the problem. | |
| − | * | + | ; Power down, then attach: |
| − | + | * Use an IDE cable (40 pin)to connect the hard drive to the Primary IDE. | |
| − | * | + | * Use the second IDE cable to connect the CDROM drive to the Secondary IDE. |
| − | + | * Use the floppy cable (34 pin)to connect the Floppy Drive to the motherboard. | |
| − | * | + | ; Boot to Memtest, Let it run for a minute, it will run for ever if you let it (The memtest program is a boot option on the hard drive) |
| − | + | ; Boot up to Operating System | |
| − | + | * Check that the mouse and keyboard work | |
| − | + | * If you have on board video check that it works. | |
| − | + | * Test all the USB ports with a mouse | |
| − | + | * If you have on board sound play a audio cd, if not then take a look at a data cd | |
| − | + | * run stress-test | |
| − | + | ; Some cases might call for testing | |
| − | + | * RAID | |
| − | + | * SATA | |
| − | |||
| − | |||
| − | * | ||
| − | |||
| − | * | ||
| − | |||
| − | * | ||
===Useful links=== | ===Useful links=== | ||
Revision as of 13:16, 26 June 2008
Process
- Check the motherboard and be able to identify
- Motherboard type (ATX family, Baby AT, LPX, NLX
- Packaging type ( SECC, PGA…)
- Socket type (Slot 1, Slot A, Socket A, Socket 370…)

Blown capacitors Check for curved or leaking top.
- Check for visual defects (blown caps, mutilated components)
- If only one capacitor is bad, send the motherboard to recycle except if it is one that supports Pentium P4.
- look for burn marks or discolerment.
- After checking the packaging and the socket type that matches the motherboard,
- Identify the motherboard by manufacturer, model, version
- Go to the manufacturer website or just search via google and determine with which range of processor the motherboard is compatible.
- Put a compatible heatsink with a fan on top of it.
- Check the battery for the CMOS, if less than 3 volts replace it.
- Add some memory
- DIMM modules, SDRAM, DDR SDRAM or Rambus RDRAM (remember to install Rambus in pairs and use CRIMMs).
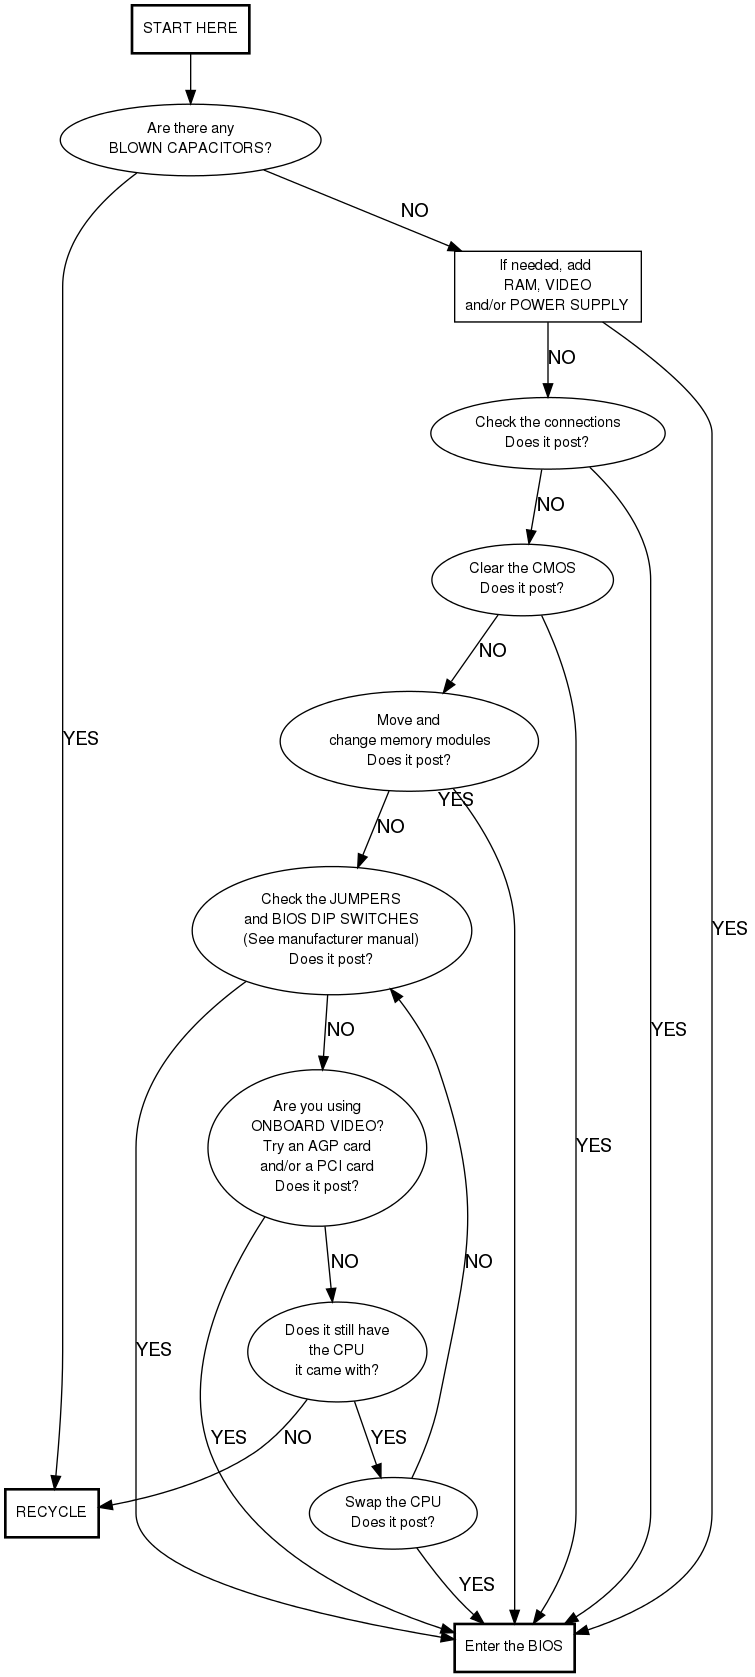
- Attempt to post
- connect the minimal things needed to post (power, keyboard, video, etc)
- if you need help see flowchart below.
- If board beeps but won't post, check the Beep Codes and diagnose the problem.
- Power down, then attach
- Use an IDE cable (40 pin)to connect the hard drive to the Primary IDE.
- Use the second IDE cable to connect the CDROM drive to the Secondary IDE.
- Use the floppy cable (34 pin)to connect the Floppy Drive to the motherboard.
- Boot to Memtest, Let it run for a minute, it will run for ever if you let it (The memtest program is a boot option on the hard drive)
- Boot up to Operating System
- Check that the mouse and keyboard work
- If you have on board video check that it works.
- Test all the USB ports with a mouse
- If you have on board sound play a audio cd, if not then take a look at a data cd
- run stress-test
- Some cases might call for testing
- RAID
- SATA
Useful links
- Information on different motherboards with summary description, it's quiet commercial but it provides quickely the basic information you're looking for : http://www.motherboards.org/ For complete and accurate information on motherboard just go to manufacturer website like Abit [1], Asus [2], MSI [3] and the others. Sometimes you are able to download the motherboard manual.
- The two main processors manufacturers can be visited on : http://www.intel.com/ and http://www.amd.com/us-en/
- If you just want an answer to any question around the computer or to understand something, go to http://computer.howstuffworks.com/
Flow Chart
Here's a chart flow that can help you to visualize the process