Difference between revisions of "Removing components from systems"
Jump to navigation
Jump to search
| Line 25: | Line 25: | ||
process_red1 [label="Remove ALL\nHARD DRIVES\nand put them in\nthe RED BOX", shape="box"] | process_red1 [label="Remove ALL\nHARD DRIVES\nand put them in\nthe RED BOX", shape="box"] | ||
put_on_cart [label="Put the system on the cart\nwith label facing out", shape="box", style="bold"] | put_on_cart [label="Put the system on the cart\nwith label facing out", shape="box", style="bold"] | ||
| + | |||
| + | process_yellow1 [label="Follow\nYELLOW LIGHT INSTRUCTIONS\nbelow", shape="box"] | ||
process_green1 [label="Remove ALL\nHARD DRIVES\nand put them in\nthe GREEN BOX", shape="box"] | process_green1 [label="Remove ALL\nHARD DRIVES\nand put them in\nthe GREEN BOX", shape="box"] | ||
| Line 44: | Line 46: | ||
what_class -> wantcase [label="YELLOW\nLIGHT"] | what_class -> wantcase [label="YELLOW\nLIGHT"] | ||
wantcase -> wantmobo [label="NO"] | wantcase -> wantmobo [label="NO"] | ||
| + | |||
wantcase -> process_case1 [label="YES"] | wantcase -> process_case1 [label="YES"] | ||
process_case1 -> process_case2 -> process_case3 -> process_case4 -> process_case5 -> process_case6 -> process_case7 -> wantmobo | process_case1 -> process_case2 -> process_case3 -> process_case4 -> process_case5 -> process_case6 -> process_case7 -> wantmobo | ||
| + | |||
wantmobo -> process_mobo1 [label="YES"] | wantmobo -> process_mobo1 [label="YES"] | ||
| − | process_mobo1 -> process_mobo2 -> process_mobo3 -> process_mobo4 -> | + | process_mobo1 -> process_mobo2 -> process_mobo3 -> process_mobo4 -> process_yellow1 |
| − | wantmobo -> | + | |
| + | wantmobo -> process_yellow1 [label="NO"] | ||
| + | process_yellow1 -> put_on_cart | ||
Revision as of 16:26, 14 May 2009
ORANGE LIST
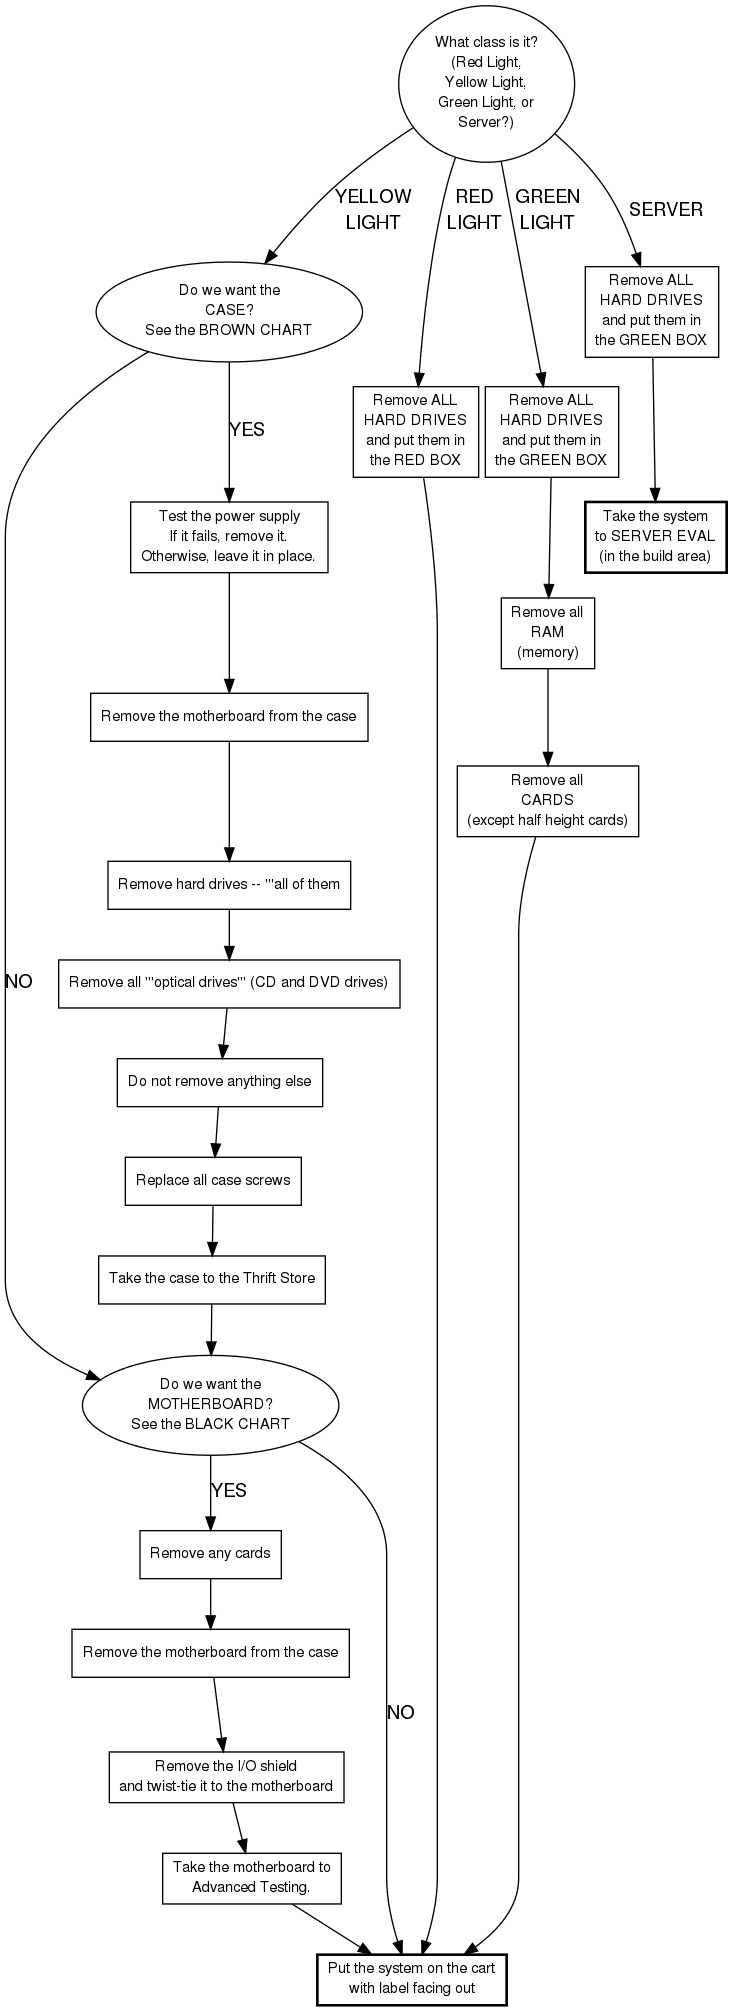
You need to know what kind of computer this is. It will be one of the following.
- Server
- Red Light System
- Yellow Light System
- Green Light System
Proceed with the corresponding instructions below
Notes
Do not pull anything unless these instructions (or the whiteboard) say to pull it. This includes ribbon cables.
- When pulling sound cards, leave sound cables attached to card (not CD Drive or motherboard)
- Do not pull risers. (They are designed to go with the motherboard they came with and are not generic.)
- When pulling any kind of drive, rails and brackets should stay with the system.
SERVERS
- Find and remove HARD DRIVES -- all of them
- (Put them in the hard drive bin)
- Take the system itself to Server Evaluation
- (Server Evaluation is in the Build Area)
RED LIGHT SYSTEMS
- Find and remove HARD DRIVES -- all of them
- (Put them on the floor in front of the hard drive bin)
- Remove any US Robotics brand ISA modem cards marked Sportster.
- Place the system on the cart
- (Make sure the front labels are all facing the same way)
GREEN LIGHT SYSTEMS
- We need to remove certain components from systems that are going to be kept. These are
- Drives -- Leave all rails and drive sleds in case!
- Pull HARD DRIVES -- all of them
- Other drives do not need to be pulled
- Memory
- Pull all DIMMs (SDRAM, DDR, and RAMBUS)
- Do not pull SIMMs
- Cards
- Pull all standard cards, except half-height sized cards
- That is anything in some kind of an industry standard slot: ISA, PCI, AGP, VESA, EISA, MCA, AMR and CNR. (AMR and CNR are the tiny slots similar to PCI, often for modems.)
- A few PCI or AGP cards will have a back plate that is only be half as tall as normal cards. These are "half height" cards and need to be left in the box.
- When pulling cards, leave cables attached to card
- Do not pull risers. (They are designed to go with the case they came with and are not generic.)
- Do not pull a "card" that does not go into an industry standard slot. (We do not consider these to be cards, and they need to stay with their motherboards.)
- Pull all standard cards, except half-height sized cards
- Place the system on the cart
- (Make sure the front labels are all facing the same way)
YELLOW LIGHT SYSTEMS
- Do not pull anything unless these instructions (or the whiteboard) say to pull it. This includes ribbon cables.
- 1. First, check to see if we want the case. (See the BROWN CHART.)
If we want the case (and only if we want it):
- Test the power supply
- If it fails, remove it. Otherwise, leave it in place.
- Remove the motherboard from the case
- Remove hard drives -- all of them
- Remove all optical drives (CD and DVD drives)
- Do not remove anything else
- Replace all case screws
- Take the case to the Thrift Store
- 2. Second, check to see if we want the motherboard. (See the BLACK CHART.)
If we want the motherboard (and only if we want it):
- Remove any cards
- Remove the motherboard from the case
- Remove the I/O shield and twist-tie it to the motherboard
- Take the motherboard to Advanced Testing.
NOTE: At this point you probably have the computer, but you may just have some parts, depending on if you have taken the case or motherboard away.
- 3. Third, continue on with the rest of the list.
- Remove the following drives
- Hard drives -- all of them
- DVD drives -- regardless of speed.
- (They must have a standard rectangular faceplate.)
- Recordable or rewritable CD drives -- regardless of speed.
- (They must have a standard rectangular faceplate.)
- Removeable hard drive enclosures. (These look like little drawers).
- Leave all rails and drive sleds in case!
- Remove all memory
- (i.e. DDRs, SDRAM, RAMBUS, SODIMMS, etc.)
- Remove the following cards
- Remove any US Robotics brand ISA modems marked Sportster.
- Remove any PCI cards
- Remove any PCI-e cards
- Remove any AGP cards
- Removed 2GHz and faster processors
- Remove all power supplies
- (both AT and ATX)
- Remove button batteries
- (unless they are soldered onto the motherboard)
- Remove Macintosh batteries (in case you're taking apart a Mac)
- Remove 3.5 inch face plates
- Also, check the whiteboard
- (From time to time there are additional components that we want pulled. This can vary from day to day depending on our need.)
- Place the system on the cart
- (Make sure the front labels are all facing the same way)
- High Speed or Ultra Speed CD RW
- They must have a standard 5.25" rectangular faceplate and not be laptop-sized.
- A drive is only High Speed or Ultra Speed if it literally says "High Speed" or "Ultra Speed" to the right of the "Compact Disc" label.

- DVD Drive
- They must have a standard 5.25" rectangular faceplate and not be laptop-sized.
- Front side card readers, only if it includes a cable
- Gigabit ethernet card (Network Card marked 1000)
- Wireless card
- Power supply with a SATA connector
- Molex to SATA power supply adapter
- Molex to 6-pin power supply adapter
- Motherboard with SATA connector(s)
- A really cool case that some geeky kid would drool over