MacBuild Laptop Build
Building a laptop in MacBuild is a fairly freeform process. Aside from the Laptop Build Checklist, there is no standard method for resolving or repairing laptops with issues. It is not uncommon to swap optical drives and displays in an effort to turn two broken laptops into one working one. We presently only build up a few different models, so it's easy to learn the basics of working with each type.
Laptop Build steps
The idea behind the steps in the Laptop Build process is to provide volunteers with an easy, worry-free way to acquire the skills they need to successfully build Apple laptops. The step sequence is as follows:
- Harvesting
- Evaluation
- QC
- Build
Harvesting
The idea behind harvesting is to get volunteers used to working with Apple laptop hardware by having them disassemble and pull out reusable parts that can be put to use in other Apple laptops. Given the intricate nature of these systems, volunteers can cut their teeth on machines destined for recycling or as-is sale without worrying about damaging machines.
We should only harvest components from laptops when we have a need for individual parts and don't have a backstock, as it's easier to get rid of laptops when they're in one piece.
When there is no need for additional parts, only the HD, RAM, and AirPort card should be removed, and all screws and adapters removed from the HD should be taped to the inside of the HD cavity in the laptop.
When there is a need for additional parts, this harvesting process should be followed:
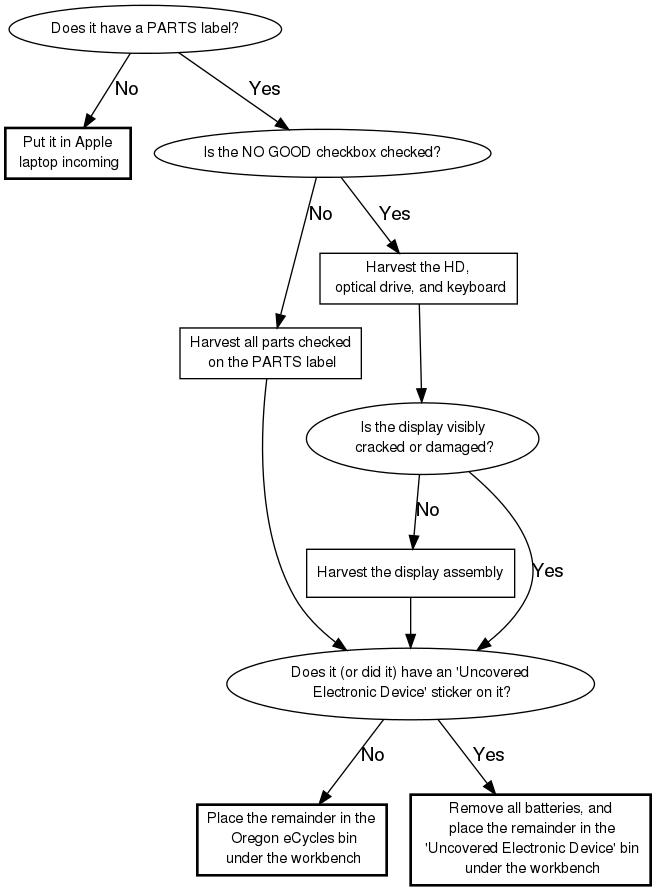
Evaluation
The Evaluation process involves sorting through the incoming stack of Apple laptops and determining whether or not they should be built or have parts pulled from them. The Evaluation flowchart documents the procedure.
QC
Build
What we build
We presently work on translucent white iBook G3s and better, PowerBook G4s and better, and any newer models that come in. The specs we build the most common models to are as follows:
Specs
iBook
Note: 800 MHz iBooks can be built "as-is" |
PowerBook G4
Note: 800 MHz PowerBooks (Aluminum) and all PowerBooks (Titanium)can be built "as-is" |
What we don't build
We don't build anything below the specs listed above.
Wiping HDs in laptops
If you've just received a Mac laptop from TARDIS and need to wipe its drive without opening the laptop up, refer to the Hard drive wiping checklist for wiping instructions.
Tips
- Use a guide - some procedures for removing/exchanging parts are very complicated, so it's always good to have documentation. iFixit's guides for laptops are particularly good, as they provide not only fairly easy steps to follow but also make note of the different types of screws and parts removed in each step, which makes it easy to keep track of.
- Keep track of your screws/part - it is not uncommon to end up removing 50+ screws from a system when swapping a HD in a laptop. You can use either an ice cube tray or a screw guide from iFixit (it should be linked in PDF form to whatever guide you reference) to keep track of what came from where.
- Allot sufficient time for a project - working on Apple laptops can be very time-consuming due to the level of deconstruction one has to go through to swap parts. For example, swapping a hard drive in an iBook can easily take over an hour and a half if you've never done it before (or if you don't do it on a regular basis). If you decide to start a project, make sure you have enough time to at least put the system back together before you leave or develop a good system for keeping track of your progress.
Laptop Build Checklist
| Steps | Notes/Detailed Instructions | Done |
| Install/verify RAM |
Make sure the system has at least 512 MB of RAM. Keep in mind that some systems may have some RAM directly on the logic board. |
|
| Install wireless card (if not present already) |
Ask the instructor |
|
| Attach network cable and power cord | ||
| Clear the PRAM |
While starting up, hold the Option+Apple+p+r keys. Continue holding the keys until the system chimes three times. Release the keys after the third chime is heard. |
|
| Set the system clock in Open Firmware |
While starting up, hold the Option+Apple+o+f keys. Release the keys when the Open Firmware prompt comes up. Run the following command: decimal dev rtc [sec min hour day month year] set-time All values aside from the year should be two-digit numbers in 24-hour format. The year should be a four-digit number. Additionally, the clock needs to be set to UTC, so remember to add 7 hours to the current time if on regular time or 8 hours during Daylight Saving Time. For example, to set the clock to 1:58 PM on September 18th, 2009, the command would be decimal dev rtc 00 58 20 18 09 2009 set-time: |
|
| Reset the NVRAM |
While starting up, hold the Option+Apple+o+f keys. Release the keys when the Open Firmware prompt comes up. Run the following commands in the specified order: reset-nvram set-defaults reset-all The system will reboot after the reset-all command is entered. |
|
| Install Ubuntu |
Please note that any values not explicitly defined here (HTTP proxies and such) should be left blank.
|
|
| Start up Ubuntu |
|
|
| Check for updates |
There are a few ways to do this:
sudo apt-get update
sudo apt-get upgrade
Install all updates if any are found |
|
| Verify hardware in the system |
To verify the hardware in a system, open up a terminal and run: sudo lshw|less This runs a command called lshw (which stands for "list hardware") and sends the output to another command called less, which is a simple reader that allows you to scroll through lshw's output. The items to pay attention to are:
|
|
| Set up the environment and install extra apps |
sudo apt-get install vlc
sudo apt-get install b43-fwcutter
|
|
| Test USB ports |
USB:
If any port doesn't work, the machine should be recycled |
|
| Check if wireless works |
Use Network Manager to see if you can connect to Free Geek's wireless network. If you can, the wireless card works. Remember to write the type of wireless card (e.g. AirPort, AirPort Extreme) on the printed report at the end of the build. |
|
| Test CD data and sound |
Note: Brasero has problems with versions of Ubuntu before Karmic (9.10). For Hardy (8.04LTS) and Jaunty (9.04) you may want to install and use k3b instead: sudo apt-get install k3b |
|
| Generate "printme" report for system |
|
|
| Test battery life |
To start the battery test:
To check the results of the battery test
|
|
| Clean outside cover |
Clean case monitor face, connector panel, keyboard, and trackpad as well |
|
| Attach "printme" report to system | ||
| Bundle system with power supply |
Special Configurations
| Steps | Notes/Detailed Instructions | Done |
| Starting up Ubuntu on a difficult system |
There are startup options set by default in the bootloader, so startup will usually not require any input. However, the following are the default options that you can enter yourself if you don't want to wait for the bootloader to do it automatically.
Some systems will not boot properly due to video issues. These systems will usually hang with a white or black screen after the yaboot boot prompt. For these systems, providing it with Linux video=ofonly at the yaboot boot prompt should fix the problem. If Linux video=ofonly does not work, try using Linux nosplash vga=1 instead. |
|
| If necessary: permanently make the video=ofonly or nosplash vga=1 addition to yaboot |
If you needed to use the video=ofonly option to get the system to start up properly, you can permanently make the addition to yaboot. This is how you do it:
|
|
| If necessary: enable the Ubuntu startup splash screen |
Sometimes a system will show a blank screen during startup instead of the normal Ubuntu splash screen. If this is the case, we can enable the Ubuntu splash screen by doing the following:
|