As-Is Checklist
Note: A version of this guide in LibreOffice format is available on the wiki at this link. That version is strongly recommended for printing.
The laptop you are inspecting has been designated an “AS-IS” laptop. This means it is either slightly below our minimum Spec Level or it has issues that prevent us from being able to offer it with a warranty. In other words, it's not quite good enough to go through the Build process, but might still be of use to someone. We ensure basic functionality, but do not perform the more detailed tests of the Build and Quality Control processes. Thank you for your help!
GOALS
- Learn to use the Laptop Build Room tools to identify hardware components.
- Practice installing and removing hardware.
- Figure out an organizational strategy that works for you when disassembling and reassembling parts.
- Learn POST troubleshooting for laptops.
1. Data Security Check
We are responsible for securely wiping or destroying any data storage device that is donated to Free Geek. This is the most important step in this process. In most cases this means removing hard drives from computers so the data can be wiped, but keep an eye out for other kinds of data storage devices.
Check for Hard Drives
☐ Separate any hard drive caddies and adapters from the hard drive.
☐ Tape them (along with their screws) back inside the hard drive bay. These should stay with the system unless your instructor needs them for parts.
☐ If a hard drive or other storage device is found, it should always be given to your instructor.
☐ Some laptops (especially larger models) may have two hard drive bays, so don't stop looking just because you've found one.
Check for Other Storage Devices
☐ Check the Optical Drive for disks.
- You can manually open the drive by pusing a paper clip into the small quick-release hole in the drive faceplate.
☐ Look inside and around the chassis for other less common storage devices, such as:
- 1.8” or other small-form-factor hard drives
- Mini PCI, mini-PCIe, or mSATA solid state drives (SSDs)
- SD cards or MemorySticks
- SIM cards (usually under the battery)
- Floppy disks
- PCMCIA (PC Card slot) hard drives
- Examples
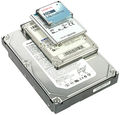
Hard Drives
3.5", 2.5", 1.8" and 1" sizes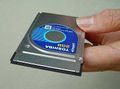
PCMCIA Hard Drive
(PC Card)
SD Memory Card

Mini-PCIe SSD
(Solid State Drive)


2. Physical Evaluation
Take a close look at the laptop you are evaluating. Inform your instructor if you find any of the following:
☐ Floppy Drive
☐ Missing cover plates on the bottom of the laptop
☐ Missing Battery
☐ Missing Optical Drive
☐ Missing keyboard or individual keys
☐ Cracked or broken hinges
☐ Cracks, discoloration, scratches, or marks on any surface
☐ Evidence of liquid spills or oxidation residue
☐ Dirt, dust, cat hair and/or grime above and beyond what can be cleaned
☐ Damaged ports or power jack (look very closely)
☐ Visible screen damage (look for hairline cracks or splatter marks inside the screen)
Stop here and check with your instructor if the laptop has any of these issues; they may have you go through the Recycling process instead.
3. Find an appropriate AC adapter
Requirements
For an AC adapter to power the device correctly, it must:
- Match the input voltage (V) of the laptop exactly.
- Match or exceed the recommended amperage (A).
- Have a plug that fits into the laptop snugly and provides power.
☐ Find the input voltage and amperage listed on the laptop. This may be printed on the back of the laptop, or on the chassis under the battery.
☐ Find an AC adapter that matches the voltage and amperage listed on the laptop. You will be looking in the output section printed on the AC adapter, which should look like this:
INPUT:  100-240V~1.9A
        50/60Hz
OUTPUT: 16V ⎓ 4.5A
Tip
AC adapters are sorted in bins by voltage, amperage, and brand; the bins are color-coded by brand.
4. POST
☐ Try turning the machine on.
- If the system loads the BIOS splash screen, you can proceed to next step.
- If the system does not boot, or appears to have screen or video problems, use sections 1 and 2 only in the Laptop POST Troubleshooting Guide in Appendix (A-1).
- If an AS-IS laptop fails to POST or has video or screen problems, it should be recycled according to the Laptop Recycling Guide. Inform your instructor.
5. Determine specifications
Identify the Hardware
☐ Boot into BIOS.
☐ Find the section with system hardware information.
- Note the CPU type and speed.
- Note the amount of RAM installed.
☐ If no hardware information is available in BIOS, find the section for setting boot options. Set the following boot order:
First:    Optical Drive
Second:   Hard Drive
Third:    Network Device (also called LAN, Onboard NIC, or PXE)
- Disable or ignore other devices.
☐ Save changes and exit BIOS.
☐ Plug in an ethernet cable from the workbench.
☐ The laptop should now automatically boot to the Network Boot Menu.
☐ From the Network Boot Menu, select Laptop Build → CPU Lookup. The CPU Lookup tool should load, detect the CPU hardware, match it to an entry in our database, and output key details about the CPU.
☐ Write down the following details:
- CPU type (e.g. Celeron M, Pentium M, Core Duo, Mobile Sempron, etc.)
- CPU clock speed in GHz (gigahertz)
Note:
Refer to the the Laptop Specs Guide in Appendix (A-6) or check with your instructor if you have difficulty locating information about the hardware.
☐ Add or remove RAM as needed until the laptop has 1-2 GB total. Only use 1 GB sticks or smaller in an AS-IS laptop.
5. As-Is sticker
Grab an As-Is Laptop Label from the clipboard.
☐ Fill out the following fields:
- Processor type
- Processor speed
- Amount of RAM installed
Do not fill out the AC adapter field, the store folks will take care of that one.
6. Remove stickers
Not all stickers have to be removed from the laptop; leave decorative stickers and stickers added by the manufacturer (specs, model number, etc) on the system. Stickers that MUST be removed are listed below.
☐ Remove:
- Microsoft stickers.
- Sticker identifying the previous owner.
- Any offensive sticker, images or words (if you're not sure if it's offensive, it's safer to remove it).
7. Sign-off and final steps
☐ Make sure the system is completely reassembled.
☐ Have your instructor sign off on your work.
- Ask your instructor if the AC adapter should stay with the laptop.
☐ Put the laptop in the outgoing cart.
REFERENCES
- Laptop POST Troubleshooting Guide (A-1)
- Laptop Network Boot (A-2)