Difference between revisions of "Build Troubleshooting Guide"
(Replacing page with '{{:Troubleshooting in Build: POST}} {{:Troubleshooting in Build: BIOS}} {{:Troubleshooting in Build: Hard Drive}} {{:Troubleshooting in Build: Optical Drives}} {{:Troubleshooti...') |
|||
| (One intermediate revision by one other user not shown) | |||
| Line 1: | Line 1: | ||
| + | {{migrated}} | ||
| + | |||
| + | [https://docs.google.com/a/freegeek.org/document/d/1vlb-39un7JiMUpsAe8nNb7n3G-JW7eI1tdFMrT8GCac/edit?usp=sharing Link] | ||
| + | |||
{{:Troubleshooting in Build: POST}} | {{:Troubleshooting in Build: POST}} | ||
{{:Troubleshooting in Build: BIOS}} | {{:Troubleshooting in Build: BIOS}} | ||
Latest revision as of 15:41, 18 April 2014
 This page has been migrated to a document on Free Geek's Google Drive. Information remaining behind may no longer be relevant. MIGRATOR: When you have tagged this page as migrated, (Link to new page immediately below.) |
POST Troubleshooting
Getting a computer to POST (Power On Self Test) can be a challenging experience. Some computers will have the "Did not POST" checkbox marked on the Green Light Sticker on the system, and sometimes, there's no advance warning. Either way, there are some steps you can take in order to troubleshoot a non-POSTing system, and we've got a few suggestions below:
Steps |
Notes and Detailed Instructions |
| Ensure All Hardware Is Connected Properly |
Now, this may seem really rudimentary, but making sure a system is properly put together before trying to POST a computer is definitely worth reviewing. Make sure the following is done on any system:
|
|---|---|
| No POST, and the computer is beeping at me! |
If when you power on the system, and you hear a series of beeps...that COULD mean your system is pleading with you to give it some memory, and the right memory. It could also mean that its trying to tell you something else. First, try and distinctly identify exactly what series of beeps your system is giving you and consult Beep Codes to find the corresponding beep sequence. If it could be pointing to an issue with your memory, look at the DDR slots on the motherboard and start with determining if its DDR1 or DDR2. Then try putting in the slowest speed memory and begin working your way up. Restart the system each time and see if any stick does the trick. If not, try different combinations in various DDR slots to see if there is any life in the system. If all this fails, grab a Build Instructor, fill him/her in on what you've done, and see if they have any suggestions for moving forward. |
| "When I turn on the system... No fans come on... nothing seems to happen! |
This could indicate that you have a bad power supply. Simply go to where the battery testers are and you should see a power supply tester. If you need assistance on how to test the power supply, reach out to a neighbor or build instructor. If the power supply is bad, replace it with something that has a similar harness connection (ie 24/20 pin cable/Dell/ATX/etc.) and wattage. These can be found in Pre-Build on the left just before you walk into the warehouse. If you're power supply passes the test, you may have a bad processor. Notify a Build Instructor and work with him/her in order to get the correct information on what processor the system takes, and the build instructor will look in Free Geeks inventory to see if there is one that is tested and available. To replace a processor, start by removing the fan and heat sink, swapping the old processor for the new one, and placing a small dot of thermal paste (located next to where the power supply tester is) on to the middle of the processor's shield. Put the heat sink and fan back in place and try to power on the system. If it still doesn't power on, or if there is no replacement processor, ask a build instructor if the system should be "Rejected" and they can help you begin that process. |
| I've got fans going, but its still an empty stage (i.e., no POST showing on the monitor) |
If the system seems to light up, the fans are moving, and the system isn't beeping at you, try installing a video card (AGP or PCIe) and take the VGA/DVI cable that was connected to the onboard or current video card and connect it to the new card. Boot up the system on the new card and see if this helps. Remember the Beep Codes mentioned above? Sometimes, they can be used to determine whether or not your motherboard is healthy! If you can't get any video but everything seems to power on fine, try removing all the device connections (IDE, SATA, etc) and taking out all of the RAM. If the manufacturer included Beep Codes into their system, then it should send out its code for Missing/Bad memory. This can eliminate the possibility of a bad a mobo, and reduce the number of steps you might need to take to troubleshoot the system. Remember that this doesn't apply to all systems! However, it can be particular useful when you're working on Dell machines, for example. |
This page has been migrated to a document on Free Geek's Google Drive. Information remaining behind may no longer be relevant. MIGRATOR: When you have tagged this page as migrated, (Link to new page immediately below.) |
BIOS Troubleshooting
Steps |
Notes and Detailed Instructions |
| Finding BIOS |
When you power on a system, the first thing that happens is the system POSTs (Power-On Self Test). When POSTing, the graphics and text should flash onto the monitor and indicate what key(s) are required in order to access the BIOS (Basic Input Output System). While all computers use the keyboard to access and navigate BIOS, each computers may have different keys to get you into BIOS. Fortunately, most systems use the following keys: Del, F1, F2, F8, F10. If the system doesn't display which keys to press to enter into the BIOS, sometimes you can get by running your finger across all 12 F-keys and hitting Del. A list of a common keystrokes can be found here: Entering BIOS Unfortunately, you only have a few seconds to press the key in order to enter BIOS. The POSTing screen will only be up for a few seconds (then the system will load Ubuntu), so don't feel bad about rebooting the system (by pressing "Ctrl+Alt+Del" or holding the power button down for several seconds) a few times in order to access BIOS. If the computer doesn't seem to respond to keystrokes, ensure that the keyboard plug is plugged into the correct port, and try switching PS2/USB keyboards if the system supports both. Otherwise, reach out to a build instructor or perform an Internet search for further troubleshooting. Note: Some systems will not recognize a USB keyboard in BIOS, so please use a PS2 keyboard if available When you can't figure out the keystroke, you can also Google a term like "Gateway BIOS key" to find pages that might tell you (It might help to include the computer's model number, usually found on the front of the case). |
|---|---|
| "There's this Password Protected thing?!" | Occasionally, you'll find that the BIOS is protected with a password. If this happens to be the case, simply power down the system (by pressing "Ctrl+Alt+Del" or holding the power button down for several seconds), remove the power cord from the system, locate the button battery (CMOS) and remove it. Look on the motherboard for a two pin jumper the says something like "Clear CMOS" or "Clear Password" (Often times, it'll abbreviate to something like “Clr Pwd”), and place a jumper onto the pins. If you can't locate these pins, just remove the battery. Get some coffee or go to the bathroom, (i.e. wait for two or so minutes with the battery out and the jumper on its pins). Put the button battery back in the system, plug in the power cord, and power on the system. You should have access to BIOS now.
If this doesn't work, try to "power cycle" the computer with the battery gone and jumper set, and power down the system (if it powered on) before putting the battery back in the computer. On Dells, there is usually a green jumper right around the main power on the motherboard that will be labeled "PSWD". Pull that jumper, and boot it up once, and you will get rid of the password. There is absolutely no way, other than this jumper, to get rid of the password on Dells. |
| Navigating BIOS |
While each system may have different key(s) to access BIOS, BIOS is only accessed through your keyboard (no mouse necessary). There are several different ways that BIOS is organized and navigated. Below are examples of most BIOS environments that Free Geek handles: Tab screen format When you see the BIOS screen you may see horizontal tabs near the top that should resemble the following options: Main | Advanced | Power | Boot You can navigate these tabs by simply using the ← and → on your keyboard. Collapsing/Expanding Menu format Generally, on the Left hand side of the screen, you will see a + sign beside the list of menu items that looks something like this: + System + Onboard Devices If you highlight the item by using your ↓ & ↑ keys and press "Enter", you will see the menu item as a heading for an expanded list of sub-menu items. The + sign will become a - sign, and the menu will look something like this: - System
System Info
Processor Info
Memory Info
Boot Sequence
+ Onboard Devices
General Navigation Most BIOS environments have common keys in order to navigate the program. These are some common commands:
In general, every BIOS is at least a little bit different. The above commands are not universal! However, almost all BIOSes that you will encounter will usually include a key or legend somewhere on the screen that indicates what commands are available. It's important that you spend some time analyzing a BIOS screen to look for hints on how to navigate! |
| "Is there any more info on desired BIOS settings?" |
Yes! Go to Testing Standard Documentation in Advanced Testing and go to the "BIOS Choices" portion on the left hand side of the page. This will not tell you what BIOS settings every computer's BIOS should have, but its a good list of generally desirable settings. |
This page has been migrated to a document on Free Geek's Google Drive. Information remaining behind may no longer be relevant. MIGRATOR: When you have tagged this page as migrated, (Link to new page immediately below.) |
Hard Drive Troubleshooting
First make sure that the hard drive you are placing in the desktop computer is the correct size based on the Build Specs worksheet. Make sure the system has the proper interface for your hard drive (e.g, IDE, SATA), and the cable is properly connected both to the hard drive and the motherboard.
NOTE: if you are connecting a SATA powered hard drive that ALSO has a 4-pin molex power connection, DO NOT plug in both the SATA power cable and the molex 4-pin cable. If there are SATA ports use only SATA connectors.
Symptoms |
Solutions |
| When starting up the computer, the hard drive clicks, chirps, or otherwise makes odd noises. |
Something is not functioning as it should in the hard drive... recycle it and obtain another. |
|---|---|
| A SMART Warning on my desktop is telling me that the "Hard drive failure imminent", or some other indication the hard drive is dying. |
Properly shut down the system (from inside of the operating system), unplug the power cord, remove and replace the hard drive. |
| I can't find the hard drive in BIOS, and/or the computer doesn't load Ubuntu after BIOS screen. |
If Ubuntu still isn't coming up, you might still be able to get into GRUB (GRand Unified Bootloader) and attempt to edit some of the boot parameters for the kernel. This can be intimidating, especially if you aren't yet comfortable with the command-line, so don't feel bad about calling over a Build Instructor to help walk you through the process. |
References
- For general Hard Drive info
- More troubleshooting info
- Or, just Google a description of the issue you're having!
This page has been migrated to a document on Free Geek's Google Drive. Information remaining behind may no longer be relevant. MIGRATOR: When you have tagged this page as migrated, (Link to new page immediately below.) |
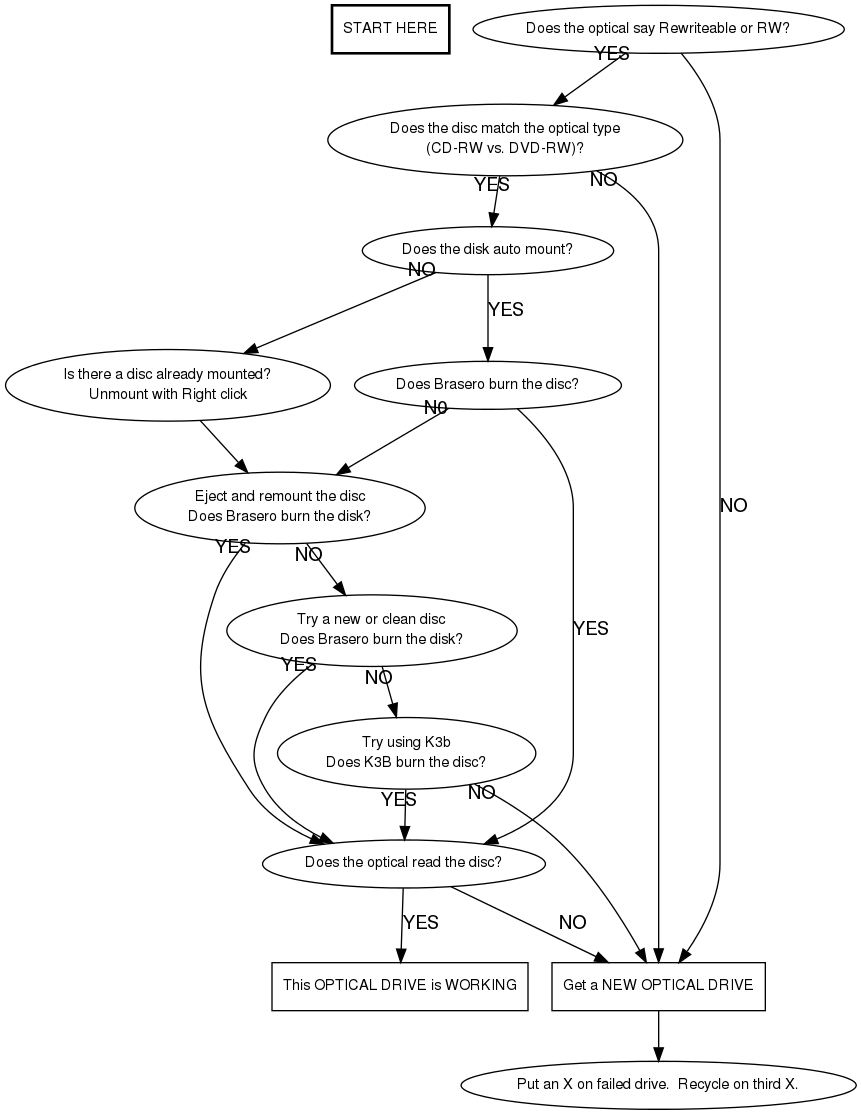
Optical Drive Troubleshooting
Optical Drives, which include DVD-ROM, DVD-RW, CD-ROM, CD-RW, and any combination thereof ("Combo" drives), are placed in all of the Free Geek machines in Build. Accordingly, you may run into some issues with handling each. Use the following table to guide you to solutions for what it is thats problematic:
Symptoms |
Solutions |
| The Optical Drive is not recognized in BIOS |
When you first arrive in BIOS to set the boot sequence, in some systems you should see the optical drive that is in the system once it is properly installed. If this device is NOT recognized, shut down the system and ensure that the IDE/SATA cable is connected properly (with molex/SATA power hooked up). Then look at the jumper settings on the Optical Drive and ensure that the wiring harness is connected accordingly (the end of the ribbon cable is generally the master, the IDE hookup in the middle is usually the slave). If this looks good, try switching out all cables that hook up the optical drive (or a different power plug from the power supply) or using a different IDE and Sata connection on the motherboard. If this still doesn't work, simply try swapping out the optical drive altogether. In case of further puzzlement, consult a Build Instructor. |
|---|---|
| The Optical Drive doesn't seem to respond at all |
This generally means the drive does not have access to power. Open the system and see if a molex or SATA connector is connected to the drive. If the connection is made, and you're still experiencing the same problem, try switching out the Optical Drive and/or the power cables that connect the Optical Drive to the power supply. This should correct the issue, but if not, grab a Build instructor for assistance |
| The drive opens and takes the disc, but it doesn't work otherwise |
If you find the CD/DVD player isn't working beyond simply opening and closing, look into the system and make sure that the IDE/SATA connection to the motherboard is good. If there are other ports then try plugging the connections into other IDE/SATA ports and see if you have any luck. Look at the jumper setting, and ensure the "slave"/"master" is set appropriately for the jumpers and the ribbon cables. If this is set correctly, try a different CD/DVD optical drive. If the same outcome results, try replacing the ribbon cables. After this measure, locate a Build Instructor in the build room and ask them for further assistance with the system. |
| The "Live" CD doesn't boot when I restart the system |
This probably has to do with the BIOS settings you have for the "Boot Sequence". Ensure that the Boot Sequence is set up properly in BIOS (ie Optical Drive is the 1st boot order. Then try replacing the "live" cd you put in the optical drive with another and reboot. If this doesn't work, seek out a Build Instructor for assistance. |
| CD/DVD Image is not released when eject button on drive is used |
Occasionally udev isn't catching the hardware events when an optical drive is ejected physically ejected. The simplest way to circumvent this is to do as much as you can from the software.
Another tool in your arsenal is Ubuntu's Disk Utility, found under System >> Administration >> Disk Utility. From here you mount, unmount, eject, and otherwise check on the status of your optical drive. Link to launchpad bug report (Confirmed as of 17 April 2011! Woo! :P) |
This page has been migrated to a document on Free Geek's Google Drive. Information remaining behind may no longer be relevant. MIGRATOR: When you have tagged this page as migrated, (Link to new page immediately below.) |
Audio Troubleshooting
You're going along your build checklist just fine. You thought it was odd that no Ubuntu drums were audible when you booted up, but you would be reaching the sound test portion of the build later on, so you didn't worry. Only, now IS later on, and you have no sound. Here's what to do:
Steps |
Notes and Detailed Instructions |
| As always, recheck your connections |
1) Is the speaker wire connected to the "outgoing" speaker port in the system (usually color-coded green)? If yes... 2) Are the speakers plugged in to a power outlet and "on" at a reasonable sound level? If yes... 3) Click the sound icon on the desktop's top panel. Is it unmuted and set to a reasonable level? If yes... 4) Plug the speaker cable into the front panel's headphone icon and see if any sound comes from the speakers. Sometimes you'll be able to play audio CDs and Files, but no sounds come through in basic check. If so... 5) Disable the plug-and-play option in BIOS if it exists. If that still doesn't do the trick... 6) If you're using a sound card, you may need to disable an on-board sound option in BIOS if it exists. |
|---|---|
| "There is no sound on the 'Sound Check' step of the 'Basic Check' Checklist" |
First thing you want to do is click on the small speaker icon located at the top right portion of your monitor and make certain nothing is muted, and the "Output Volume" is set to a moderate level. If this still doesn't work, open a terminal and type in |
| If there is no sound, and you have no front speaker plug, try this... |
You will need to look at the Front Panel Motherboard Pin-outs and go to the "Front Panel Audio" section and find these pins in your own system. Once you locate them, you will want to jumper the pins labeled 6 and 5, as well as 10 and 9. This will enable the rear audio plug to work. |
| Both Right and Left come from the same one speaker in the "Sound Check" step of the "Basic Check" Checklist |
Oftentimes if the front headphone plug isn't hooked up properly on the motherboard, it will wreak havoc on the on-board sound card. Check for any missing plugs coming from the front panel. There should be a plastic casing around the tip of the plugs that will tell you what it is for. Check the motherboard for "AUDIO" written next to corresponding pins. Use the Front Panel Motherboard Pin-outs to guide you on how to do the hookup. If this still doesn't work, simply shut down the system, replace or put in a new sound card, and plug the speaker chord into that sound card. |
| "I have sound, but my CD-ROM/DVD Player isn't working" |
See the Optical Drives guide for further troubleshooting tips. If these measures don't yield results, locate a staff person or Build Instructor in the build room and ask them for further assistance with the system. |
| Audio displays a mute icon that cannot be changed. |
This means Ubuntu couldn't find the sound card. Most likely the audio is disabled in the BIOS. Restart the computer, enter the BIOS, and see if you can find something that looks promising. If this doesn't fix it, it's possible that the computer needs a new sound card. |
This page has been migrated to a document on Free Geek's Google Drive. Information remaining behind may no longer be relevant. MIGRATOR: When you have tagged this page as migrated, (Link to new page immediately below.) |
Video Troubleshooting
Video issues can come up for a number of reasons, so below, we'll try and identify some of the main ones for you to try and troubleshoot...
Steps |
Notes and Detailed Instructions |
| The computer seems to be up and running, but there is no POST or Boot! |
If the system fans are running and the lights are on, first test the power supply (some times a defunct power supply will give enough power to make it seem like the system is operating properly, but not provide enough power to properly boot the system). If the power supply checks out, try swapping in different speeds and sizes of RAM. Start by loading the RAM into the first bank (usually the closest to the processor), and then into the subsequent slots. Occasionally a DIMM slot on the motherboard can be bad, preventing the system from successfully POSTing. Try installing a couple of different video cards into the video interface (AGP or PCIe) and connecting it to the monitor. If you need help finding the right video card, simply ask a build instructor for help. And finally, try hooking up to a different monitor, or use different cables for the hook-up. If this still doesn't work, simply reach out to a Build Instructor and bring them up to speed on where you are with the issue. |
|---|---|
| For strange video issues in general... |
If you're experiencing paranormal-like activity on your video, try updating the systems drivers for the hardware the system has. Do this by going to System >> Administration >> Hardware Drivers. The system will then search for any necessary drivers for your system. Once this is complete, simply restart the system and see if the issue is resolved. Alternatively, check to see if the 82845G chipset is present on your system, either by running |
| "My screen is a strange tint/color" |
This usually occurs when a connection is bad. Check all the connections from the system to the monitor and ensure that the plugs are hooked up correctly. If this has been checked, reach out to a Build instructor; you may want to replace your video card, or swap out the VGA cable. |
| "When Ubuntu starts up and I login, the power button disappears" |
Oftentimes this can be fixed by rebooting. Another way of resolving the issue is to right-click the top panel and go to Add to panel. Either type Indicator Applet Session or scroll down and select it from the list and click Add. Once you see the power icon, you will need to unlock each of the items to the right of the power icon by right-clicking the icon and unchecking Lock to Panel. Then you can go about moving the power icon to the right side of the screen. Make sure to lock each icon again when you're finished. |
This page has been migrated to a document on Free Geek's Google Drive. Information remaining behind may no longer be relevant. MIGRATOR: When you have tagged this page as migrated, (Link to new page immediately below.) |
Miscellaneous Troubleshooting
Steps |
Notes and Detailed Instructions |
| When there is no Internet connection while updating software (i.e. no network connection) |
First, double check that your ethernet cable is securely plugged into both your system and the wall jack. Next, right-click the Network icon on the top panel, next to the time and date, and ensure that Networking is listed as Enabled. Then left-click the Network icon and see if an option appears under Wired Connections (it should say something like |
|---|---|
| "I have optical drive issues" |
In most cases, if an optical drive isn't being recognized in a system, or isn't being responsive in some way, the most expedient thing to do is shut down the system, yank out the optical drive, and replace it. If it's a rewritable drive (CD/DVD-RW), mark a small X in Sharpie on the drive and put it back into its appopriate crate. If it's just a readable drive (CD/DVD-ROM), go ahead and put it in the recycle bin underneath the workbench. If you are still having issues after having replaced the optical drive, then grab a build instructor to look over your connections and help you further troubleshoot the problem, or look through the Optical Drive troubleshooting page on the wiki. |
| "The system will not complete a reboot. It just hangs on the Ubuntu screen. Shutdown works fine." |
GRUB is the boot loader package responsible for starting up and shutting down your computer. Try editing the following GRUB configuration file and see if it makes a difference. HINT: if you hit the Esc key while your computer is booting up or shutting down during the Ubuntu splash screen, you may get more text information about what your computer is doing. If you're not comfortable working in a terminal, grab some help on this one. In a terminal, type: sudo gedit /etc/default/grub Find the line GRUB_CMDLINE_LINUX_DEFAULT="splash quiet" and edit it to read: GRUB_CMDLINE_LINUX_DEFAULT="reboot=bios splash quiet" Save and exit. In a terminal, type: sudo update-grub Shut down the computer, power on again and try rebooting. Is fixed, no? |
| "In BasicCheck, I see less RAM reported than I have installed." |
If you have are working with the Ubuntu OS, 32-bit extension, and your system has more than 4G of RAM installed, the basiccheck script will not recognise the additional RAM beyond 4G. Open a terminal and type the following command: "sudo apt-get install linux-generic-pae linux-headers-generic-pae" and press enter (enter default password to confirm.) Reboot the system, run basiccheck again and the memory check should recognise the full amount of RAM. |
| "The XUbuntu splash screen does not show because of a Nvidia chipset" |
If the computer just displays a blank screen and then the Display manager you can try the following to add a boot progress splash screen. STEP 1: apt-get install v86d hwinfo hwinfo --framebuffer STEP 2: edit /etc/default/grub and after the GRUB_GFXMODE= line add another line containing: GRUB_GFXPAYLOAD_LINUX=1280x1024x24 or GRUB_GFXPAYLOAD_LINUX=1024x768 or something that matches a mode provided by hwinfo.
echo FRAMEBUFFER=y > /etc/initramfs-tools/conf.d/splash
  update-initramfs -u
  update-grub2
reboot
You might also need to put something like the following line: uvesafb mode_option=1280x1024-32@60 mtrr=3 scroll=ywrap into /etc/initramfs-tools/modules and run update-initramfs -u again. http://techhamlet.com/2012/11/ubuntu-fix-ugly-splash-screen-after-installing-nvidia/ |