CPUs are the "brains of the computer system. This is where all of the information and instructions are gathered from, processed, and redistributed to the other components of the system. The following will be a description of a VERY RUDIMENTARY TEST to determine the viability of a CPU to function in a system. In actuality, there are a multitude of details and issues involved that would take far more space to cover and time to perform than is practical in these circumstances. This is a very basic overview of the essentials that are necessary to get through the process. For more information please consult other experienced volunteers, instructors, or research such sources as Wikipedia or forums on Google.
| STEPS
|
NOTES AND DETAILED INSTRUCTIONS
|
| Collect |
CPUs will accumulate in two areas:
- Advanced Testing Incoming Rack - there is a covered, foam lined bin on the rack labeled "Incoming CPUs".All CPUs extracted from systems by System Evaluation or other departments and CPUs that have come to the store as customer returns are supposed to be brought and deposited in this container. CPUs extracted in Advanced Testing during Motherboard triage should be deposited here as well.
- Receiving - there is a box on the top shelf of their rack, next to 'Unsorted Memory' labeled 'Processors'. In theory, all processors with pins are supposed to be brought immediately to us by Receiving, however, exceptions do occur. Other types of CPUs may gather there as well.
- At least once a day (preferably twice to three times) the contents of these collection points should be gathered and evaluated.
|
| Pre-test Evaluation and Storage |
CPUs will not be tested on a daily basis. Some socket types will accumulate more rapidly than others.
- Intel socket 478 processors will accumulate the fastest and will probably need to be tested at least once a week.
- Intel socket 775 processors will probably need to be tested every two to three weeks.
- AMD socket 754, 939, and AM2 processors will probably need to be tested once a month.
- AMD socket AM2+ and AM3 processors are still extremely rare and can be tested whenever it is convenient (we currently do not have an AM3 test board).
Pending sufficient accumulation to warrant actual testing, the collected CPUs will be evaluated and stored as described below:
Evaluate the collected CPUs as follows:
1. Socket Type
- Intel 478 and 775 - Retain in Pre-test Storage.
- AMD 754, 939, AM2/AM2+/AM3, Phenom - Retain in Pre-test Storage.
- Intel other than 478 or 775 (e.g.. 370, slot processors, etc.) - Automatic Recycle.
- AMD other than 754, 939, AM2/AM2+/AM3 (e.g., 462 [socket A], socket 5, socket 6, etc.) - Automatic Recycle.
- Non-Intel or AMD (e.g., Cryix, VIA, etc.) - Automatic Recycle.
- Non-desktop system processors (e.g., laptops, servers [Intel Xeon, AMD 940, etc.], etc.) - Automatic Recycle.
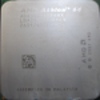
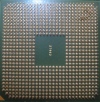
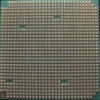
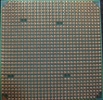
- To differentiate among the AMD socket 754, 939, and AM2 see below:
 |
 |
 |
|
| Top of all 3 |
754 pins |
939 pins |
AM2 pins
|
2. Obvious Physical Damage
- Primarily this will be bent pins or pins broken off.
- This will only occur with PGA (Pin Grid Array) processors; socket 478s, 754s, 939s, AM2s, etc.
- This is not necessarily a sign to recycle the processor. Many can be rescued. A determination will be made at the actual time of testing - Retain in Pre-test Storage.
- If any pins are broken off - Automatic Recycle.
- This step of evaluation is primarily to determine whether there is an inordinate amount of damage occurring prior to their arrival in Advanced Testing so that the sources can be advised and corrective steps taken.
- Very rarely an LGA (Land Grid Array) processor (currently this applies only to Intel socket 775) may have a deep scratch across one or more of the gold contacts on the face. This is the equivalent of a broken pin on a PGA processor and cannot be repaired - Automatic Recycle.
- Very, very rarely ... there will be signs of scorching; indicating that a major thermal event has taken place sometime during the life of the processor. Again, this is not necessarily a sure indicator that the processor should be recycled unless the damage is obviously severe (melted metal, etc.). This is a judgment call that experience will teach - Retain in Pre-test Storage.
Put the sorted processors into Pre-test Storage in TARDIS or into the "Bad CPU" bin for recycling.
- Those processors going into TARDIS are kept in basically the same place as the tested processors; on the self, in trays or other containers, in places designated by socket type.
|
| Preparation, Evaluation, & Testing |
When the is accumulation of untested processors in Pre-test Storage is sufficient to justify testing, bring the trays out of TARDIS for preparation, evaluation, and testing:
1. Prepare - Prepare the CPUs as follows:
- a. Place the Pre-test Storage tray on a work surface.
- b. Place a drop of solvent on the die (solid, metallic, upper surface) of each processor and smear until coated evenly.
- c. Leave for a minute or so to allow the solvent to work.
- d. Use a rag to clean thoroughly clean away all of the old thermal paste and other material from the die.
- e. Replace the processor in the tray and repeat until all of the processors have been cleaned.
2. Evaluate - Evaluate the prepared processors as follows:
- a. Processor type
- Pentium 4 with a Frequency (see notes) greater than or equal to 2.4 GHz - Retain for Testing.
- Pentium 4 with a Frequency(see notes) less than 2.4 GHz - Automatic Recycle.
- Celeron or Celeron D - Automatic Recycle.
- All 'Confidentials' or blank dies - Automatic Recycle.
- Pentium 4 with a Frequency* greater than or equal to 2.4 GHz - Retain for Testing.
- Pentium 4 with a Frequency* less than 2.4 GHz - Automatic Recycle.
- Celeron and Celeron D - Retain for Testing.
- Pentium D - Retain for Testing.
- Core 2 Duo - Retain for Testing.
- AMD sockets 754, 939, & AM2/AM2+/AM3 -
- Athlon 64 & Athlon 64X2 - Retain for Testing.
- Opteron - Retain for Testing.
- Sempron - Automatic Recycle.
- b. Pin Damage:
- There will be a great deal of subjective "judgment call" associated with this step. The actual process of repairing damage requires a great deal of skill, patience, and delicacy. This is one of those areas wherein you will need to learn by doing. Don't be afraid to take chances ... "if the patient dies, the patient dies". Ask instructors or experienced volunteers for help and advice. The tools you will need are in the box labeled "The Little Things That Count". Below are guidelines for deciding what to recycle and what may be worth attempting to save. Good Luck!
- Pentium 4 w/ FSB (Front Side Bus) speed of 400 MHz. - More than one or two bent pins or any broken pins - Automatic Recycle. Otherwise, attempt to repair.
- Pentium 4 w/ FSB speed of 533 or 800 Mhz. - More than three or four bent pins, any crimped pins, or any broken pins - Automatic Recycle. Otherwise, attempt to repair.
- AMD socket 754, 939, & AM2/AM2+/AM3 -
- Many of these, particularly the Athlon 64X2s (which are dual core) can be very high end and therefore valuable. Also, the pins on these processors are somewhat coarser than those on the Intel socket 478s and so are a bit more sturdy and forgiving when it comes to manipulating them. Unless the damage is really severe; many bent pins, badly crimped pins, or broken pins, go ahead and give it a shot. Many a seemingly hopeless case has been brought back from the dead.
3. Test - Test the evaluated CPUs as follows:
- a. Set up the Test Station
- The components for the station are stored in the bottom three drawers of the grey cabinet, next to the HD test racks, and consist of:
- A motherboard platform identical to those located at the Motherboard Testing, Video Card Testing, and Network Device and External HD Testing stations.
- A power supply
- A keyboard
- A small, green, plastic box labeled "The Little Things That Count", containing:
- A power switch
- A tube of silicon based thermal paste
- Two small square foam pads
- A small, flat-head screwdriver (used for straightening pins)
- A pushpin (used for straightening pins)
- A plastic card (used for straightening pins)
- The motherboards for testing the CPUs labeled with the appropriate socket type.
- The sorting table for RAM Testing is ideal for setting up the CPU Test Station. It has an LCD monitor and power cord available for the purpose.
- Assemble the platform with the appropriate motherboard and connect the components (be sure to plug in the power supply).
- b. Unlatch or otherwise remove the Heat sink/fan assembly from the socket and apply a very small amount of thermal paste to the area that will cover the die on the processor. Smear the paste around to create a thin film. You will need to repeat this from time to time during the testing process.
- c. On the socket 775 board, it will be necessary to remove the Socket Protector.
- d. Select a processor from the Pre-test Storage tray and insert it into the socket.
- There will be various visual cues to enable proper alignment that are specific to each manufacturer and socket type.
-
- Intel socket 775s (a LGA socket) will have two notches on the processor platform that will align with two tabs on the socket frame.
- Intel socket 478s and all of the AMDs (PGA sockets) will have small gold triangles on the processor platforms that will align with similar triangle markings on the socket frame.
- The Intel socket 478s and the AMDs are ZIF (Zero Insertion Force) sockets which means that it should take little or no pressure to get the processor to drop completely into place.
- If any resistance is encountered, a further inspection of the processor should be made to determine whether or not there are any bent pins. Correct as necessary (or possible).
- e. With your left hand, place the Heat sink/fan assembly onto the processor and align it so that it sits evenly. Apply gentle but firm pressure and maintain until the test is complete.
- f. With your right hand, turn on the power switch (make sure the power switch on the power supply is turned on as well).
- g. Observe the LCD monitor.
- If the small green LED stops blinking and remains steady, this is a good sign. The monitor should soon display a logo screen or a POST screen (if necessary take the necessary steps to get to the POST screen). These screens will vary from manufacturer to manufacturer. This is what you are looking for. This is the indication that the CPU is receiving, processing, and retransmitting data to and from the system. The CPU has passed.
- If the LED continues to blink, the LCD monitor remains blank, and it is difficult or impossible to shut off the system with the onboard power switch, the CPU has almost certainly failed. Be cautious, however, particularly at the beginning of a test run. If you are getting an unusual number of apparent failures (even in the middle of a test run):
-
- Check all of your connections, particularly the 'plus four' from the power supply, and the VGA cable.
- Check the RAM. Try a different stick of known good RAM.
- Retest a known good processor.
- Retest the suspect processor. If the result is still negative, you can have confidence in the result and the CPU has failed.
- Once you have established confidence in your results, you may proceed without repeating the above steps until another suspected anomaly occurs.
- h. When success or failure have been determined, turn off the power to the motherboard, either at the onboard switch or the power supply, and remove the CPU from the socket.
- i. If the test was successful, label, as shown below, and place in tray to be sorted and either stored or passed along to Online Sales.
Insert images of labeled processors
- j. If the test was a failure, place the CPU in the "Bad CPUs" bin for recycling.
- k. Repeat these steps until the test run is complete.
- l. Dismantle the test station and return the components to the storage cabinet.
|
| Sorting & Routing |
After the testing process has been completed, sort and route the tested CPUs as follows:
1. Sort the CPUs by Frequency/L2 Cache/FSB -.
- During the testing and labeling process you should have established the above statistics for each processor and marked them accordingly.
- Sort first by processor type (e.g., P4, Pentium D, Athlon 64, Opteron, etc.).
2. Route the sorted CPUs as follows -
- Check the supply in the Motherboard Testing kit. Fill in any obvious gaps. Consult with the Motherboard Testing volunteers or instructor regarding this.
- Co-mingle the tested CPUs with the processors already in storage -
- Follow the established pattern as closely as possible.
- Shift processors around as needed.
- Space is definitely at a premium with some processor and socket types, so use your judgment and imagination.
- Pass as many tested CPUs on to Online Sales as possible -
- Intel socket 478 - P4s - any Frequency/L2 Cache/FSB - pass on in lots of 10.
- Intel Socket 775 - P4s, Celeron, or Celeron D - any Frequency/L2 Cache/FSB - pass on in lots of 10.
- Intel socket 775 - Pentium D, or Core 2 Duo - pass on all.
- AMD socket 939 and AM2 - Athlon 64X2 - pass on all.
- AMD any socket - Sempron or Opteron - pass on all.
- Retain the remainder in TARDIS for use by Build, sales in the Thrift Store, and accumulation toward Online Sales.
CONGRATULATIONS ... YOU'RE DONE!!! ... NOW GO WASH YOUR HANDS!!!
File:Example.jpg
|
Notes:
Frequency, L2 Cache, and FSB are categories used to determine the capabilities of a processor.
- Frequency refers to the rate at which the CPU processes data e.g., 3.0 GHz. (Gigahertz).
- L2 Cache refers to the capacity of a designated portion of the CPU architecture to store short term instructions.
- FSB (Front Side Bus) refers to the rate at which the CPU transfers data between itself and the 'North bridge'.
- These terms are relevant here only for evaluation, labeling, sorting, and routing purposes. They each have very involved technical definitions and meanings that are far too involved to go into here. For more information, please ask and instructor, an experienced volunteer, or consult online sources such as Wikipedia.
- The specific information in these categories pertaining to an individual CPU can be obtained as follows:
- Intel socket 478s and 775s - The information is engraved on the die of the processor directly below the processor type. It will be listed in the form Frequency/L2 Cache/FSB.
- AMD socket 754s, 939s, AM2s, etc. - The information will be located in "The Book of CPUs", and found by referencing model number and part number. Ask an instructor or experienced volunteer to assist you.
|


