Difference between revisions of "Laptop Evaluation Checklist"
AshleySueMas (talk | contribs) |
|||
| (35 intermediate revisions by 6 users not shown) | |||
| Line 1: | Line 1: | ||
| − | + | {{Migrated}} | |
| + | [https://drive.google.com/a/freegeek.org/?tab=mo#folders/0B9fabqk-bNi7cER2RW1zc3REMG8 Link] | ||
| − | + | __NOTOC__ | |
| − | + | <blockquote> | |
| − | + | '''Note:''' A version of this guide in LibreOffice format is available on the wiki at '''[[Media:Laptop_Evaluation_Checklist.odt|this link]]'''. That version is strongly recommended for printing. | |
| − | + | </blockquote> | |
| − | + | The laptop you are inspecting has not yet been evaluated. The goal of the evaluation process it identify the hardware in the laptop, find any major issues or problems it may have, and determine whether we will recycle it or refurbish it. Take care to make note of anything about the laptop that may be important to the Build or Quality Control processes. Remember to take your time and ask your instructor if you have any questions. Thank you for your help! | |
| − | + | ===1. Data Security Check=== | |
| − | + | {{Template:Laptop_Data_Security}} | |
| − | + | ---- | |
| − | + | ===2. Physical Evaluation=== | |
| − | + | {{Template:Laptop_Physical_Inspection}} | |
| − | + | <br> | |
| − | + | Stop here and check with your instructor if the laptop has any of these issues; they may have you go through the [[Laptop Recycling|Recycling]] or [[As-Is Checklist|AS-IS]] process instead. <br> | |
| − | + | ---- | |
| − | |- | + | ===3. Find an appropriate AC adapter=== |
| − | | | + | {{Template:AC_Adapter}} |
| − | + | ---- | |
| − | + | ===4. POST=== | |
| − | + | {{Template:Laptop_POST}} | |
| − | + | ---- | |
| − | + | ===5. Access the Network Boot Menu=== | |
| − | + | {{Template:Laptop_Network_Boot}} | |
| − | + | ---- | |
| − | + | ===6. Determine System Spec Level=== | |
| − | + | '''Background Information''' <br> | |
| − | + | Different laptops have varied capabilities based on their hardware specifications, or “specs”. We categorize laptops into different “Spec Levels” based on the type of CPU they have, and use this to determine the laptop's suitability for reuse. If a laptop has enough performance and the featurese required for the software we use, we will try to refurbish it through the Build process. If a laptop is not capable of providing a decent user experience, it may be considered below spec and sent through the AS-IS or Recycling process instead. <br> | |
| − | |||
| − | |||
| − | |||
| − | |||
| − | |||
| − | |||
| − | |||
| − | |||
| − | |||
| − | |||
| − | |||
| − | |||
| − | |||
| + | '''Identify the CPU''' <br> | ||
| + | In order to determine the Spec Level of a laptop, we must first identify what type of CPU it has. <br> | ||
| + | ☐ From the Network Boot Menu, select Laptop Build → CPU Lookup. The CPU Lookup tool should load, detect the CPU hardware, match it to an entry in our database, and output key details about the CPU. <br> | ||
| + | ☐ Write down the following details: <br> | ||
| + | *CPU manufacturer (e.g. Intel or AMD) <br> | ||
| + | *CPU brand (e.g. Pentium M, Core 2 Duo, Turion X2, Phenom II, etc.) <br> | ||
| + | *CPU model (e.g. T5600, i5-560M, TL-56, U9300, P340, etc.) <br> | ||
| + | *CPU clock speed in GHz (gigahertz) <br> | ||
| + | *number of CPU cores <br> | ||
| + | *Spec Level <br> | ||
| + | ☐ If the Spec Level reads 'AS-IS', check with your instructor. They may have you switch to the AS-IS Checklist or Recycling Checklist instead of continuing with Evaluation. <br> | ||
| + | <br> | ||
| + | '''Troubleshooting Tips:''' | ||
| + | *If Network Boot fails, see the [[Laptop_Network_Boot_Guide|Laptop Network Boot Guide]] in Appendix (A-2). | ||
| + | *If the CPU Lookup tool fails to load or can't find a match in our database, check with your instructor or refer to the [[Laptop Specs Guide]] in '''Appendix (A-6)'''. | ||
| + | <br> | ||
| + | ---- | ||
| + | ===7. Install Hardware=== | ||
| + | With the Spec Level determined, we can now decide which hardware best matches the capabilities of the processor. <br> | ||
| + | ☐ Find the column on the Laptop Specs whiteboard corresponding to the laptop's Spec Level. <br> | ||
| + | ☐ Read out how much RAM to install based on the Spec Level. <br> | ||
| + | ☐ Boot into BIOS and verify that the system recognizes all of the RAM you just installed. <br> | ||
| + | *BIOS may report slightly less RAM than the total amount installed. It should not be more than a couple hundred megabytes. The 'missing' RAM is being reserved by the system. <br> | ||
| + | ☐ Determine what type of hard drive you need (SATA or IDE). <br> | ||
| + | ☐ Get a hard drive from your instructor based on the size listed in the Spec Level's column and install it. They may have you skip this step in some cases. <br> | ||
| + | ☐ Make sure an optical drive is installed if the laptop has a space for one. Check the optical drive faceplate to check what type of drive it is: <br> | ||
| + | *DVD-RW drives are preferred; DVD-ROM/CD-RW drives are acceptable | ||
| + | *Swap CD-ROM only drives for a DVD-ROM/CD-RW or DVD-RW drive if possible. <br> | ||
| + | <br> | ||
| + | <blockquote> | ||
| + | '''Notes:''' <br> | ||
| + | *Some Spec Levels list a range of acceptable hard drive sizes or RAM amounts. This gives us more flexibility to build laptops based on their strengths or the availability of parts. Ask your instructor if you are unsure of what to install. | ||
| + | *There are some optical drives available in the Laptop build room sorted by brand. Ask your instructor if you are not able to find the drive you need. | ||
| + | </blockquote> | ||
| + | <br> | ||
| + | ---- | ||
| + | ===8. Keeper label=== | ||
| + | '''Background Information''' <br> | ||
| + | The Keeper label is used to: <br> | ||
| + | *Keep track of basic hardware information. <br> | ||
| + | *Track the laptop through RAM testing, battery testing, and the Build and QC processes. <br> | ||
| + | *Transfer notes about the laptops from builder to builder, and to the instructors. <br> | ||
| + | <br> | ||
| + | Get a Keeper Label and use the information gathered in the previous steps to fill in these fields: <br> | ||
| + | ☐ Laptop make and model <br> | ||
| + | ☐ CPU brand, model, number of cores, and clock speed <br> | ||
| + | ☐ RAM size and type <br> | ||
| + | ☐ Hard Drive interface type and size (if installed) <br> | ||
| + | ☐ Optical Drive type <br> | ||
| + | <br> | ||
| + | ☐ Once the Keeper Label is filled out, use masking tape down the left and right sides to attach it to the lid of the laptop.<br> | ||
| + | *Be careful not to cover up any "FG-PDX" or "Uncovered Electronic Device" stickers. | ||
| + | <br> | ||
| + | ---- | ||
| − | [[Category: Laptops]] | + | ===8. Begin Memtest86+=== |
| + | ☐ Put the laptop on the testing shelf and plug it into a power strip. <br> | ||
| + | ☐ Attach one of the available ethernet cables and boot to the '''Network Boot Menu'''. <br> | ||
| + | ☐ From the '''Network Boot Menu''', select '''Laptop Build → Memtest86+'''. After a few moments, you should now see memtest running. If so, check the '''Start''' box on the line for memtest on the Keeper Label. <br> | ||
| + | <br> | ||
| + | <blockquote> | ||
| + | '''Congratulations!''' Evaluation is now complete! Check with your instructor for your next task. | ||
| + | </blockquote> | ||
| + | ---- | ||
| + | [[Category:Laptops]] | ||
Latest revision as of 15:56, 21 May 2014
 This page has been migrated to a document on Free Geek's Google Drive. Information remaining behind may no longer be relevant. MIGRATOR: When you have tagged this page as migrated, (Link to new page immediately below.) |
Note: A version of this guide in LibreOffice format is available on the wiki at this link. That version is strongly recommended for printing.
The laptop you are inspecting has not yet been evaluated. The goal of the evaluation process it identify the hardware in the laptop, find any major issues or problems it may have, and determine whether we will recycle it or refurbish it. Take care to make note of anything about the laptop that may be important to the Build or Quality Control processes. Remember to take your time and ask your instructor if you have any questions. Thank you for your help!
1. Data Security Check
We are responsible for securely wiping or destroying any data storage device that is donated to Free Geek. This is the most important step in this process. In most cases this means removing hard drives from computers so the data can be wiped, but keep an eye out for other kinds of data storage devices.
Check for Hard Drives
☐ Separate any hard drive caddies and adapters from the hard drive.
☐ Tape them (along with their screws) back inside the hard drive bay. These should stay with the system unless your instructor needs them for parts.
☐ If a hard drive or other storage device is found, it should always be given to your instructor.
☐ Some laptops (especially larger models) may have two hard drive bays, so don't stop looking just because you've found one.
Check for Other Storage Devices
☐ Check the Optical Drive for disks.
- You can manually open the drive by pusing a paper clip into the small quick-release hole in the drive faceplate.
☐ Look inside and around the chassis for other less common storage devices, such as:
- 1.8” or other small-form-factor hard drives
- Mini PCI, mini-PCIe, or mSATA solid state drives (SSDs)
- SD cards or MemorySticks
- SIM cards (usually under the battery)
- Floppy disks
- PCMCIA (PC Card slot) hard drives
- Examples
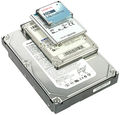
Hard Drives
3.5", 2.5", 1.8" and 1" sizes
PCMCIA Hard Drive
(PC Card)
SD Memory Card

Mini-PCIe SSD
(Solid State Drive)


2. Physical Evaluation
Take a close look at the laptop you are evaluating. Inform your instructor if you find any of the following:
☐ Floppy Drive
☐ Missing cover plates on the bottom of the laptop
☐ Missing Battery
☐ Missing Optical Drive
☐ Missing keyboard or individual keys
☐ Cracked or broken hinges
☐ Cracks, discoloration, scratches, or marks on any surface
☐ Evidence of liquid spills or oxidation residue
☐ Dirt, dust, cat hair and/or grime above and beyond what can be cleaned
☐ Damaged ports or power jack (look very closely)
☐ Visible screen damage (look for hairline cracks or splatter marks inside the screen)
Stop here and check with your instructor if the laptop has any of these issues; they may have you go through the Recycling or AS-IS process instead.
3. Find an appropriate AC adapter
Requirements
For an AC adapter to power the device correctly, it must:
- Match the input voltage (V) of the laptop exactly.
- Match or exceed the recommended amperage (A).
- Have a plug that fits into the laptop snugly and provides power.
☐ Find the input voltage and amperage listed on the laptop. This may be printed on the back of the laptop, or on the chassis under the battery.
☐ Find an AC adapter that matches the voltage and amperage listed on the laptop. You will be looking in the output section printed on the AC adapter, which should look like this:
INPUT:  100-240V~1.9A
        50/60Hz
OUTPUT: 16V ⎓ 4.5A
Tip
AC adapters are sorted in bins by voltage, amperage, and brand; the bins are color-coded by brand.
4. POST
☐ Try turning the machine on.
- If the system loads the BIOS splash screen, you can proceed to next step.
- If the system does not boot, shuts itself off, or has video problems, use the Laptop POST Troubleshooting Guide in section (A-1) of the Appendix.
5. Access the Network Boot Menu
☐ Plug in an ethernet cable from the workbench.
☐ Boot into BIOS.
☐ Find the section for setting boot options. Set the following boot order:
First:    Optical Drive
Second:   Hard Drive
Third:    Network Device (also called LAN, Onboard NIC, or PXE)
- Disable or ignore other devices.
☐ Save changes and exit BIOS.
☐ The laptop should now automatically boot to the Network Boot Menu.
6. Determine System Spec Level
Background Information
Different laptops have varied capabilities based on their hardware specifications, or “specs”. We categorize laptops into different “Spec Levels” based on the type of CPU they have, and use this to determine the laptop's suitability for reuse. If a laptop has enough performance and the featurese required for the software we use, we will try to refurbish it through the Build process. If a laptop is not capable of providing a decent user experience, it may be considered below spec and sent through the AS-IS or Recycling process instead.
Identify the CPU
In order to determine the Spec Level of a laptop, we must first identify what type of CPU it has.
☐ From the Network Boot Menu, select Laptop Build → CPU Lookup. The CPU Lookup tool should load, detect the CPU hardware, match it to an entry in our database, and output key details about the CPU.
☐ Write down the following details:
- CPU manufacturer (e.g. Intel or AMD)
- CPU brand (e.g. Pentium M, Core 2 Duo, Turion X2, Phenom II, etc.)
- CPU model (e.g. T5600, i5-560M, TL-56, U9300, P340, etc.)
- CPU clock speed in GHz (gigahertz)
- number of CPU cores
- Spec Level
☐ If the Spec Level reads 'AS-IS', check with your instructor. They may have you switch to the AS-IS Checklist or Recycling Checklist instead of continuing with Evaluation.
Troubleshooting Tips:
- If Network Boot fails, see the Laptop Network Boot Guide in Appendix (A-2).
- If the CPU Lookup tool fails to load or can't find a match in our database, check with your instructor or refer to the Laptop Specs Guide in Appendix (A-6).
7. Install Hardware
With the Spec Level determined, we can now decide which hardware best matches the capabilities of the processor.
☐ Find the column on the Laptop Specs whiteboard corresponding to the laptop's Spec Level.
☐ Read out how much RAM to install based on the Spec Level.
☐ Boot into BIOS and verify that the system recognizes all of the RAM you just installed.
- BIOS may report slightly less RAM than the total amount installed. It should not be more than a couple hundred megabytes. The 'missing' RAM is being reserved by the system.
☐ Determine what type of hard drive you need (SATA or IDE).
☐ Get a hard drive from your instructor based on the size listed in the Spec Level's column and install it. They may have you skip this step in some cases.
☐ Make sure an optical drive is installed if the laptop has a space for one. Check the optical drive faceplate to check what type of drive it is:
- DVD-RW drives are preferred; DVD-ROM/CD-RW drives are acceptable
- Swap CD-ROM only drives for a DVD-ROM/CD-RW or DVD-RW drive if possible.
Notes:
- Some Spec Levels list a range of acceptable hard drive sizes or RAM amounts. This gives us more flexibility to build laptops based on their strengths or the availability of parts. Ask your instructor if you are unsure of what to install.
- There are some optical drives available in the Laptop build room sorted by brand. Ask your instructor if you are not able to find the drive you need.
8. Keeper label
Background Information
The Keeper label is used to:
- Keep track of basic hardware information.
- Track the laptop through RAM testing, battery testing, and the Build and QC processes.
- Transfer notes about the laptops from builder to builder, and to the instructors.
Get a Keeper Label and use the information gathered in the previous steps to fill in these fields:
☐ Laptop make and model
☐ CPU brand, model, number of cores, and clock speed
☐ RAM size and type
☐ Hard Drive interface type and size (if installed)
☐ Optical Drive type
☐ Once the Keeper Label is filled out, use masking tape down the left and right sides to attach it to the lid of the laptop.
- Be careful not to cover up any "FG-PDX" or "Uncovered Electronic Device" stickers.
8. Begin Memtest86+
☐ Put the laptop on the testing shelf and plug it into a power strip.
☐ Attach one of the available ethernet cables and boot to the Network Boot Menu.
☐ From the Network Boot Menu, select Laptop Build → Memtest86+. After a few moments, you should now see memtest running. If so, check the Start box on the line for memtest on the Keeper Label.
Congratulations! Evaluation is now complete! Check with your instructor for your next task.