Laptop Recycling
GOALS
- Get familiar with how various laptops are put together.
- Get oriented in the Build room.
- Practice assembling and disassembling laptops without breaking components.
1. Data security check
We are responsible for securely wiping or destroying any storage device that is donated to Free Geek. This commonly means removing hard drives to be wiped, but keep an eye out for other kinds of data storage devices as well.
What to keep in mind when removing hard drives
☐ Make sure to separate any caddy parts and adapters from the hard drive.
☐ Tape any caddy parts, adapters, and screws together back inside the hard drive bay. These should stay with the system unless your instructor needs them for parts.
☐ Only ever leave hard drives and other storage devices in a designated box or with your instructor.
Check for disks and other storage media
☐ Check the optical drive for disks.
- Look for the small quick-release hole on the faceplate, and use a paperclip to manually open the drive.
☐ Take a quick look for other kinds of media, let your instructor know if you find anything.
Commonly encountered storage devices:
- 3.5" hard drives (Desktop size)
- 2.5" hard drives (Laptop size)
- Optical disks
Less commonly encountered storage devices:
- 1.8" and other odd-sized small form-factor hard drives
- Mini PCI or mini PCIe solid state drives
- Small media cards (SD, Compact Flash, etc)
- SIM cards
- Floppy disks
- PCMCIA (PC Card) hard drives
- Examples
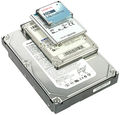
3.5", 2.5", 1.8" and 1" Hard Drives
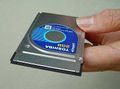
PCMCIA (PC Card) Hard Drive

SD Card

Mini PCIe Solid State Drive


2. Remove stickers
☐ Remove stickers:
- Microsoft stickers.
- Any sticker identifying the previous owner.
- Stickers added by the manufacturer (specs, model number, etc) should be left on the system.
- No cleaning or gunk removal is necessary; these laptops are headed straight for the recycling shredder!
3. Remove reusable parts
☐ Remove RAM from all systems, unless it is very difficult to get to.
☐ We won't reuse parts from most recyclers, usually because they are below our minimum build specifications. However, if the laptop is being recycled because of damage rather than age, we may keep some parts. Keep an eye out for:
- Wireless cards
- DDR2 or DDR3 RAM
- DVD-RW optical drives
4. Final steps
☐ Minimally reassemble the system (the lid should close, more or less).
☐ Put a Hard Drive Removed sticker on the top of the lid, and have your instructor sign it.
☐ For laptops with an Uncovered Electronics or FG-PDX sticker:
- Remove the battery, and put it in the Bad Batteries bin on the recycling cart.
- Put the laptop in the Uncovered bin on the recycling cart.
☐ For laptops without an Uncovered Electronics or FG-PDX sticker:
- These laptops are 'covered' by Oregon E-Cycles laws, hence they go in the Covered bins on the recycling cart.
OPTIONAL EXERCISE
If you'd like a chance to explore a bit more, in addition to the steps above, locate and remove as many of these components as you can find from a few different machines:
- Modem or WiFi card
- Keyboard and trackpad
- Optical Drive
- Screen and hinge assembly
- Battery