Laptop Recycling
Note: A version of this guide in LibreOffice format is available on the wiki at this link. That version is strongly recommended for printing.
The laptop you are inspecting has been designated for Recycling. This means it is either too old or too broken to be useable. Some individual parts may be reuseable, but the laptop itself will be recycled. Thank you for your help!
GOALS
- Get familiar with how various laptops are put together.
- Get oriented in the Build room.
- Practice assembling and disassembling laptops without breaking components.
1. Data Security Check
We are responsible for securely wiping or destroying any data storage device that is donated to Free Geek. This is the most important step in this process. In most cases this means removing hard drives from computers so the data can be wiped, but keep an eye out for other kinds of data storage devices.
Check for Hard Drives
☐ Separate any hard drive caddies and adapters from the hard drive.
☐ Tape them (along with their screws) back inside the hard drive bay. These should stay with the system unless your instructor needs them for parts.
☐ If a hard drive or other storage device is found, it should always be given to your instructor.
☐ Some laptops (especially larger models) may have two hard drive bays, so don't stop looking just because you've found one.
Check for Other Storage Devices
☐ Check the Optical Drive for disks.
- You can manually open the drive by pusing a paper clip into the small quick-release hole in the drive faceplate.
☐ Look inside and around the chassis for other less common storage devices, such as:
- 1.8” or other small-form-factor hard drives
- Mini PCI, mini-PCIe, or mSATA solid state drives (SSDs)
- SD cards or MemorySticks
- SIM cards (usually under the battery)
- Floppy disks
- PCMCIA (PC Card slot) hard drives
- Examples
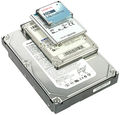
Hard Drives
3.5", 2.5", 1.8" and 1" sizes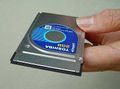
PCMCIA Hard Drive
(PC Card)
SD Memory Card

Mini-PCIe SSD
(Solid State Drive)


2. Remove Reuseable Parts
While most recycler laptops are simply too old for us to reuse, some laptops are recycled due to damage instead of age and might have reuseable parts inside.
Remove the following parts from the laptop:
☐ RAM
☐ Wireless cards
☐ Modem cards
☐ Optical Drive
☐ Check with your instructor to see which of these parts will be reused or recycled.
Note:
If any of the above parts is very difficult to locate or remove, check with your instructor for tips on how to access it. In some cases, they may even have you leave it in rather than tear apart a whole system for it.
3. Final Steps and Sign-Off
☐ Minimally reassemble the system. It doesn't have to be perfect, but it should mostly fit together and the lid should close at least most of the way.
☐ Remove any sticker or note identifying the previous owner or with personal information.
☐ No cleaning or gunk removal is necessary. These laptops are headed straight for the recycling bin!
☐ Put a Recycler sticker on the top of the lid and have your instructor sign off on it.
☐ Check for an Uncovered Electronic Device or FG-PDX sticker. If it has one:
- Remove the battery and put it in the Bad Batteries bin on the Recycling Cart.
- Put the laptop itself in the Uncovered bin on the Recycling Cart.
☐ For laptops without an Uncovered or FG-PDX sticker, put the laptop into one of the Covered bins on the Recycling Cart.
OPTIONAL EXERCISE
If you would like a chance to explore a bit more, try to locate and remove as many of these components as you can from a few different machines:
- Modem or wireless card
- Keyboard
- Trackpad
- Optical Drive
- Screen/hinge assembly
- Battery