Difference between revisions of "Mac Build Checklist"
AshleySueMas (talk | contribs) |
AshleySueMas (talk | contribs) |
||
| Line 1: | Line 1: | ||
| + | {{Migrated}} | ||
| + | [https://drive.google.com/a/freegeek.org/#folders/0B9fabqk-bNi7c3JQTkM0U1gtX0U Google Docs Link] | ||
| + | |||
The system you are working on has been designated a “Build” system. That means it we will now do our best to refurnish it, but it may still need to be recycled. Take your time and note anything about the system that may be important, including flaws and specialties. Ask your instructor if you have any questions. Thank you for your help! | The system you are working on has been designated a “Build” system. That means it we will now do our best to refurnish it, but it may still need to be recycled. Take your time and note anything about the system that may be important, including flaws and specialties. Ask your instructor if you have any questions. Thank you for your help! | ||
Latest revision as of 12:17, 30 March 2014
 This page has been migrated to a document on Free Geek's Google Drive. Information remaining behind may no longer be relevant. MIGRATOR: When you have tagged this page as migrated, (Link to new page immediately below.) |
The system you are working on has been designated a “Build” system. That means it we will now do our best to refurnish it, but it may still need to be recycled. Take your time and note anything about the system that may be important, including flaws and specialties. Ask your instructor if you have any questions. Thank you for your help!
Data Security Check
We are responsible for securely wiping or destroying any data storage device that is donated to Free Geek. This is the most important step in the Recycling process. In most cases this means removing hard drives from computers so the data can be wiped, but keep an eye out for other kinds of data storage devices. If you are not sure how to remove the hard drive, use the website ifixit.com for a step by step disassembly guide to most systems.
Check for Hard Drives
- For iMac computers: If they are successfully wiped from the SDA, hard drive removal is not needed. If there is not a SDA sticker on the system, you MUST manually remove the hard drive.
- Separate any hard drive caddies and adapters from the hard drive.
- Tape them (along with their screws) back inside the hard drive bay. These should stay with the system unless your instructor needs them for parts.
- If a hard drive or other storage device is found, it should always be given to your instructor.
- Some systems, mostly desktops, may have two hard drive bays.
Check for Other Storage Devices
- Check the Optical Drive for disks.
- You can manually open most drive by pushing a paper clip into the small quick-release hole in the drive faceplate.
- To verify there are no disks in a laptop optical drive, try to insert a disk into the drive (do not put the disk in all the way), if the disk seems to slide in easily, there is no disk, if you cannot push the disk in, there is a disk in the way. You will need to turn on the system to remove that disk, or remove the whole optical drive.
- Look inside and around the chassis for other less common storage devices, such as:
- 1.8” or other small-form-factor hard drives
- Mini PCI, mini-PCIe, or mSATA solid state drives (SSDs)
- SD cards or MemorySticks
- SIM cards
- Floppy disks
- PCMCIA (PC Card slot) hard drives
- Examples
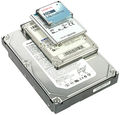
Hard Drives
3.5", 2.5", 1.8" and 1" sizes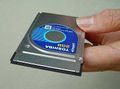
PCMCIA Hard Drive
(PC Card)
SD Memory Card

Mini-PCIe SSD
(Solid State Drive)


Physical Inspection
Take a close look at the system you are evaluating. Inform your instructor if you find any of the following:
- Floppy Drive
- Missing cover plates
- Missing Battery (laptops)
- Missing Optical Drive
- Missing keyboard or individual keys (laptops)
- Cracked or broken hinges (laptops)
- Cracks, discoloration, scratches, or marks on any surface
- Evidence of liquid spills or oxidation residue
- Dirt, dust, cat hair and/or grime above and beyond what can be cleaned
- Damaged ports or power jack (look very closely)
- Visible screen damage (laptops)
Stop here and check with your instructor if the system has any of these issues; they may have you go through the Recycling process instead.
Find an Appropriate AC Adapter (Laptops)
If you are working on a laptop, you will need to the appropriate AC adapter for it. Adapters are sorted by magnetic or non-magnetic plugs, then further more by voltage (V) and amperage (A). Most laptops will have this information on the back side; if you cannot find the voltage and amperage, ask an instructor.
POST
- Plug in the power supply, network cable, and keyboard/mouse if needed, then try turning the machine on while pressing the 'N' button.
- It may take a while for it to boot to the network. You will see an Apple logo, or a globe.
- If the system does not boot to the network, ask your instructor for an external hard drive. Turn off the machine, plug in the external HDD, then try turning the machine on while pressing the 'Option' key. You should see an icon for booting to the external HDD. Select the external disk option to boot into.
- Click 'Ignore' if a disc insertion warning box starts up.
Fill Out a Keeper Label
If the system posts, we're going to assume it could be a system we build out. At this point, ask your instructor for a Keeper Label and start noting the specifications of the system. The Keeper Label is used to:
- Keep track of basic hardware information.
- Track the laptop through RAM testing, battery testing, and the Build and QC processes.
- Transfer notes about the laptops from builder to builder, and to the instructors
- Get a Keeper Label and use the information from the previous steps to fill in these fields:
- System model
- CPU type and speed
- RAM size and type
- Hard Drive size (if installed) and Mac OS installed (10.7 or 10.9)
- Optical Drive type
- Once the Keeper Label is filled out, use masking tape to attach it to the system
- Be careful not to cover up any "FG-PDX" or "Uncovered Electronic Device" stickers.
Identify and Test the Hardware
- Click on the Apple icon in the top, left corner.
- Click on About This Mac
- Note the CPU type and speed.
- Note the amount of RAM installed. If more or less RAM is required, turn off the machine then remove/add as needed.
- Click on the More Info button and note the graphics card installed on the system. You can add this to the “Notes” section of the Keeper Label.
Stress-test the CPU
- Click on the CPU Test icon (green check mark) on the Menu Bar at the bottom of the screen
- Choose the option primenet as the test type and start the test; this will take a few minutes
- If this or any other test fails, consult your instructor
- Note if this test passed on the Keeper Label. If it failed, ask your instructor what your next step should be.
Stress-test the GPU
- Click on the Apple icon in the top, left corner.
- Select System Preferences, then click on the Desktop & Screen Saver icon
- Scroll down to the bottom of the list and select GPULife
- Select Options, verify limit framerate is not selected and that show framerate is selected.
- Set Zoom to 1 and click OK , select Test.
- Look for any artifacting or other issues
- These would be popping lights, obvious glitches, lines, and cross hatching
- The frames per second should remain consistent, it may take a moment to appear.
- Note if this test passed on the Keeper Label. If it failed, ask your instructor what your next step should be.
Test the WiFi
- Click on the Airport icon near the top, right corner of the screen
- Check to see if the Freegeek wireless network shows on the list, select that network.
- Open the web browser, select yes to the Free Geek wireless agreement then browse to any website to verify the wireless connection works.
- Note if this test passed on the Keeper Label. If it failed, you may need to verify the wireless network is working in the building, or that a wireless card is installed. Ask your instructor what your next step should be.
Test the iSight Camera (iMac and laptops only)
- Click on the Photo Booth icon (red curtains) on the Menu Bar at the bottom of the screen
- It should be readily apparent whether or not the camera works. :)
- Note if this test passed on the Keeper Label. If it failed, you may need to verify the camera is plugged into the logicboard, or replace the camera.
Test the Battery (laptops only)
- Click on the Finder icon (square face icon)
- Click on the Applications section, then click on the Coconut Battery icon
- Note the battery capacity (NOT the current charge) on the Keeper Label
- If the battery capacity is below 75% ask your instructor if they want to replace it
Test the Optical Drive and Audio Jack
We do not currently test CD/DVD burning, but if you would like to do this additional exercise, ask your instructor for directions.
- Insert a Movie DVD into the optical drive. The disc should mount and the DVD Player should start playing the DVD
- Network boot may not have DVD player installed. You may need an external drive to test the optical drive
- If this fails, try another DVD prior to replacing the drive
- While the DVD is playing, verify you can hear sound through the system's speakers. Then plug in either speakers or headphones to the system to verify the audio jack works.
- Note if this test passed on the Keeper Label. If it fails, always try additional disks prior to replacing the drive.
- If the speakers or the audio port do not work, we may attempt to replace them. Ask your instructor what your next steps should be.
Test the USB ports
- Plug in a USB mouse and see that the cursor moves and can interact with icons on the screen.
- Repeat this with all USB ports
- Note if this test passed on the Keeper Label. USB ports are difficult to replace, so ask your instructor what your next step should be if any of them fail.
Keyboard and Trackpad Testing (Laptops only)
If you have not yet found an issue with the keyboard or the trackpad, there is a good chance they work. However, we like to verify everything is in working condition before finishing up the build.
- Click on the Finder icon (square face icon)
- Click on the Applications section, then click on the TextEdit icon
- In the program, type in each key to verify it registers. Some functions keys will prefer a task.
- If any of these keys failed, you will need to replace the keyboard. Ask your instructor what your next steps should be.
- If the trackpad seems jittery, or accidentally selecting items on the screen, you might need to replace the trackpad. Ask your instructor what your next steps should be.
- Note if these tests passed on the Keeper Label.
Determine Which OS X to Install
Currently, we install two Mac OS X versions; 10.7 (Lion) and 10.9 (Mavericks). Prior to that, we need to determine which OS the machine can handle; not all systems can support Mavericks. Turn to A1 in the Appendix to determine which OS the system can support. Note which one it can support on the Keeper Label.
At this point, we have finished testing the hardware for the system. Now we are going to install a new hard drive, test the RAM and install a Mac operating system (OS) on the system.
Install a Hard Drive
iMacs that have been wiped in the SDA and have a clean hard drive, do not need this step, skip to Testing the RAM.
- Determine what hard drive size you need by reviewing the Spec List posted on the Mac Build Wall.
- Get a hard drive from your instructor and install it. Depending on the availability of hard drives, they may have you skip this step.
- Verify the hard drive you have been given has the Free Geek Linux OS installed on it. If not, ask your instructor what your next steps should be.
- Install the hard drive in your system. If you are are not sure how to do so, ask your instructor. They will most likely direct you to ifixit.com, a website that will show you step by step how to install a hard drive.
Print Me
This is ONLY for systems with a Free Geek Linux OS installed on them. If the system you are working with does not have a Linux imaged hard drive, ask your instructor what your next step should be. Turn the system on and allow it to boot into the Linux OS (this may take a while). The password to enter the OS is freegeek.
- Click on the Terminal icon located at the bottom menu bar.
- Type printme – this will generate a questionnaire in Command Line, the password is freegeek. Follow the onscreen instructions.
- For “BIOS Key”, type N/A. For “Boot Options” type in Option Key.
- When it asks if there are notable items, press enter to bypass and create a web document. It is easier to fill it out by editing the document then in Terminal.
- When the window opens with the Printme document, scroll down to where it says Edit, and select.
For Macs that can run the current Mac OS (10.9), put the following in the large test-box:
- Current Mac OS installed
- Firefox, LibreOffice, VLC, and Flash installed
- Webcam tested
- Free Geek warranty covers HARDWARE ONLY
- Software is NOT covered under
- Battery Life at #% [For laptops only, use the battery results test on the Keeper Label]
- For Macs that cannot run the current Mac OS (10.9), put the following in the large test-box:
- Mac OS 10.7 installed. WILL NOT take current MAC OS
- Firefox, LibreOffice, VLC and Flash installed
- Webcam tested
- Free Geek warranty covers HARDWARE ONLY
- Software is NOT covered under
- Battery Life at #% [For Laptops only, use the battery results test on the Keeper Label]
- Have your instructor sign off on the digital copy of your work.
- Print a paper copy of the printme:
- Navigate to Menu → System → Printing in the desktop panel.
- Navigate to Server → Settings... in the new window that pops up.
- Check the box next to “Show printers shared by other systems” and click “OK”. Close the Printer Settings window.
- Select Print from the green section of the printme page in Firefox, and send to the Classroom Printer. Tape this copy to the system.
- Document the System ID Number
- Shut down the system and unplug from power.
- On the printme, find the section labeled Gizmo Info and find the System ID.
- Write the System ID on a blank sticker either place it under the battery (laptops) or on the back side of the system (desktops)
Test the RAM
If this has not been done previously on the system, we are going to now set up Mem Test, which will verify the RAM installed in the system is OK. This test takes a while, so set the system up on the Testing Rack. Currently, we can only test the RAM using a network boot.
- Plug in the power supply, network cable, and keyboard/mouse if needed, then try turning the machine on while pressing the 'N' button. This will boot you into the Mac OS.
- Click on the Finder icon (square face icon)
- Click on the Applications section, then click on the Mem Test icon
- Select two loops and start the test
Install the Mac OS and Software
Currently, we can only install the Mac OS via USB sticks. You will need to set up the drive prior to installing the OS.
- If the system has a Printme attached to it, note which OS is required for this system. If there is no Printme, ask your instructor how you should proceed.
- Plug in the power supply, network cable, keyboard/mouse if needed, and USB boot device.
- Power on the system while holding the 'option' key, select the install icon when it appears on the screen.
- Select English as the Main Language, and the install program will show the Mac OSX Utilities screen.
- Select Disk Utility
Disk Utility
- Select the Hard Drive installed in the system from the list on left. DO NOT select the USB media. That is the OS X Install drive.
- Click on Partition
- Under Partition Layout, select 1 Partition
- Under Partition Information, select Mac OS Extended (Journaled) for the Format
- Under Options, select GUID Partition Table. Click OK
- Click Apply. It will prompt you to verify you want this partition. Click Partition.
- When it is finished, exit out of the Disk Utility, it will lead you back to the Mac OS X Utilities
The next instructions are broken down into Mac OS X 10.7 and Mac OS X 10.9. Follow the instructions for the specific OS you are installing, then proceed to the section called Installing Additional Software
Installing Mac OS X 10.7
- Select Reinstall Mac OS X and click Continue
- Follow the prompts the install program gives you; it will then ask which drive you want to install the OS on.
- Choice the hard drive that is installed NOT the USB
- Set the machine on the Testing Rack. It will take a while to install the OS X (20-45 minutes)
- After the system has installed the OS, it will prompt you with a Welcome screen.
- Select the Language (English), Keyboard (American), and WiFi (freegeek).
- Select Don't Transfer Now for Transfer Information to This Mac
- Leave the following blank:
- Apple ID
- Registration Information
- When it prompts you for an Account Name, enter OEM for the name on the account and freegeek for the password. Select the penguin photo for user photo.
- Select the Pacific West coast time zone, and follow the remaining onscreen prompts
- The system now has 10.7 fully installed on it.
Installing Mac OS X 10.9
- Select Reinstall Mac OS X and click Continue
- Follow the prompts the install program gives you; it will then ask which drive you want to install the OS on.
- Choice the hard drive that is installed NOT the USB
- Set the machine on the Testing Rack. It will take a while to install the OS X (20-45 minutes)
- After the system has installed the OS, it will prompt you with a Welcome screen.
- Select the Location (United States), Keyboard (American), and WiFi (freegeek).
- Select Don't Transfer Now for Transfer Information to This Mac
- Leave the Apple ID blank (select Don't sign in) and follow the next prompt for Terms and Conditions
- When it prompts you for an Computer Account, enter OEM for the name on the account and freegeek for the password. Select the penguin photo for user photo. Under Options verify that both Set time zone and Send Diagnostics are unchecked
- Select the Pacific West coast time zone
- Select Don't Register at the Register Your Mac screen
- The system now has 10.9 fully installed on it.
Installing Additional Software
We need to install several programs onto the system via the internet. Make sure you are plugged into the network prior to continuing.
- Open Safari and download the following programs:
- Firefox
- VLC Media Player
- LibreOffice (this one will take a while to download)
- Flash
- Open the Downloads file and install each of these programs, dragging them into Applications.
- When finished installing all, add a short cut to to Firefox and LibreOffice onto the Menu Bar, and remove the Safari shortcut.