Difference between revisions of "Processor Testing"
Jump to navigation
Jump to search
Jared.kimber (talk | contribs) |
|||
| (6 intermediate revisions by 4 users not shown) | |||
| Line 1: | Line 1: | ||
| + | {{migrated}} | ||
| + | [https://docs.google.com/document/d/1soC8FpirGQoSFpYCURt-ZfOASABsZzJfYCworOX1FRQ/edit?usp=sharing Link] | ||
| + | |||
| + | See [[CPU Testing]] | ||
| + | |||
===Process=== | ===Process=== | ||
| − | ;Identify Processor Type (clean with rubbing alcohol if | + | ;Identify Processor Type (clean with rubbing alcohol if necessary) |
:'''Intel:''' | :'''Intel:''' | ||
| − | |||
| − | |||
:Pentium D? | :Pentium D? | ||
| + | :Pentium Dual core? | ||
:Core 2 Duo? | :Core 2 Duo? | ||
:Core 2 Extreme? | :Core 2 Extreme? | ||
| + | :Core 2 Quad? | ||
| + | :i-series(i3,i5,i7)? | ||
| Line 16: | Line 22: | ||
:Athlon 64 FX? | :Athlon 64 FX? | ||
:Athlon 64 X2? | :Athlon 64 X2? | ||
| + | :Athlon 64 X3? | ||
:Athlon MP? | :Athlon MP? | ||
:Athlon XP? | :Athlon XP? | ||
| + | :AthlonII? | ||
| + | :Phenom? | ||
| + | :PhenomII? | ||
| + | |||
:Duron? | :Duron? | ||
:Opteron? | :Opteron? | ||
| Line 173: | Line 184: | ||
</graphviz> | </graphviz> | ||
| − | [[Category: | + | [[Category: Howto]] |
| − | |||
| − | |||
| − | |||
| − | |||
Latest revision as of 11:19, 15 August 2014
 This page has been migrated to a document on Free Geek's Google Drive. Information remaining behind may no longer be relevant. MIGRATOR: When you have tagged this page as migrated, (Link to new page immediately below.) |
See CPU Testing
Process
- Identify Processor Type (clean with rubbing alcohol if necessary)
- Intel:
- Pentium D?
- Pentium Dual core?
- Core 2 Duo?
- Core 2 Extreme?
- Core 2 Quad?
- i-series(i3,i5,i7)?
- AMD:
- Athlon?
- Athlon 64?
- Athlon 64 FX?
- Athlon 64 X2?
- Athlon 64 X3?
- Athlon MP?
- Athlon XP?
- AthlonII?
- Phenom?
- PhenomII?
- Duron?
- Opteron?
- Sempron?
- Important note about processor model numbers
- Processor models are named in 1 of 2 ways, either by using the processor clock speed as the model number or by Using a trivial model number.
Processors that use clock speed model numbers
- Intel Pentium III, Pentium 4 (excluding socket 775), and Celeron (excluding socket 775).
- AMD Athlon and Duron processors.
Processors that use trivial model numbers
- Intel Socket 775 processors
- AMD Athlon XP, Athlon MP, Athlon 64, Athlon 64 FX, Athlon 64 X2, Operon, and Sempron.
Special note about Athlons and Athlon XP's
- All Athlon processors are made in a ceramic package and have a speed of 1400MHz or less.
- All Athlon XP processors have an "X" prior to the model number, however, there may be letters following the "X" (such as AXDA2400KV3C for an Athlon XP 2400+). There are no Athlon XP's in a ceramic package. Later Athlon XP processors dropped the "XP", but can still be identified as an Athlon XP by the "X" preceeding the model number on the chip itself.
- Identify Processor Socket Type (listed oldest to newest by make)
- AMD Slot A (Athlon)
- AMD Socket 462 (A) (Athlon, Athlon XP, Duron, Sempron)
- AMD Socket 754 (Athlon 64, Sempron, Turion)
- AMD Socket 940 (Athlon 64 FX, Opteron)
- AMD Socket 939 (Athlon 64, Athlon 64 X2, Sempron, Athlon 64 FX, Opteron)
- AMD Socket AM2 (Athlon 64, Athlon 64 X2, Sempron, Athlon 64 FX, Opteron)
- Intel Slot II (Pentium III, Celeron)
- Intel Socket 370 (Pentium III, Celeron, C3)
- Intel Socket 423 (Pentium 4, Celeron)
- Intel Socket 478 (Pentium 4, Celeron)
- Intel Socket 479 (Pentium M, Celeron M, Core Duo)
- Intel Socket 775 (T) (Pentium 4, Pentium D, Celeron D)
- Find a working motherboard compatible with the processor. This may be a challenge. The Advanced Testing Kit supports most socket 478 and socket 462 products. Test the motherboard with known working components to verify the functionality of the motherboard.
Make sure that all CPU fan control/throttling, CPU fan detection, and CPU overheat protection functions are disabled in the motherboard BIOS.
- Make sure the motherboard is grounded. This can be accomplished in several ways...
- Connected to a power supply that is plugged in and turned off.
- Installed in a case and connected to a power supply that is plugged in and turned off.
- Placed on an ESD safe grounding mat.
- Install the Processor
- Lift the arm of the ZIF socket to the vertical position.
- Check the pin orientation of the processor in relation to the socket. The processor will only fit in one way.
- Set the processor in the ZIF socket. The processor should drop right in without resistence, if it doesn't, recheck the orientation and check for bent pins.
- Lower the ZIF socket arm and click into place.
- Apply a small amount of thermal compound onto the processor, thinly coating the Die or Heatspreader. Carefully install a proper cooling unit (HSF).
- Plug the fan connector of the cooling unit (HSF) to the CPU Fan pin header of the motherboard.
- Test the Processor
- Install memory and a video card (if necessary) on the motherboard. Connect the floppy drive to the motherboard.
- Clear the motherboard CMOS.
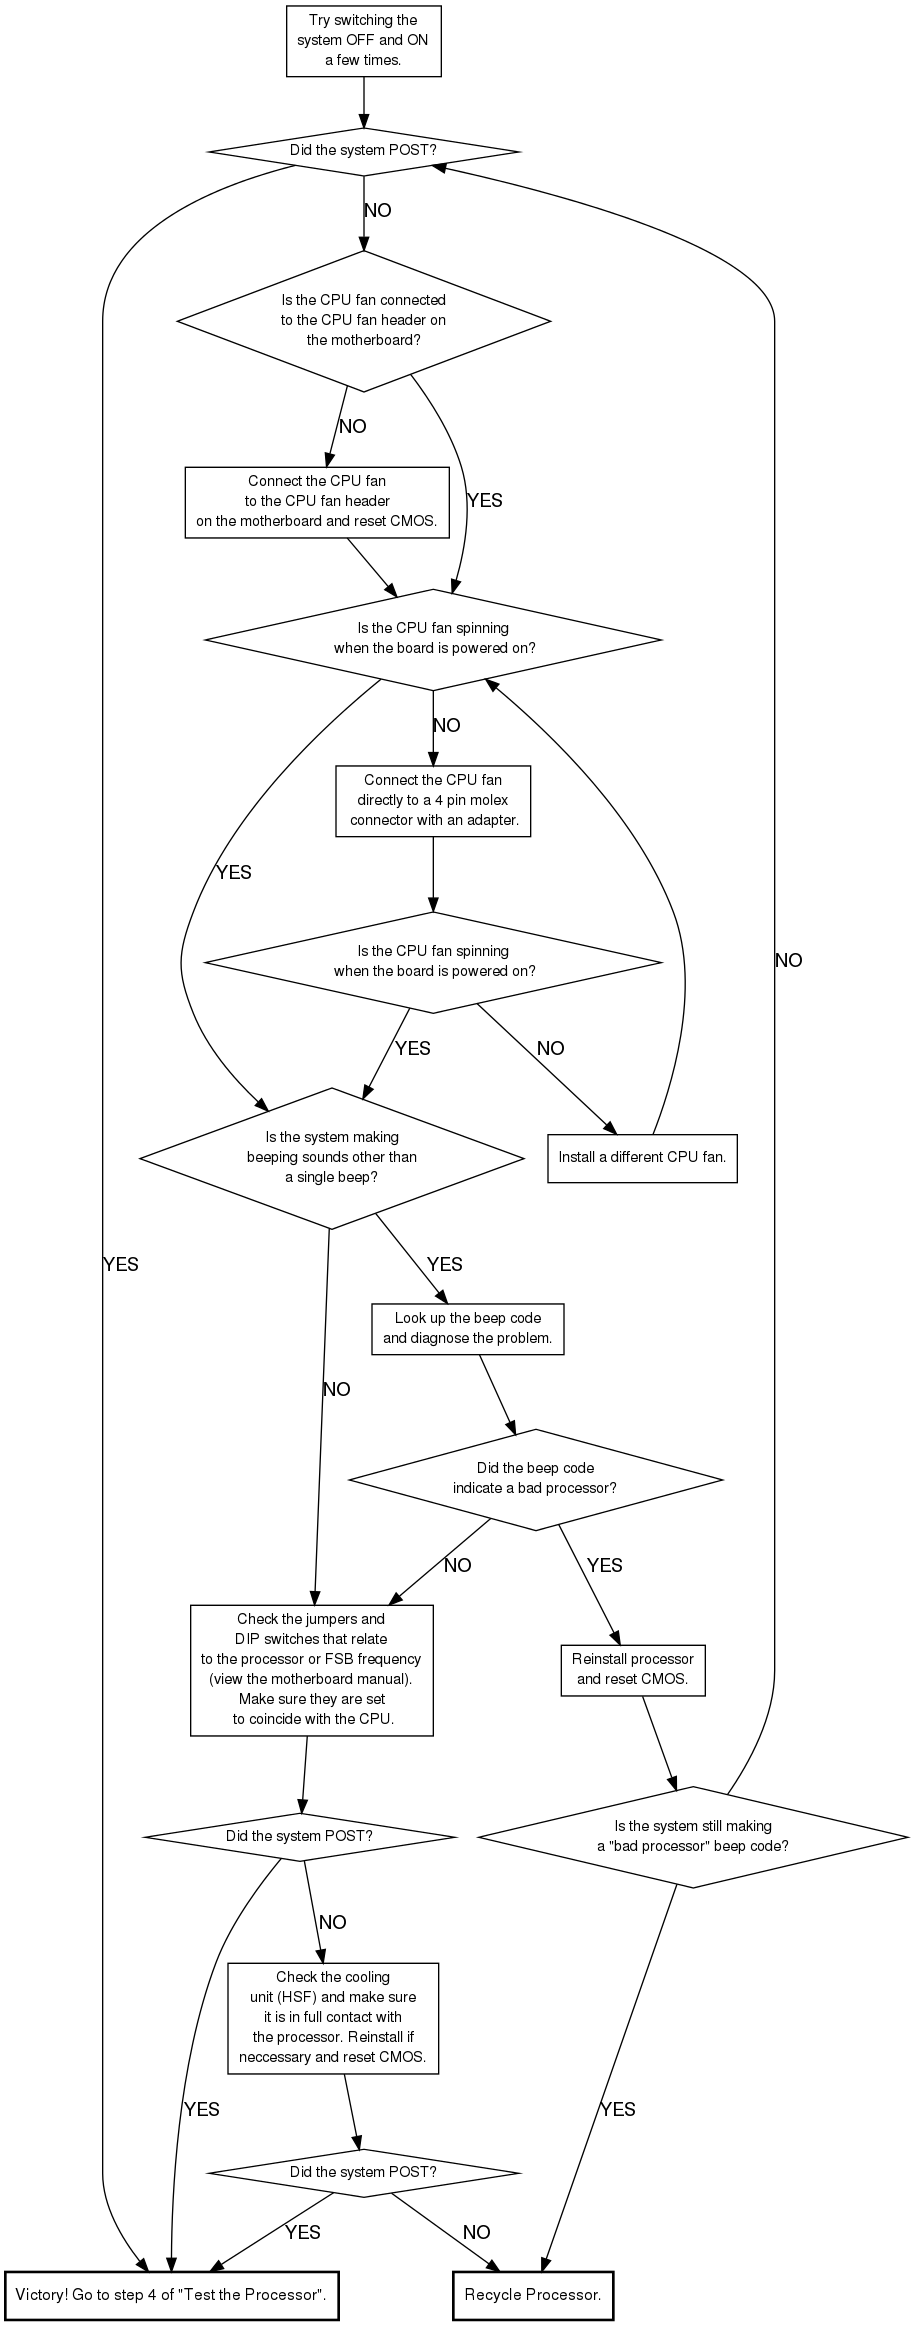
- Power up the motherboard and watch for a post. If the board didn't post, go to the troubleshooting flow chart.
- Enter the BIOS and change settings specific to that processor (FSB, multiplier, core voltage, etc.). Make sure memory is set to auto, SPD, or a speed that it supports.
- Make sure the floppy drive is in boot sequence and insert memtest floppy disk.
- Save and exit, system should reboot and load memtest. If system doesn't do this, manually reboot.
- Watch memtest for immediate errors. If immediate errors show up for processor, the processor is bad. If no errors show up immediatly, the processor is good. Eject memtest disk and hit ESC to reboot then power down system.
- If the processor was good, mark the model number, FSB speed, and "OK" on the processor. If the processor was bad, recycle it.
Troubleshooting Flow Chart