Difference between revisions of "Server Build"
(updated server build program) |
Michaelkelly (talk | contribs) (→Info) |
||
| (21 intermediate revisions by 4 users not shown) | |||
| Line 1: | Line 1: | ||
| − | ''' Server | + | ''' Server Build Program''' at Free Geek |
[[Image:servers.jpg|thumb| ]] | [[Image:servers.jpg|thumb| ]] | ||
=The Program= | =The Program= | ||
| − | Server Build evaluates and builds, well, servers. Servers are | + | Server Build evaluates and builds, well, servers. Servers are computers that tend to have higher quality parts, hot-swappable power supplies, hot swappable hard drives, or fit into server racks. |
==Class Times== | ==Class Times== | ||
| − | * | + | * Wednesdays 10AM - 1:45PM |
==Steps== | ==Steps== | ||
| − | The Server Build program requires a great deal of | + | The Server Build program requires a great deal of PC hardware experience, so it is expected that all students have gone through the Build program before moving into the Server Build program. |
| − | Server | + | <strong>Server Evaluation</strong>: Determine basic specs such as processor(s) type and speed, hard drive bays, RAM type, etc. |
| − | Server | + | <strong>Server Build</strong>: Build out systems that meet criteria for use in infrastructure, hardware grants or the thrift store. |
| − | Quality | + | <strong>Server Quality Control</strong>: Ensure that systems already built can read CDs, USB ports work, boot fine, etc. |
In addition, there are some tasks that can be done throughout your time in the project: | In addition, there are some tasks that can be done throughout your time in the project: | ||
| − | * | + | * RAM Sorting |
| − | * | + | * Shelf Organizing |
| − | =Server | + | =Server Evaluation= |
| − | + | {{:Server Evaluation Triage}} | |
| − | |||
| − | |||
| − | =Server | + | =[[Server Build Checklist]]= |
| + | {{:Server Build Checklist}} | ||
| + | ==Documentation== | ||
| + | Labels we use in the build and QC process: | ||
| + | * [[Media:Server_Specs.pdf|Server Spec Labels]] | ||
| + | * [[Media:Server_Build-QC_Checklist.pdf|Server Build/QC Checklist sheets]] | ||
| + | * [[Media:Server_Labels_S1-S80.pdf|Server Tags S1 - S80]] | ||
| + | * [[Media:Server_Labels_S81-S160.pdf|Server Tags S81 - S160]] | ||
=Info= | =Info= | ||
| − | Here | + | Here are the HOW-TOs and information we need to accomplish our tasks. |
| − | * [[Entering BIOS | + | * [[Entering BIOS]] |
| − | |||
| − | |||
* [[Server System Disassembly]] | * [[Server System Disassembly]] | ||
* [[Server Hard Drive Removal]] | * [[Server Hard Drive Removal]] | ||
* [[Server Service Manuals]] | * [[Server Service Manuals]] | ||
* [[Server Memory]] | * [[Server Memory]] | ||
| − | |||
| − | |||
| − | |||
| − | |||
* [[CD DVD & External drives]] | * [[CD DVD & External drives]] | ||
| − | * [[ | + | * [[Hp J4XXX Managed Switches]] |
=Links= | =Links= | ||
| Line 60: | Line 59: | ||
= ToDo: = | = ToDo: = | ||
| − | * syllabus, repair howto(s) & triage charts, wiki | + | * syllabus, repair howto(s) & triage charts, wiki, RAID howto, |
[[Category:Server_Build]] | [[Category:Server_Build]] | ||
Latest revision as of 22:52, 6 February 2013
Server Build Program at Free Geek

The Program
Server Build evaluates and builds, well, servers. Servers are computers that tend to have higher quality parts, hot-swappable power supplies, hot swappable hard drives, or fit into server racks.
Class Times
- Wednesdays 10AM - 1:45PM
Steps
The Server Build program requires a great deal of PC hardware experience, so it is expected that all students have gone through the Build program before moving into the Server Build program.
Server Evaluation: Determine basic specs such as processor(s) type and speed, hard drive bays, RAM type, etc.
Server Build: Build out systems that meet criteria for use in infrastructure, hardware grants or the thrift store.
Server Quality Control: Ensure that systems already built can read CDs, USB ports work, boot fine, etc.
In addition, there are some tasks that can be done throughout your time in the project:
- RAM Sorting
- Shelf Organizing
Server Evaluation
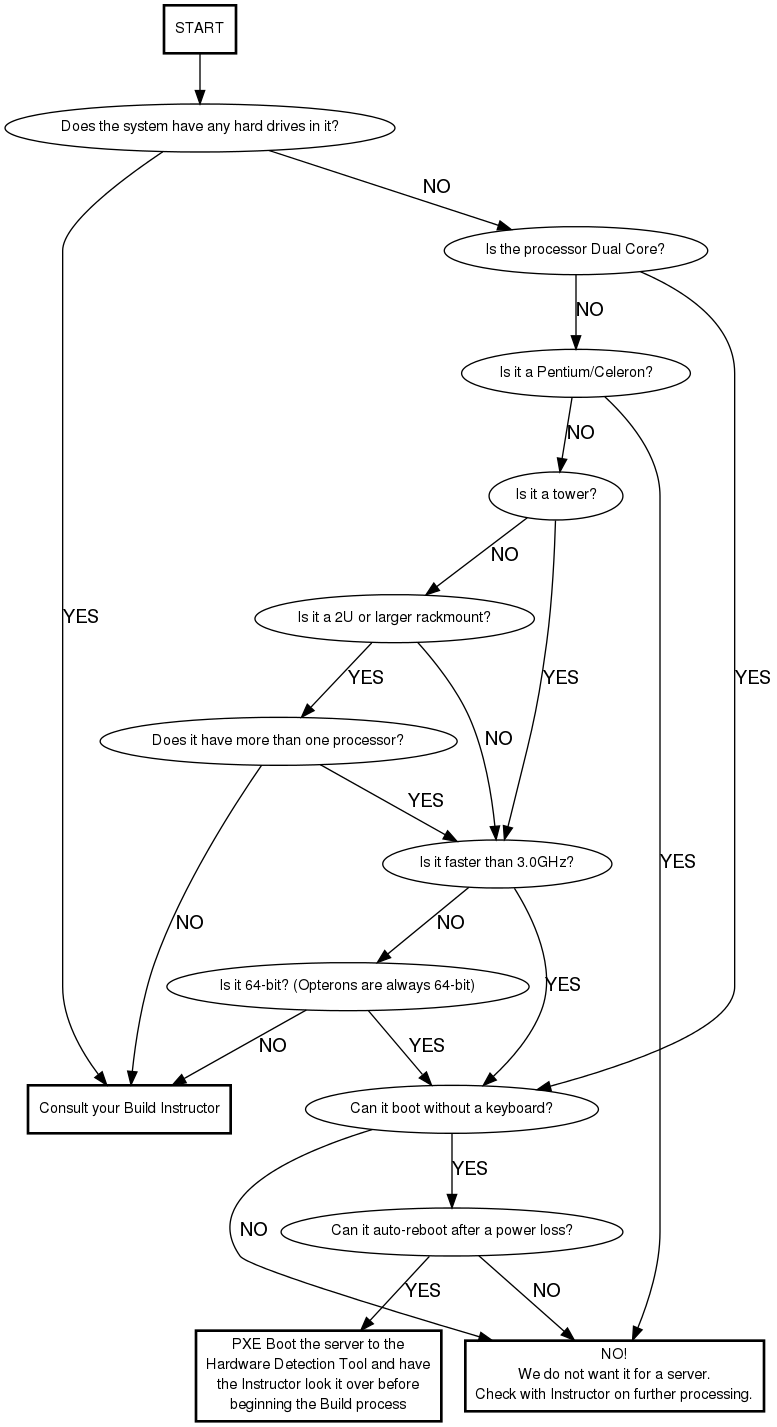
- Boot Without Keyboard
- Just make sure it attempts to boot; no need to install a hard drive during Eval.
- Auto-Reboot After Power-Loss
- Will the system reboot all by itself after a power-loss when the system was running before the power-loss (required)? Will the system stay off after a power-loss when the system was not running before the power-loss (optional)?
Server Build Checklist
Preliminaries
Check for blown caps - Examine all of the capacitors
Check battery - Confirm that the CMOS battery is at least 3 volts
Boot Process - Ensure that the server boots properly in the following ways:
- Boots from CD - use an Ubuntu Live CD, leave Ubuntu running for next step
- Boots automatically after power loss - while still in Ubuntu from the previous step, unplug all power cords (and the keyboard for the next step) from the server to simulate a sudden power loss. It should reboot automatically - if not, check BIOS settings.
- Boots without keyboard - the server may report a "Keyboard failure" error - this is okay as long it boots successfully without human intervention, such as "press key X to continue..."
RAID & LVM Setup (Build ONLY)
Install Debian Wheezy - Boot to network and install Debian Wheezy to local disks, choose hostname, leave domain name as “fglan”
Setup Software RAID
Partition Disks:
- Create small partition (400-500M) on each device
- primary partition at the beginning of the drive
- use as “physical volume for RAID”
- set as bootable
- Create large partition (all remaining space) on each device
- primary, not bootable
Setup RAID for small partitions: RAID1 (bootable) with the number of devices equal to number of disks
Setup RAID for large partitions:
- For 2-3 disks:Setup RAID1, with number of devices equal to number of disks
- For 4+ disks:Setup RAID6, with number of devices equal to number of disks
Configure LVM - configure larger RAID1 or RAID6 array as LVM volume
- Create Logical Volume Group with same name as hostname
- Select Large RAID array as LVM Volume
- create volume (4G) named root (mounted at /, ext4 filesystem)
- create volume (1G) named swap (use as swap)
- create volume (remaining) named srv (mounted at /srv, ext4 filesystem)
- Debian Wiki Guide to Software RAIDs: http://wiki.debian.org/DebianInstaller/SoftwareRaidRoot
- Wikipedia RAID article: http://en.wikipedia.org/wiki/RAID
Diagnostics & Databases
- Boot from local disk(s)
- Test USB ports (front and back),
- Test video ports (front and back),
- Test network ports - at terminal:
ifconfig eth0 up,ifconfig eth1 up, thentail -f /var/log/syslog, and when you plug and unplug the ethernet cable, you should see reasonable printouts. Ctrl-C to stop thetailcommand.
- QC Only: Remove any SATA/SAS drives and give them to your Instructor
- QC Only: Remove any SATA/SAS drives and give them to your Instructor
Run printme:
- Boot from network
- Select printme from the network boot menu
- Log in as guest
- Open a terminal
- Run printme
- Answer all questions and record anything else noteworthy in the notes section
Fill out the Server Specs sticker based on whether you are doing Build or QC:
- For BUILD:
- Put System ID on server specs sticker
- Number of physical processors and number of cores per processor
- Processor speed (GHz)
- Circle processor type (Xeon, Opteron, Core 2, Other)
- Total amount of included RAM
- Total number of RAM slots on board
- Number of included RAM sticks with their speed and size
- Circle type of RAM (DDR, DDR2, DDR3)
- Circle type of DIMM (ECC, FB-DIMM, etc.)
- Number of hard drive bays
- Circle hard drive bay type (IDE, SCSI, SATA, SAS)
- Number and size of included hard drives
- Record anything notable, like Hardware RAID support, in the notes section
- Do not print! Instead, put your Volunteer ID on a piece of tape on the system
- For QC:
- Confirm the accuracy of information already on the Server Specs sticker
- Number and size of included hard drives
- Circle whether an OS is installed (none if hard drives removed!)
- Write the System ID# on a Server Tag sticker (small labels marked S1, S2, etc.) and stick it to the front of the chassis.
- Print the printme - Write the number from the Server Tag in the upper right-hand corner of the printme, and give it to your instructor.
- Move the system to the Server Build KVM and run Memtest, if it hasn't already been done.
- Consult your Instructor for a new project!
Documentation
Labels we use in the build and QC process:
Info
Here are the HOW-TOs and information we need to accomplish our tasks.
- Entering BIOS
- Server System Disassembly
- Server Hard Drive Removal
- Server Service Manuals
- Server Memory
- CD DVD & External drives
- Hp J4XXX Managed Switches
Links
These are mostly pages full of links to other place:
- OS X86 Links
- http://www.networkdictionary.com/hardware/server.php
- http://ultimatebootcd.com/
- http://www.streambench.org/
- http://www.freebench.org/
- http://www.tux.org/˜mayer/linux/bmark.html
- http://www.acnc.com/benchmarks.html
- http://www.netlib.org/benchmark/hpl/
- http://lbs.sourceforge.net/ - Linux Benchmark Suite Homepage
ToDo:
- syllabus, repair howto(s) & triage charts, wiki, RAID howto,