|
|
| (14 intermediate revisions by the same user not shown) |
| Line 1: |
Line 1: |
| − | '''MISC JUNK'''<br> | + | '''OBJECTIVE''' To enable the builder to recognize and install memory sticks on the motherboard |
| − | http://www.debian.org/releases/2.2/powerpc/ch-init-config.en.html
| |
| | | | |
| | + | RAM (or Random Access Memory) is an important part of the computer system which is used by actively running programs to perform necessary tasks while the computer is on. It is composed of integrated circuit memory chips that allow information to be stored or accessed in any order and all storage locations are equally accessible. The information on RAM can be tossed out to make more space, as opposed to the Hard Disk Drive where the computer stores information for the long haul. |
| | | | |
| − | '''NEW USER DOC FOR THE FREE GEEK MAC COMPUTER'''<br>
| + | ==Memory sticks== |
| − | ==A Note About the One Button Mouse== | + | :RAM or Random Access Memory comes in 2 types, DIMM and SIMM |
| − | The Free Geek Mac Computer has a USB one-button mouse, unlike the two- or three-button mouse that comes with
| |
| − | a PC style FreekBox. Ubuntu Linux expects a three-button mouse, so the Mac version makes special arrangements for that. The one-button mouse acts as the left button (or left-click) on a two/three button mouse. The F12 key on the keyboard acts as the right button (or right-click), and the F11 key acts as the middle button (or middle-click). There are two- and three-button USB mice available, and if attached to the Free Geek Mac Computer, will work just fine and as you would expect.
| |
| | | | |
| − | ==How do I get started?==
| + | : DIMM (Dual In-Line Memory Module) |
| − | The first time you use your Free Geek Mac Computer, it will come up to a login screen for the '''oem''' account. The username for this account is ''oem'' and the password is ''freegeek''. While this account will work, and is the one we use to test the machine, it is not very secure to have an account for which hundreds of people know the password. You can change this by resetting the '''oem''' account password.
| + | :* DIMMs are usually 5.25" long and plug into slots that have plastics clips at the end that open and close to hold them in. There is also a type of DIMM that is only 2.5-2.75" long known as SODimm which is used in laptops and small computer systems |
| | | | |
| − | At the login screen, login as user ''oem'' with the password ''freegeek'', then follow the instructions in the FAQ item [[#How do I change my password?]] later in this document. You will be providing a new password
| + | : SIMM (Single In-Line Memory Module) |
| − | which you should remember.
| + | :* SIMM is the oldest form of memory that we still see and is shorter than the currently-used types - generally 4.25" long or 3.5" long. Its slots on the motherboard have metal clamps at the end to hold the stick in place. |
| | | | |
| − | At the same time, you may wish to create a new, personalized account with your own user name and password.
| + | '''Exercise''' |
| − | Follow the instructions in the FAQ item [[#How do I create new users?]], providing your own user name and a new password. Be sure to give yourself (in your new account) ''Administrator'' privileges. That selection is available as one of the ''Profile'' selections in the new user setup. After creating the new account, log out of the ''oem'' account by selecting the red button in the upper right corner of the display and then selecting the Logout button. You can also find the red button in the System menu (select ''System'' in the top bar) labelled as ''Quit''. The display will return to the original login screen that you saw when you first turned on the computer. Log in with your new user name and password.
| + | Find the SIMM and DIMM slots on the motherboards on the example board in front of you so you can identify these slots. |
| | | | |
| − | Giving a new user account ''Administrator'' privileges allows that user to do computer management things that are otherwise restricted to the '''root''' user, like create and delete user accounts.
| + | === DDR === |
| | + | [[Image:DDR.jpg]] |
| | | | |
| | + | A stick of DDR has a single notch in it near the center of the stick.<br> |
| | + | ''Un módulo de DDR tiene una muesca en en el centro del módulo.'' |
| | | | |
| − | ==What software is included?==
| + | The newer DDR2 has a single notch that is slightly nearer the center of the stick, so it will not fit into a regular DDR slot |
| − | The Free Geek Ubuntu box has a full complement of useful software. The list below is not exhaustive. | + | [[Image:DDR2.jpg]] |
| | | | |
| − | *'''The Gimp''' - Image processing software roughly equivalent to Adobe Photoshop
| + | And the DDR3 stick also has a single notch on it that is slightly closer to the end than the DDR. |
| − | *'''OpenOffice''' - Word Processing, Database, Spreadsheet, Drawing, Presentation Manager
| + | [[Image:DDR3.jpg]] |
| − | *'''Firefox''' - Internet browser
| |
| − | *'''Evolution''' - Email, Calendar, Personal Information Manager
| |
| − | *'''Nautilus''' - File Manager and CD/DVD creator
| |
| − | *'''gThumb''' - Photo archive and Camera reader
| |
| − | *'''XSane''' - Scanner Software
| |
| − | *Lots of games
| |
| − | *Many utilities such as a calculator, screenshot taker, dictionary
| |
| | | | |
| − | ==How do I create new users?== | + | === RAMBUS === |
| − | New users are created by going to System>Administration>Users and Groups
| + | [[Image:RAMBUS.jpg]] |
| | | | |
| − | The first user is set to have administrative privileges. This will not be true of new accounts unless it is specifically set under User Privileges.
| + | A stick of RAMBUS has two notches in it at the center of the stick.<br> |
| | + | ''Un módulo de RAMBUS tiene dos muescas en en el centro del palo.' |
| | | | |
| − | ==How do I change my password?== | + | === SDRAM === |
| − | Your password can be changed in System>Preferences>About Me.
| + | [[Image:SDRAM.jpg]] |
| | | | |
| − | Alternatively, all user passwords can be changed in System>Administration>Users
| + | A stick of SDRAM has two notches in it, one near the center of the stick, and one closer to the side.<br> |
| | + | ''Un módulo de SDRAM tiene dos muescas, una cerca del centro del módulo, y otra cerca a un extremo del módulo.'' |
| | | | |
| − | ==How do I add a printer?== | + | === 72-Pin SIMM === |
| − | Make sure the printer is cabled to the computer and turned on. Go to System>Administration>Printers. Double-click on "New Printer". You will need to enter your password at this point. A dialog box will pop up. The large box in the middle should have the name of your printer in it, and if you press "Forward", reasonable defaults should already be filled in.
| |
| | | | |
| − | ==How do I connect to the internet?==
| + | [[Image:72-pin-simm.png]] |
| − | ===Dialup===
| |
| − | We recommend using gnome-ppp instead of the Ubuntu "Network Settings" dialog. On the Free Geek boxen, it is in the Internet menu, It is not part of the default Ubuntu installation, so if you install from CD, you will need to use the Add/Remove application to install it. When you first use the program, you should go to "Setup" and click on "Detect" to detect the modem. This should only have to be done once. Otherwise, most users should leave all the defaults alone and only put in the username, password and phone number in order to be able to connect. Make sure to check the "Remember password" box. Do not put anything in the "Dial prefix" box on the settings page, unless you need to dial an extra number (like 9) to access an outside line.
| |
| | | | |
| − | ===Broadband (cable or dsl)===
| + | 72 pin SIMMs are 4.25 inches long. The holes and notches need to match exactly since there are other objects that look like 72-pin SIMM but aren't, so see points A (side holes), B (center notch) and C (side notch) in the picture. |
| − | For most cable and dsl modems, once the modem is set up, your ubuntu box will be able to connect without any extra configuration. If you are not able to connect, then check the following:
| |
| − | * The ethernet connection may need to be enabled. Go to System>Administration>Networking, highlight the ethernet connection and then click on properties. There should be a check mark in "Enable this connection". The Configuration should be DHCP unless you know it should be otherwise.
| |
| − | * The modem may need to be rebooted or reset.
| |
| − | * If the modem has not been configured, try browsing to the web interface of the modem. This can be found by checking System>Administration>Network tools. Change the network device to show the ethernet connection. If the IPV4 IP address starts with 169, or is absent, you are not connected. Otherwise, click on the Netstat tab. and check the routing information. The gateway address is the address of the modem. Just put that address in to firefox and you should see the administrative interface for the modem.
| |
| | | | |
| − | ==My menu and icons are messed up. How can I fix it?== | + | === 30-Pin SIMM === |
| − | The gnome panels (the strips containing menus, icons and buttons on the top and bottom of the screen) are very easy to customize, and so are very easy to mess up. The following tips can help you recover them.
| |
| − | ===missing panel===
| |
| − | It is easy to delete one of the panels. To replace it, right-click on the remaining panel, and choose "New Panel" from the menu. This will give you a new blank panel. You will need to replace the menus and other features of the panel.
| |
| − | ===missing menu or other feature===
| |
| − | You can add most features of the panels by right-clicking on the panel and choosing "Add to Panel". You will be presented with a large list of features to be added. Try them out. You can always delete them by right-clicking on the feature and selecting "Remove from Panel". Note that the Menu which was there originally is "Menu Bar", not "Main Menu".
| |
| | | | |
| − | Application icons are added by clicking on the menu and then right-clicking on the application icon in the menu and selecting "Add this launcher to panel"
| + | 30 Pin SIMM |
| − | ===panel in the wrong place===
| + | [[Image:30-pin-simm.png]] |
| − | Panels can be moved to different sides of the screen by clicking and dragging.
| |
| | | | |
| − | ==Adding Software==
| + | 30-pin SIMMs are 3.5 inches long. These are the oldest types of memory we still see on a regular basis in System Evaluation. Note that they do not have a center notch. |
| − | The first place to look for software to add is in the Add/Remove utility (Applications>Add/Remove). This gives you access to the Ubuntu supported applications plus many others. More packages, and finer control over them, can be found by going to System>Administration>Synaptic Package Manager.
| |
| | | | |
| − | The Free Geek Ubuntu boxes come preinstalled with Automatix, a script which simplifies the installation of many kinds of software such as media players. (Applications>System Tools>Automatix)
| |
| | | | |
| − | ===Media and online games===
| + | '''Exercise 1:''' |
| − | For various reasons, the Free Geek Mac boxen do not come preinstalled with software to play some types of video formats. Some Macs and "Store Specials" may come with DVD players physically installed, but again do not have all the the software installed to play all DVDs and video files. Free Geek Mac Computers have the application '''Ogle''' pre-installed, which will play some videos/DVDs with non-restricted formats. Automatix can be used to install other software for playing videos.
| + | Look at the example memory sticks and match them up with the following pictures and descriptions. Then, |
| − | *Flashplayer is necessary to play video on sites such as youtube.com.
| |
| − | *Totem-xine and Multimedia codecs allow the playing of DVD's
| |
| − | *Mplayer and FF plugin allows the playing of many kinds of online streaming video
| |
| − | *AUD-DVD allows the playing of encrypted DVD's such as current movies. '''Free Geek will not install this package due to legal issues.'''
| |
| − | *Java (found in both Automatix and Add/Remove) enables the playing of online games.
| |
| | | | |
| − | [[Category:Ubuntu tips]]
| + | '''Exercise 2:''' |
| − | [[Category:Tech support]]
| + | Try putting the sticks into their slots on the motherboard. Open the clips, match up the notches and install the stick into the grooves at either end. Press down on the stick until the clips flip closed by themselves around the stick. This tells you that the memory is properly seated into the slot so it can function correctly. '''IMPORTANT - YOU CAN RUIN THE RAM AND FRY THE MOTHERBOARD IF YOU DON'T DO THIS!!!''' |
| − | [[Category:Thrift Store]] | + | |
| | + | |
| | + | [[Category: Hardware ID]] |
OBJECTIVE To enable the builder to recognize and install memory sticks on the motherboard
RAM (or Random Access Memory) is an important part of the computer system which is used by actively running programs to perform necessary tasks while the computer is on. It is composed of integrated circuit memory chips that allow information to be stored or accessed in any order and all storage locations are equally accessible. The information on RAM can be tossed out to make more space, as opposed to the Hard Disk Drive where the computer stores information for the long haul.
Memory sticks
- RAM or Random Access Memory comes in 2 types, DIMM and SIMM
- DIMM (Dual In-Line Memory Module)
- DIMMs are usually 5.25" long and plug into slots that have plastics clips at the end that open and close to hold them in. There is also a type of DIMM that is only 2.5-2.75" long known as SODimm which is used in laptops and small computer systems
- SIMM (Single In-Line Memory Module)
- SIMM is the oldest form of memory that we still see and is shorter than the currently-used types - generally 4.25" long or 3.5" long. Its slots on the motherboard have metal clamps at the end to hold the stick in place.
Exercise
Find the SIMM and DIMM slots on the motherboards on the example board in front of you so you can identify these slots.
DDR

A stick of DDR has a single notch in it near the center of the stick.
Un módulo de DDR tiene una muesca en en el centro del módulo.
The newer DDR2 has a single notch that is slightly nearer the center of the stick, so it will not fit into a regular DDR slot
And the DDR3 stick also has a single notch on it that is slightly closer to the end than the DDR.
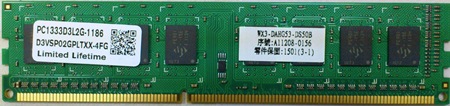
RAMBUS
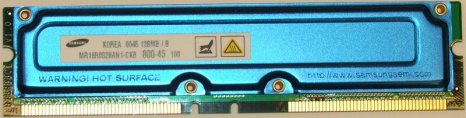
A stick of RAMBUS has two notches in it at the center of the stick.
Un módulo de RAMBUS tiene dos muescas en en el centro del palo.'
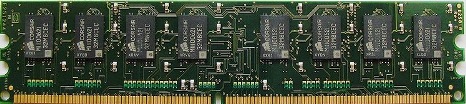
SDRAM

A stick of SDRAM has two notches in it, one near the center of the stick, and one closer to the side.
Un módulo de SDRAM tiene dos muescas, una cerca del centro del módulo, y otra cerca a un extremo del módulo.
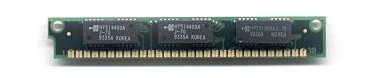
72-Pin SIMM

72 pin SIMMs are 4.25 inches long. The holes and notches need to match exactly since there are other objects that look like 72-pin SIMM but aren't, so see points A (side holes), B (center notch) and C (side notch) in the picture.
30-Pin SIMM
30 Pin SIMM
30-pin SIMMs are 3.5 inches long. These are the oldest types of memory we still see on a regular basis in System Evaluation. Note that they do not have a center notch.
Exercise 1:
Look at the example memory sticks and match them up with the following pictures and descriptions. Then,
Exercise 2:
Try putting the sticks into their slots on the motherboard. Open the clips, match up the notches and install the stick into the grooves at either end. Press down on the stick until the clips flip closed by themselves around the stick. This tells you that the memory is properly seated into the slot so it can function correctly. IMPORTANT - YOU CAN RUIN THE RAM AND FRY THE MOTHERBOARD IF YOU DON'T DO THIS!!!


