Mouse Testing
Revision as of 12:17, 1 October 2013 by AmberSchmidt (talk | contribs) (→How To Test a PS2/USB Mouse)
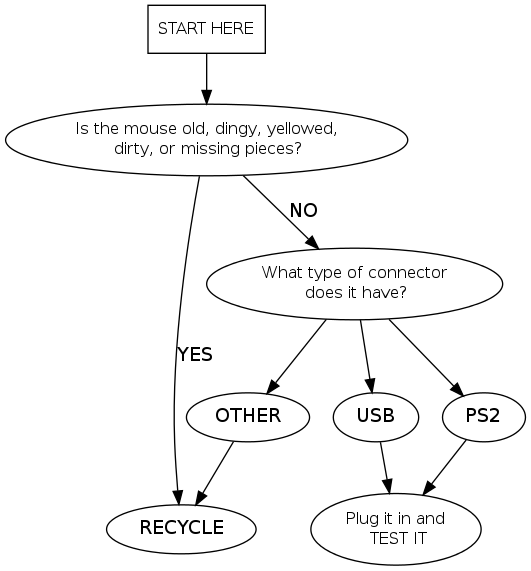
Howto Flow Chart

How To Test a PS2/USB Mouse
- Make sure the computer is turned on. If it is not, turn it on. If it won't turn on, make sure the power strip in on.
- Log in. Be sure to change to "Keyboardtester".
- At the top of the screen, click the "Mouse" button.
- If it is a PS2 mouse (meaning it has a little round connector) plug in into the matching wire on the computer. It it is USB, plug it into the hub next to the computer.
- Follow the prompts on the screen.
- Click both the right and left buttons, and the center button if a three button mouse. If the mouse is functional, the buttons will turn from red to green. If nothing happens, recycle the mouse*
- Scroll up and down where prompted. Does it work? If not, recycle the mouse*
- Click and drag into the areas shown.
*To recycle a mouse, cut its cord. Place the cord in the Cords/Wire to be Recycled bin & place the mouse in the box labeled "Copper Bearing Materials".
Mac Mouse Testing
- Follow same procedure as PS2/USB mouse testing.
- Click the one button. If nothing happens, recycle the mouse*
*To recycle a mouse, cut its cord. Place the cord in the shopping cart full of cords & place the mouse in the box labeled "Copper Bearing Materials" in the main Receiving room.
Where the Functional Mice Go
After testing a mouse, neatly wrap and rubber band the mouse's cord and put the mouse in 1 of 3 boxes:
- PS2 mice go in the box labeled "Tested PS2 Mice"
When box is full, take to the Warehouse Storage Area.
- USB mice go in the box labeled "Tested USB Mice"
When box is full, take to the Store.
- Mac mice go in the box labeled "Tested Mac Mice"
When box is full, take to Mac incoming.