User:Lynnae/As-Is
As-Is Laptops
Goals
- Learn to use the Laptop Build Room tools to identify hardware components.
- Practice installing and removing hardware.
- Get some practice using the Power-On Self-Test (POST) Troubleshooting guide in the Appendix of your Laptop Build Binder.
1. Data security check
We are responsible for securely wiping or destroying any storage device that is donated to Free Geek. This commonly means removing hard drives to be wiped, but keep an eye out for other kinds of data storage devices as well.
What to keep in mind when removing hard drives
☐ Make sure to separate any caddy parts and adapters from the hard drive.
☐ Tape any caddy parts, adapters, and screws together back inside the hard drive bay. These should stay with the system unless your instructor needs them for parts.
☐ Only ever leave hard drives and other storage devices in a designated box or with your instructor.
Check for disks and other storage media
☐ Check the optical drive for disks.
- Look for the small quick-release hole on the faceplate, and use a paperclip to manually open the drive.
☐ Take a quick look for other kinds of media, let your instructor know if you find anything.
Commonly encountered storage devices:
- 3.5" hard drives (Desktop size)
- 2.5" hard drives (Laptop size)
- Optical disks
Less commonly encountered storage devices:
- 1.8" and other odd-sized small form-factor hard drives
- Mini PCI or mini PCIe solid state drives
- Small media cards (SD, Compact Flash, etc)
- SIM cards
- Floppy disks
- PCMCIA (PC Card) hard drives
- Examples
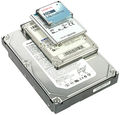
3.5", 2.5", 1.8" and 1" Hard Drives

PCMCIA (PC Card) Hard Drive

SD Card

Mini PCIe Solid State Drive


2. Find an appropriate AC adapter
Requirements
For an AC adapter to power the device correctly, it must:
- Match the input voltage (V) of the laptop exactly.
- Match or exceed the recommended amperage (A).
- Have a plug that fits into the laptop snugly and provides power.
☐ Find the input voltage and amperage listed on the laptop. This may be printed on the back of the laptop, or on the chassis under the battery.
☐ Find an AC adapter that matches the voltage and amperage listed on the laptop. You will be looking in the output section printed on the AC adapter, which should look like this:
INPUT:  100-240V~1.9A
        50/60Hz
OUTPUT: 16V ⎓ 4.5A
Tip
AC adapters are sorted in bins by voltage, amperage, and brand; the bins are color-coded by brand.
3. POST
☐ Try turning the machine on.
- If the system loads the BIOS splash screen, you can move to the next step.
- If the system does not boot, or appears to have screen or video problems, use sections 1 and 2 only in the Laptop POST Troubleshooting Guide in the Appendix.
- As-Is laptops with video or screen problems should be recyled unless they are high-end systems. Double-check with your instructor if you are not sure. Use the Recycle guide in your binder.