Getting the Processor Information
Getting the System to POST
- Getting a system to POST and getting it to boot are two different things. POST means Power On Self Test, and happens first. At this stage the computer is self-testing to make certain that it can boot when the time comes. It does a simple check against its BIOS, processor, and memory.
- If it fails POST it will never boot, no matter how many floppy disks you try. This is because it doesn't access the drives until after a successful POST.
- Never boot from the hard drive in System Evaluation. (This is to protect our customers' data.) Instead, power down the system instead instead and disconnect the hard drive cable.
old page text
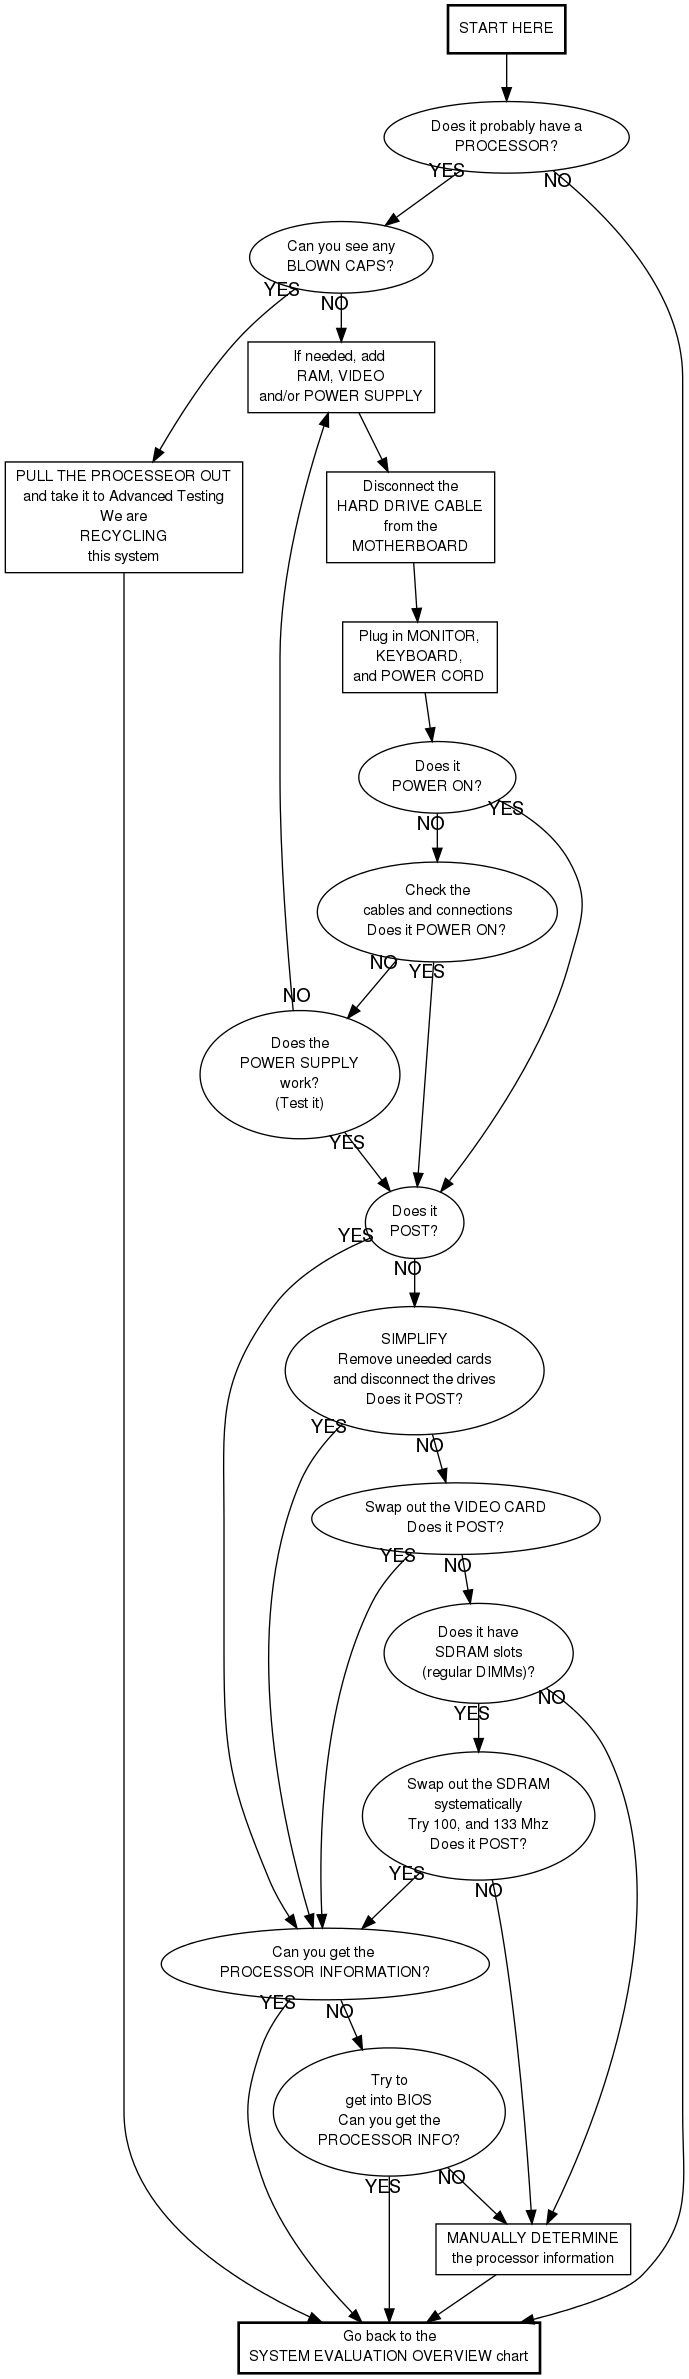
NOTE: There is a large handwritten flow chart on the wall in Eval 2 which covers this material. However, it is sometimes useful to read through this when you are having problems with a specific system.
If the system is likely to be a keeper, it becomes necessary to power up the system to see if it POSTs. If it does, this usually tells us information about the system. There are a couple of cases when it's not worth it trying to get the system to POST, these are:
When not to even try
- If the power supply is missing, it is not worth trying to get it to POST or boot at this point. Write "No Power Supply" on the label. Pull the processor to see what kind it is, note the processor class and speed on the label, and continue on.
- If the processor is missing, it is not worth trying to get it to POST or boot at this point. Treat the processor as 0 MHZ and refer to the system triage chart.
Getting the system to POST
- Open the system first. You'll need it open later anyway.
- In order to POST we may need to add any missing but essential components. Make certain these items are all present and properly connected and/or seated in their slots:
- RAM
- Video (card or onboard)
- Make sure everything is hooked up
- Power supply to motherboard
- Power supply to power
- Video cable to monitor
- Keyboard to keyboard port
- Power up the system and see if it POSTs.
Troubleshooting
Power up the system. Pay attention to the sounds the system makes. Normally, you can hear the fan and/or hard drive spinning, then a single beep. Extra beeps, or long, high pitched beeps indicate a problem. No beeps at all may indicate that the power is not hooked up (or the speakers are disconnected). Typical steps for troubleshooting systems that won't post are:
- Incompatible, missing. or poorly seated RAM. (Swap, install or reseat RAM.)
- SIMMs that are not in the first two SIMM slots. (Move SIMMs. The slots are usually labeled with teensy weensy letters or numbers.)
- A poorly seated card in one of the slots. (Pull unnecessary cards.)
- A card with a short in it. (Swap card with a known working card.)
- An IDE cable that is connected to the motherboard with a bad or missing IDE device. Some motherboards will not POST in this condition. (Disconnect the IDE cables from the motherboard.)
When it doesn't work
If you cannot get a system to POST, you will need to physically examine the processor to see its class and speed. NO POST is not a reason to recycle a system.
When it does work
If the system POSTs correctly, you may see a report on the amount of memory and the processor class and speed. If so, use the triage chart and this information to determine if it's a keeper or a recycler. In some circumstances, you'll need to get into BIOS to see this information. In a few cases you may even need to boot from a floppy. (If so, see Booting from a floppy disk.)
- For keepers, proceed on to Labeling and tallysheets for keeper systems.
- For recyclers, label as you would in Eval 1 (Labeling and tallysheets for recycled systems) and put on the REJECT pile. Then proceed onto the next system.